LPR: Analytics
Overview
To access analytics, select the Analytics tab in the navigation menu:

Use and Functionality
The search menu allows filtering created analytics by the following parameters:

- In the Analytics parameter, enter:
- Analytics name or characters in the name
- Analytics ID
- In the Status parameter, select the required analytics status:
- Active
- Stopped
- Processing
See the list of created analytics in the table below. It contains:
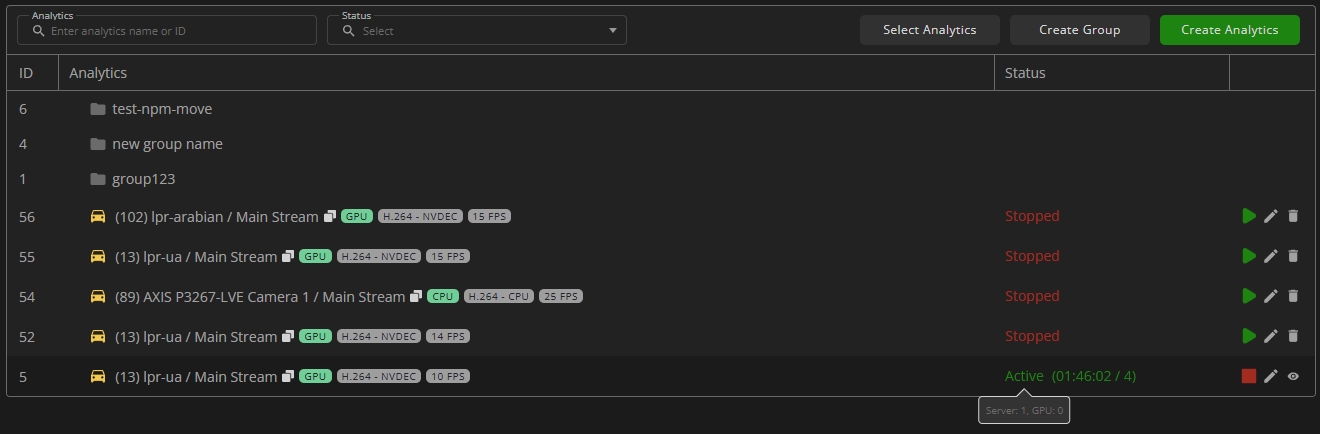
- ID of analytics and their groups
- Analytics comprises:
- Groups' and separate video streams' names
- Copy Name icon to copy the video stream name
- Additional hardware parameters
- Analytics status:
- Active: Analytics is enabled and processing the video stream
- Processing: Analytics is initializing. This status may appear with an error indicator when:
- Analytical server is unavailable
- System lacks sufficient resources to start analytics
- Paused: Analytics is temporarily paused due to one of the following conditions:
- System disk space is below 10%
- Storage space is below 10%
- No available license channels for this analytics (resumes automatically once a channel becomes available)
- Offline: Analytics is enabled but not yet processing video. This may be caused by:
- Hardware optimization and neural network model caching in progress
- Missing video stream input
- Stopped: Analytics is disabled
- Toolbox comprises:
- Start/Stop
- Edit
- View Live
- Delete
- For the Active and Offline statuses, the system also displays:
- Countdown since analytics launch
- Last server connection to analytics (seconds ago)
- To learn more about managing all analytics related to the desired camera, refer to the Camera: Plugins Tab documentation.
- To find out the ID of the GPU and the server running the video stream, hover the mouse over the status of the running analytics.
To create a new analytics group:

- Click the Create Group button
- Enter the name of a new group and press Enter to confirm the intention
To use additional options for analytics management:
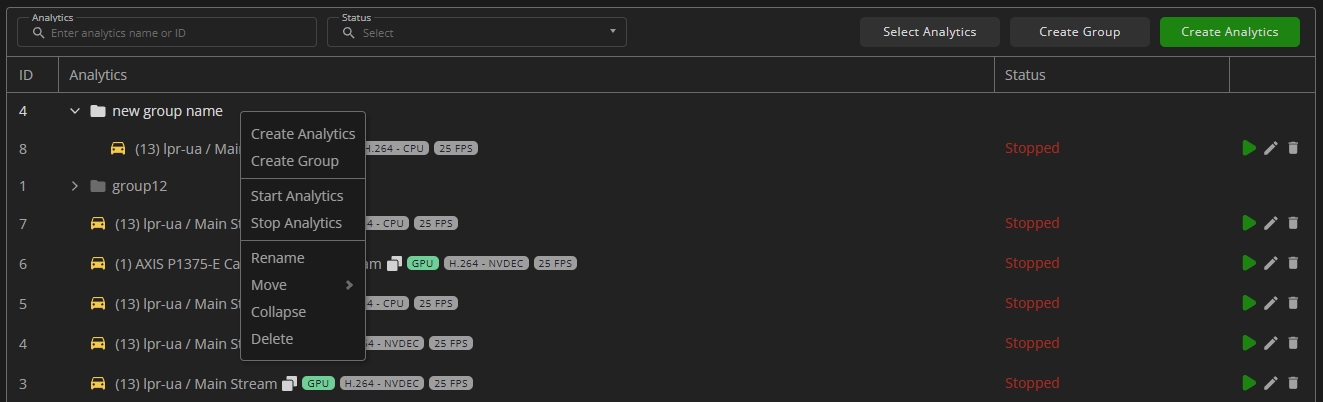
- Right-click the desired analytics group name in the table to:
- Create a new analytics within this group
- Create a subgroup within it
- Start/stop all analytics in this group
- Rename the group
- Move the selected group inside the other one
- Collapse the group content, if it was expanded
- Delete the group
- Right-click the required analytics name in the table to:
- Start/stop the analytics
- Move the analytics to another group
- Delete the analytics
- The selected analytics can be moved to another group only when they are stopped.
- The group containing analytics or other groups cannot be deleted. First, delete the items within the group, and then proceed to delete the group itself.
Create Analytics
To create new analytics, click the Create Analytics button:

The Create Analytics pop-up window comprises 4 tabs:
Source Tab
Configure camera and stream parameters in the Source tab:
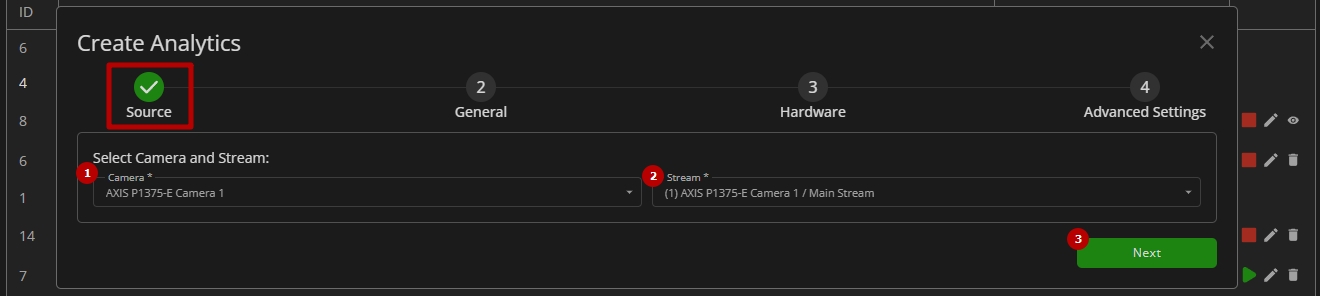
- Select the desired camera. In the Select Cameras pop-up window:
- Check the box next to the required camera
- Click the Confirm button
- Choose the required stream for the selected camera
- Click the Next button to proceed with general analytics settings configuration
General Tab
Configure general and recognition options in the General tab:
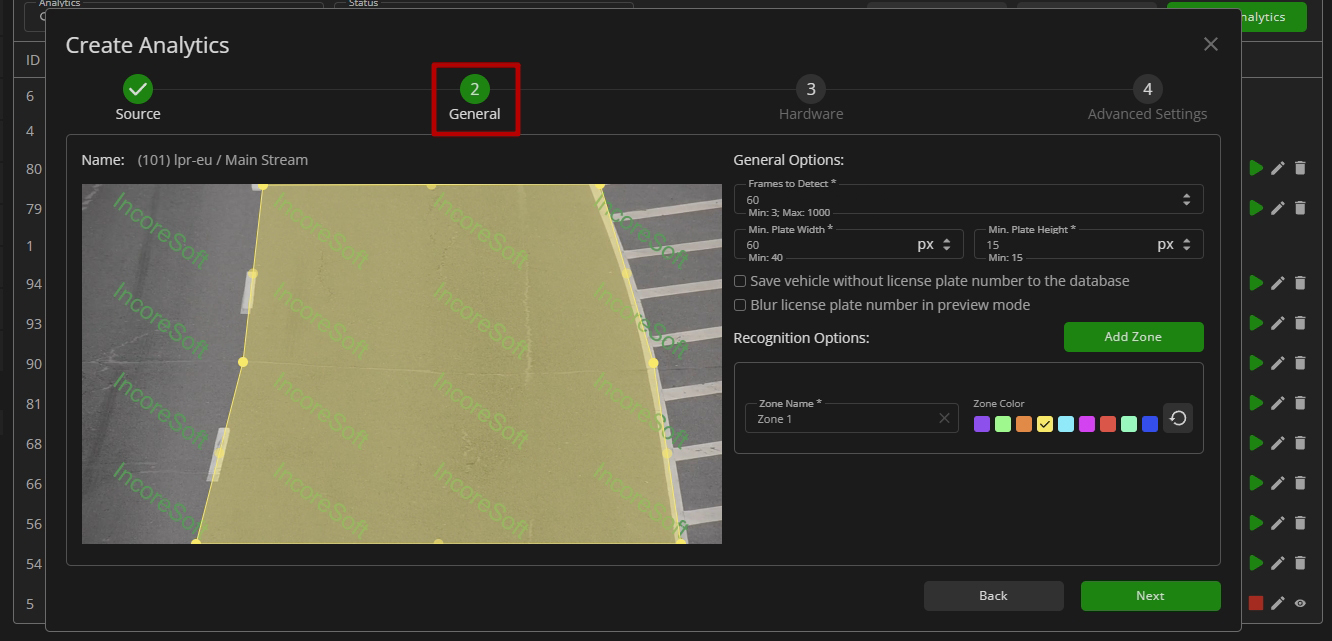
The General Options block determines the parameters of all zones:

- Set the number of frames for the sample from which the best frame is selected for vehicle detection
- Set the minimum plate width in pixels for recognition
- Set the minimum plate height in pixels for recognition
- Select the Save Vehicle Without License Plate Number to the Database checkbox to save detected vehicles with absent or unrecognizable license plate numbers to the database
- Select the Blur License Plate Number in Preview Mode checkbox to blur the license plate area in the analytics live view mode
- The possible range for the Frames to Detect parameter is from 3 to 100 frames.
- The minimum value for the Min Plate Width, px parameter is 40 pixels.
- The minimum value for the Min Plate Height, px parameter is 15 pixels.
The Recognition Options block contains analytics settings to perform the recognition:

- Select the Add Zone button to create a new detection zone
- Enter the zone name and pick a color
- Modify the detection zone:
- Click and drag the handles with LMB to set the zone borders
- Click and drag the area inside the zone with LMB to move the whole zone
- Click the Reset button to return the detection zone borders to their original position
- Click the red Delete Zone icon to delete the detection zone section
Once general analytics settings are configured, proceed with the hardware settings.
Hardware Tab
Customize hardware parameters in the Hardware tab:
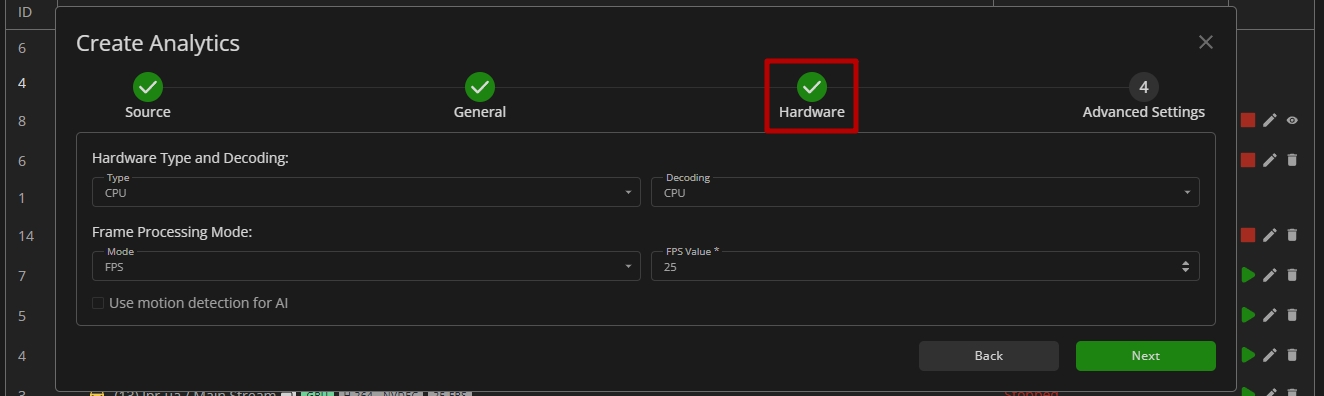
- Choose the CPU or GPU hardware acceleration
- Select the hardware decoder from the drop-down list:
- CPU
- Intel
- NVDEC
- Select the frame processing mode:
- FPS to set the desired number of frames per second
- Key Frame to set the frame processing only by keyframes
- Once Every X Seconds to set intervals in seconds between frame processing
- Select the Use motion detection for AI checkbox to enable analytics to process frames only when motion is detected in the frame
- The recommended value for the FPS mode is 25.
- The Use motion detection for AI checkbox is available only for FPS frame processing mode.
- The default parameters allow the production of analytics. To customize the analytics, set parameters as required.
Once the hardware customization is complete, proceed with the license plate recognition advanced analytics settings.
Advanced Settings Tab
Configure advanced analytics settings for license plate recognition in the Advanced Settings tab:
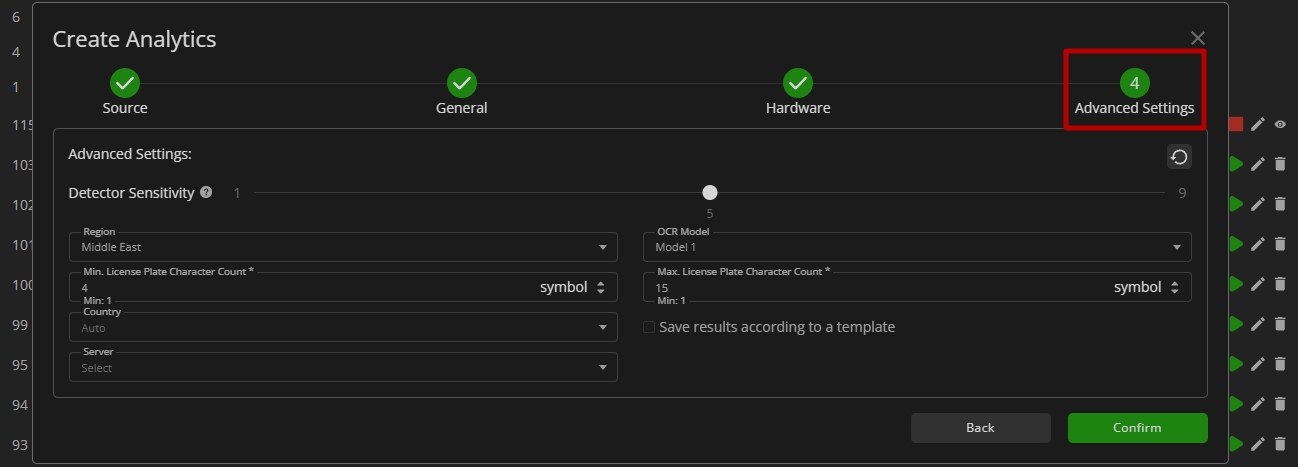
- Move the slider to the left (to decrease) or to the right (to increase) the detector sensitivity
- Choose a region for license plate recognition based on predefined templates:
- Global Recognition
- Europe + CIS
- USA + Canada + Mexico
- Australia + New Zealand
- Japan
- Thailand
- Middle East
- Latin America
- Select an OCR model for recognition
- Enter the values from 1 to 15 for the minimum and maximum license plate character count
- Select a specific country (recommended) for focused license plate recognition and dynamic adaptation to the detected country's license plate templates, or leave the Auto option to ensure targeted recognition for a predefined region
- Enable the Save Results According to a Template option to filter and recognize license plates that match the specified country template, ensuring only relevant plates are processed and saved in the results
- Select a server from the drop-down list to run the analytics
- Increasing the detector sensitivity value results in more accurate recognition, fewer objects are recognized by the analytics, but some objects may be skipped. While decreasing the detector sensitivity value, the recognition accuracy decreases and the analytics recognizes more objects, but false recognitions are possible.
- Utilize various OCR models to optimize results based on specific scenarios. Experiment with different models to identify and select the most suitable one that aligns with your requirements.
- Employ the Min. License Plate Character Count and Max. License Plate Character Count parameters to control the character count in the license plate number, providing flexibility in customizing the length as needed.
- Refer to the Supported Countries documentation for comprehensive information on the list of supported countries within each region (analytical model).
Click the Confirm button to create the analytics and apply its settings.
Edit Analytics
To edit settings in the selected analytics, click the Edit icon on the toolbox:

The Edit Analytics functional menu allows to:
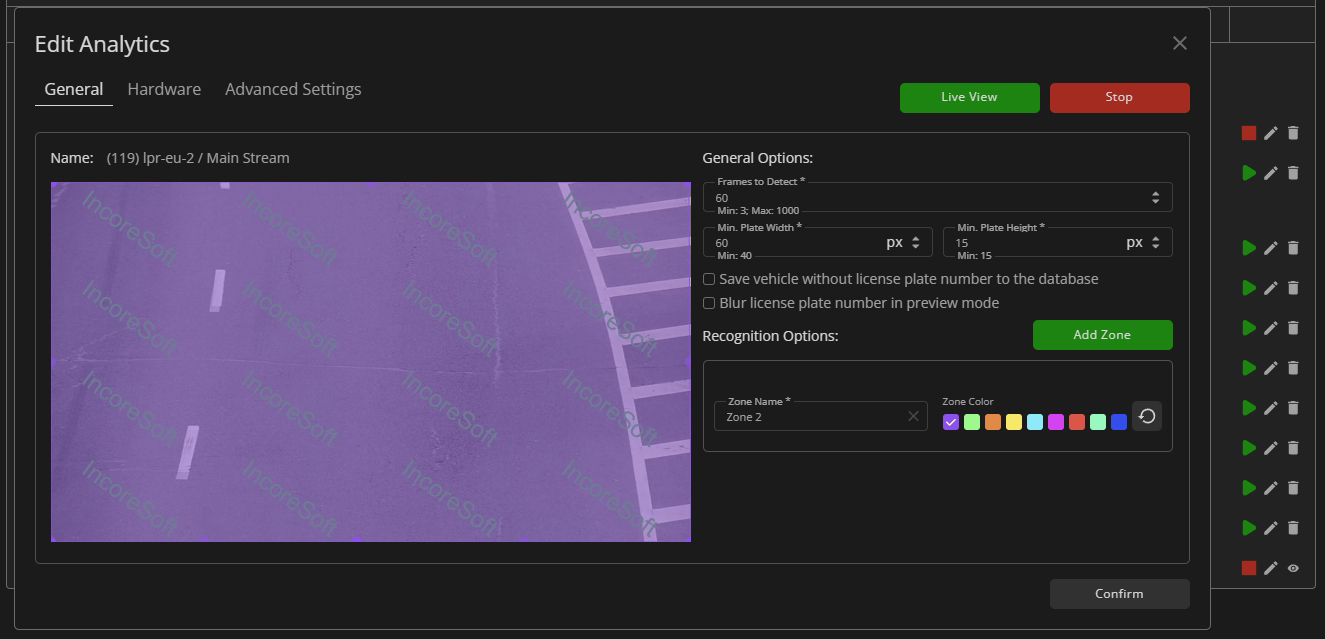
- See the setting tabs and move among them by clicking their titles:
- General
- Hardware
- Advanced Settings
- Select the Stop button to disable the analytics:
- Yes to confirm the analytics disabling
- No to cancel the action
- Select the Start button to enable the analytics
- Click the Live View button to see the selected analytics process in real-time
- Select the Confirm button to apply the changes to the selected analytics
- The selected tab is always highlighted.
- Analytics editing is available only when selected analytics is disabled.
- The Stop button is available only when the current analytics is enabled.
- The Start button is available only when the current analytics is disabled.
- The Live View button is available only when the current analytics is enabled.
To view editing parameters for the General, Hardware, and Advanced Settings, read Create Analytics.
Manage Analytics Status
To enable or disable the analytics and view the change of the analytics status:

- Select the Start button to enable the analytics
- Click the Stop button to disable the analytics process
- Confirm the intention
To enable or disable multiple analytics at once, click the Select Analytics button:

The Select Analytics functional menu allows to:
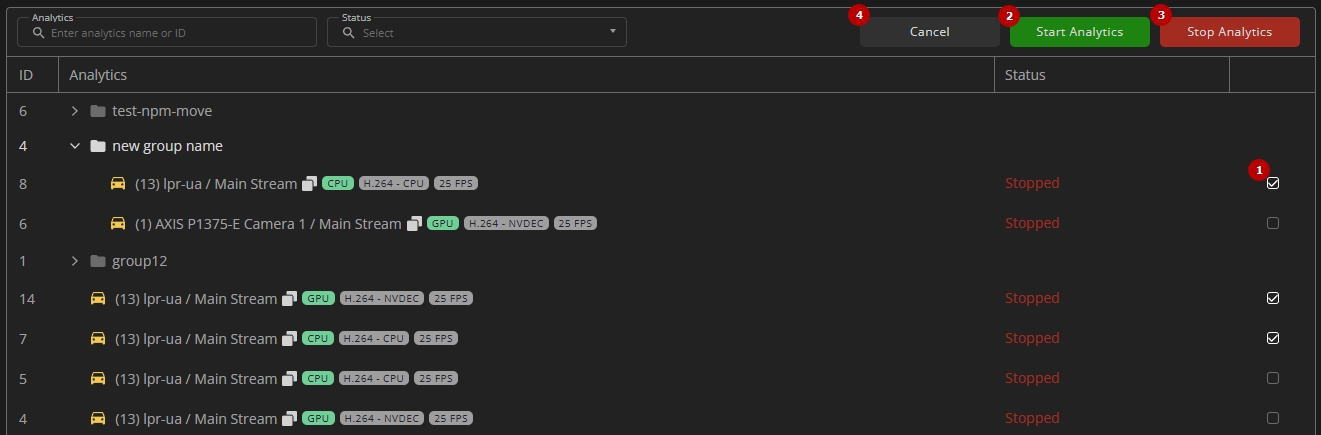
- Check the boxes next to the required analytics to select them
- Click the Start Analytics button and confirm the intention in the pop-up window to enable all selected analytics
- Click the Stop Analytics button and confirm the intention in the pop-up window to disable all selected analytics
- Click the Cancel button to quit the analytics selection
View Analytics Live
To see the selected analytics in real-time, click the View icon on the toolbox:

The live view analytics mode allows to:

- In the video block:
- View the video from the camera in real-time mode
- Hover the mouse over the video to display additional settings:
- Click the Update icon to update the video frame
- Click the Camera Settings icon to select the desired video format from the drop-down list:
- H.264
- MJPEG
- Click the Full Screen icon to see the selected video stream in full-screen (or double-click the video frame)
- In the event block:
- View the frame preview with the recognized license plate number
- View the event details:
- Details tab displays the recognized vehicle information and event data
- Location tab shows the camera location on the map
- In the table:
- View the list of recognized license plate numbers
- Select the "+" button to add the license plate number to the required list. In the Create Vehicle Card pop-up window:
- Verify the license plate number
- Select a required list
- Write a comment about the license plate number
- Click the Confirm button
- Click the Stop Analytics button to disable the analytics
- Click the Edit Analytics button to make changes to the current analytics settings
Delete Analytics
To delete the analytics:

- Select the Delete icon on the toolbox
- Confirm the intention