Recording Servers: Device Item Parameters
Overview
To access the parameters, select the required device item in the Recording Servers item:
Camera Parameters
The Camera device item parameters are organized into the following tabs:

- The switching between tabs is available by clicking on their names.
- The selected tab is always highlighted.
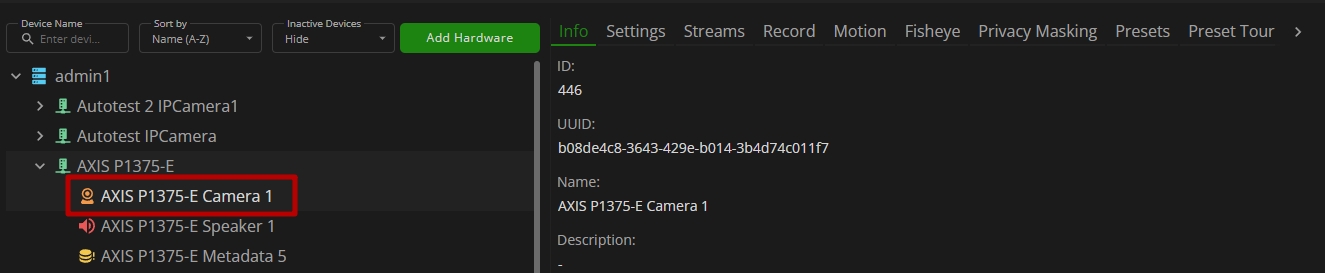
Camera: Info Tab
The Info tab allows to:

- View the camera ID
- View the camera UUID
- View the camera name and edit it by clicking the Edit icon
- View the camera description and edit it by clicking the Edit icon
- View a video stream frame preview captured by the camera
Camera: Settings Tab
The content and parameters of the Settings tab depend on the driver of the selected camera:

- AXIS driver
- ONVIF driver
- Dahua driver
- Hikvision driver
- Bosch driver
- Hanwha driver
- Uniview driver
- Vivotek driver
Camera settings with the AXIS driver allow configuring the following parameters.
In the Appearance section:
- Select a scene profile that suits your surveillance scenario:
- Forensic: Suitable for surveillance purposes
- Vivid: Useful for demonstration purposes
- Traffic Overview: Suitable for vehicle traffic monitoring
- Use the Saturation slider to adjust the color intensity
- Use the Contrast slider to adjust the difference between light and dark
- Use the Brightness slider to adjust the light intensity
- Use the Sharpness slider to make objects in the image appear sharper by adjusting the edge contrast
- A scene profile optimizes image settings, including color level, brightness, sharpness, contrast, and local contrast, for a specific environment or purpose.
- Increasing the Brightness parameter can make objects easier to see. Brightness is applied after image capture and doesn’t affect the information in the image. To get more details from a dark area, it’s usually better to increase gain or exposure time.
- Raising the Sharpness parameter may also lead to a higher bitrate and an increased amount of storage space required.
In the Wide Dynamic Range section:
- Enable the WDR mode by selecting the On option from the drop-down list to make both bright and dark areas of the image visible.
- Use the Local Contrast slider to adjust the contrast of the image.
- Use the Tone Mapping slider to adjust the amount of tone mapping that is applied to the image.
- To disable the WDR mode, set the option to Off from the drop-down list.
- A higher Local Contrast value makes the contrast higher between dark and light areas.
- If the Tone Mapping value is set to zero, only the standard gamma correction is applied, while a higher value increases the visibility of the darkest and brightest parts in the image.
In the White Balance section, select the desired lighting environment from the drop-down list:
- Auto: Automatic identification and compensation for the light source color. This is the recommended setting which can be used in most situations.
- Auto – Outdoors: Automatic identification and compensation for the light source color. This is the recommended setting which can be used in most outdoor situations.
- Custom – Indoors: Fixed color adjustment for a room with some artificial light other than fluorescent lighting and good for a normal color temperature around 2800 K.
- Custom – Outdoors: Fixed color adjustment for sunny weather conditions with a color temperature around 5500 K.
- Fixed – Fluorescent 1: Fixed color adjustment for fluorescent lighting with a color temperature around 4000 K.
- Fixed – Fluorescent 2: Fixed color adjustment for fluorescent lighting with a color temperature around 3000 K.
- Fixed – Indoors: Fixed color adjustment for a room with some artificial light other than fluorescent lighting and good for a normal color temperature around 2800 K.
- Fixed – Outdoors 1: Fixed color adjustment for sunny weather conditions with a color temperature around 5500 K.
- Fixed – Outdoors 2: Fixed color adjustment for cloudy weather conditions with a color temperature around 6500 K.
- Hold: Keep the current settings and do not compensate for light changes.
- Manual: Fix the white balance with the help of a white object. Drag the circle to an object that you want the camera to interpret as white in the live view image. Use the Red balance and Blue balance sliders to adjust the white balance manually.
- When the camera detects the color temperature of the incoming light, it can adjust the image to make the colors look more natural. If this is not sufficient, you can select a suitable light source from the list.
- The automatic white balance setting reduces the risk of color flicker by adapting to changes gradually. If the lighting changes, or when the camera is first started, it can take up to 30 seconds to adapt to the new light source. If there is more than one type of light source in a scene, that is, they differ in color temperature, the dominating light source acts as a reference for the automatic white balance algorithm. This behavior can be overridden by choosing a fixed white balance setting that matches the light source you want to use as a reference.
In the Day Night Mode section:
- Select the IR filter cut mode from the drop-down list:
- Yes, to turn on the IR-cut filter. The image is in color, but with reduced light sensitivity.
- No, to turn off the IR-cut filter. The image is in black and white for increased light sensitivity.
- Auto, to automatically turn on and off the IR-cut filter. When the camera is in day mode, the IR-cut filter is turned on and blocks incoming infrared light, and when in night mode, the IR-cut filter is turned off, and the camera’s light sensitivity increases.
- Use the Threshold slider to adjust the light threshold where the camera changes from day mode to night mode:
- Move the slider towards Bright to decrease the threshold for the IR-cut filter. The camera changes to night mode earlier.
- Move the slider towards Dark to increase the threshold for the IR-cut filter. The camera changes to night mode later.
In the Exposure section:
- Select the exposure mode from the drop-down list to reduce rapidly changing irregular effects in the image, for example, flicker produced by different types of light sources:
- Auto: The camera adjusts the aperture, gain, and shutter automatically.
- Hold: Locks the current exposure settings.
- Flicker-free 50 Hz: The camera adjusts the aperture and gain automatically, and uses the shutter speed 1/50 s.
- Flicker-free 60 Hz: The camera adjusts the aperture and gain automatically, and uses the shutter speed 1/60 s.
- Flicker-reduced 50 Hz: This is the same as flicker-free, but the camera might use shutter speeds faster than 1/100 s for brighter scenes.
- Flicker-reduced 60 Hz: This is the same as flicker-free, but the camera might use shutter speeds faster than 1/120 s for brighter scenes.
- Select the exposure zone to optimize the exposure in a selected part of the scene:
- Auto: Suitable for most situations.
- Center: Uses a fixed area in the center of the image to calculate the exposure. The area has a fixed size and position in the live view.
- Upper: Uses an area with a fixed size and position in the upper part of the image to calculate the exposure.
- Lower: Uses an area with a fixed size and position in the lower part of the image to calculate the exposure.
- Left: Uses an area with a fixed size and position in the left part of the image to calculate the exposure.
- Right: Uses an area with a fixed size and position in the right part of the image to calculate the exposure.
- Spot: Uses an area with a fixed size and position in the live view to calculate the exposure.
- Custom: Uses an area in the live view to calculate the exposure. You can adjust the size and position of the area.
- Select the max shutter speed in milliseconds from the drop-down list to provide the best image.
- Select the suitable max gain in dB from the drop-down list to improve the image.
- Use the Blur-Noise Trade-Off slider to adjust the priority between motion blur and noise:
- Move the slider to the left (low noise) if you want to prioritize low bandwidth and have less noise at the expense of details in moving objects.
- Move the slider to the left (low motion blur) if you want to prioritize the preservation of details in moving objects at the expense of noise and bandwidth.
- Choose whether to lock the aperture by selecting the corresponding option from the drop-down list:
- Yes, to keep the aperture size set by the Aperture slider.
- No, to allow the camera to automatically adjust the aperture size (for example, for scenes with permanent light conditions).
- Use the Aperture slider to adjust the aperture size, that is, how much light passes through the lens:
- Move the slider towards Open to allow more light to enter the sensor and thereby produce a brighter image in low-light conditions. An open aperture also reduces the depth of field, which means that objects close to or far from the camera can appear unfocused.
- Move the slider towards Closed to allow more of the image to be in focus.
- Use the Exposure Level slider to adjust the image exposure.
- Configure the Defog parameters:
- Select Yes from the drop-down list to enable the detection and automatic removal of foggy weather effects for a clearer image.
- Select No To disable the defog mode.
- Move the Strength slider to the right (to increase) or to the left (to decrease) the defog strength in percentage, if the Yes option for the Defog parameter has been previously selected.
- We recommend using the automatic exposure mode, or the same frequency as your power network.
- Low shutter speeds (longer exposure) might cause motion blur when there is movement, and a too high shutter speed might affect the image quality. Max shutter works with max gain to improve the image.
- Increasing the max gain improves the visible level of detail in dark images, but also increases the noise level. More noise can also result in increased use of bandwidth and storage. If you set the max gain to a high value, images can differ a lot if the light conditions are very different from day to night. Max gain works with max shutter to improve the image.
- You can change the exposure either by adjusting the exposure time or by adjusting the gain. If you increase the exposure time, it results in more motion blur, and if you increase the gain, it results in more noise. If you adjust the Blur-Noise Trade-Off towards low noise, the automatic exposure will prioritize longer exposure times over increasing gain, and the opposite if you adjust the trade-off towards low motion blur. Both the gain and exposure time will eventually reach their maximum values in low-light conditions, regardless of the priority set.
- We recommend not to enable the Defog mode in scenes with low contrast, large light level variations, or when the autofocus is slightly off. This can affect the image quality, for example, by increasing the contrast. Furthermore, too much light can negatively impact the image quality when defog is active.
Camera settings with the ONVIF driver allow configuring the following parameters.
In the General Information section:
- Move the corresponding sliders to adjust the image:
- Brightness
- Saturation
- Contrast
- Sharpness
- Select the IR filter cut mode from the drop-down list:
- On, enabling IR cut filter; typically Day mode
- Off, disabling IR cut filter; typically Night mode
- Auto, allowing the device to enable or disable the IR cut filter automatically
- Select the Wide Dynamic Range mode state from the drop-down list:
- On, to enable the WDR mode
- Off, to disable the WDR mode
- Enter the specific WDR level value if WDR mode is enabled (optional). The possible range is from 0 to 100:
- 0: WDR is turned off.
- 1: WDR is set to its minimum effect.
- 100: WDR is set to its maximum effect, providing the greatest level of dynamic range correction.
In the Focus section:
- Select the focus mode from the drop-down list:
- Auto, allowing the device to adjust focus automatically
- Manual, disabling automatic focus adjustment and enabling manual setting
- Set near/far limits for focus lens (for Auto focus mode only):
- Near Limit: Parameter to set autofocus near limit (unit: meter).
- Far Limit: Parameter to set autofocus far limit (unit: meter). If set to 0.0, infinity will be used.
- Set default speed value for focus move operation (for Manual focus mode only)
In the White Balance section:
- Select the white balance adjustment mode from the drop-down list:
- Auto, allowing the device to adjust the white balance automatically.
- Manual, disabling automatic white balance adjustment and enabling manual setting.
- Enter the required values in the CR Gain and CB Gain fields to manually adjust the white balance. The possible range is from 0 to 100.
- If the device does not support white balance, the settings for White Balance will not be displayed.
- If the White Balance Mode is Manual, the CB Gain and CR Gain additional parameters are available.
- If the White Balance Mode is Auto, the CB Gain and CR Gain values do not have impact on the setup.
In the Exposure section, select the Exposure mode and set the required parameters:
- Auto mode enables the exposure algorithm on the device:
- Select the exposure priority mode from the drop-down list:
- Low Noise
- Frame Rate
- Enter the required values in seconds in the Exposure Min. Time and Exposure Max. Time fields to set time range allowed to be used by the algorithm.
- Adjust the Exposure Min. Gain and Exposure Max. Gain parameters to set the sensor gain range that is allowed to be used by the algorithm. The possible range is from 0 to 100.
- Select the exposure priority mode from the drop-down list:
- Manual mode disables the exposure algorithm on the device:
- Enter the fixed exposure time used by the image sensor (μs).
- Enter the fixed gain value used by the image sensor (dB).
- Enter the value for fixed attenuation of input light affected by the iris (dB). 0dB maps to a fully opened iris.
In the Backlight section:
- Select the Backlight Compensation mode state from the drop-down list:
- On, to enable the BLC mode
- Off, to disable the BLC mode
- Enter the specific BLC level value if BLC mode is enabled (optional). The possible range is from 0 to 100:
- 0: BLC is turned off.
- 1: BLC is set to its minimum effect.
- 100: BLC is set to its maximum effect, providing the greatest level of backlight compensation.
Camera settings with the Dahua driver allow configuring the following parameters.
In the Picture section:
- Select the profile preset mode from the drop-down list:
- Day: Weaker hue and lower contrast than the actual image
- Night: Default image style, displaying the actual color of the image
- Normal: More vivid image than the actual one
- Select the mirror mode from the drop-down list:
- On, to enable the mirror mode and display the picture with left and right side reversed
- Off, to disable the mirror mode
- Use the Brightness slider to adjust the picture brightness
- Use the Contrast slider to change the contrast of the picture
- Use the Saturation slider to adjust the color intensity
- Use the Sharpness slider to change the sharpness of the picture edges
- Use the Gamma slider to adjust the picture brightness and improve the dynamic range in a non-linear way
- Set the display direction of the picture by selecting the desired angle from the Flip drop-down list:
- 0°: Normal display
- 180°: The picture rotates 90° counterclockwise
- Higher brightness values result in a brighter picture, while lower values make it darker. Excessive brightness may cause the picture to appear hazy.
- Higher contrast values increase the contrast between bright and dark areas. Lower values reduce the contrast. Excessive contrast may cause dark areas to be too dark and bright areas to be overexposed. Insufficient contrast may make the picture appear hazy.
- Higher saturation values result in deeper colors, while lower values make the colors lighter. Saturation adjustments do not affect image brightness.
- Higher sharpness values result in clearer edges. Excessive sharpness may introduce picture noise.
- Higher gamma values result in a brighter picture, while lower values make it darker.
In the Exposure section:
- Select the anti-flicker mode from the drop-down list:
- 50 Hz: When the electric supply is 50 Hz, the system adjusts the exposure according to ambient light automatically to ensure that no stripe appears.
- 60 Hz: When the electric supply is 60 Hz, the system adjusts the exposure according to ambient light automatically to ensure that no stripe appears.
- Outdoor: You can select any device exposure mode as needed.
- Choose the device exposure mode from the Mode drop-down list:
- Auto: Automatically adjusts the image brightness according to the actual conditions.
- Gain Priority: When the exposure range is normal, the system prioritizes the configured gain range while auto-adjusting based on ambient lighting conditions. If the image brightness is insufficient and the gain has reached its upper or lower limit, the system automatically adjusts the shutter value to maintain ideal brightness. You can configure the gain range to adjust the gain level in the Gain Priority mode.
- Shutter Priority: When the exposure range is normal, the system prioritizes the configured shutter range while auto-adjusting based on ambient lighting conditions. If the image brightness is insufficient and the shutter value has reached its upper or lower limit, the system automatically adjusts the gain value to maintain ideal brightness.
- Manual: Manually configure both gain and shutter values to adjust image brightness.
- Select the effective exposure time from the Shutter drop-down list: The smaller the value, the shorter the exposure time will be. If the Custom option is selected, set the minimum and maximum shutter in milliseconds.
- Adjust the Gain sliders to set the desired gain range. Depending on the illumination conditions, the camera automatically balances the gain within the set range to produce clearer images.
- Select the 3D NR mode state from the drop-down list:
- Auto: Reduces noise by using the frame information between previous and subsequent frames. This works only with multi-frame (no fewer than 2 frames) images.
- Off: Disables the 3D noise-reduction mode.
- If the Auto mode state is selected, move the Grade slider to adjust the effectiveness of the 3D NR parameter. The higher the grade, the better the noise reduction result.
- If Anti-Flicker is set to 50 Hz or 60 Hz, only Auto and Manual options are available in the Mode parameter. All other modes are accessible only when Anti-Flicker is set to Outdoor.
- The Shutter parameter with related settings is available only if the Shutter Priority or Manual device exposure mode is selected.
- The Gain parameter is available only if the Gain Priority or Manual device exposure mode is selected.
In the Backlight section, select the backlight mode from the drop-down list:
- BLC: Enables backlight compensation, allowing the camera to capture clearer images of dark areas when shooting against the light. Additionally, select the BLC type:
- Default: The system automatically adjusts exposure based on ambient lighting conditions to ensure the clarity of the darkest areas.
- Customized: The system automatically adjusts exposure only in the specified area based on ambient lighting conditions to ensure the set area has ideal brightness.
- HLC: Enables highlight compensation in environments with extremely strong light (such as toll stations or parking lots). The camera will dim strong light and reduce the size of the halo zone to lower the overall image brightness, allowing it to capture details of human faces or license plates clearly. The higher the value, the more pronounced the HLC effect will be.
- WDR: Dims bright areas and compensates dark areas to ensure the clarity of the entire image. The higher the value, the brighter the dark areas will be, but more noise may be introduced.
- SSA: Automatically adjusts the image brightness according to the environment to make the objects in the image clearer.
- Off: Disables the backlight mode.
In the White Balance section, select the white balance mode from the drop-down list:
- Auto: The system automatically adjusts the white balance according to color temperature to ensure color accuracy.
- Natural: The system automatically adjusts the WB for environments without artificial light to ensure color accuracy.
- Street Lamp: The system adjusts the WB for outdoor night scenes to ensure color accuracy.
- Outdoor: The system automatically adjusts the WB for most outdoor environments with natural or artificial light to ensure color accuracy.
- Manual: Manually configure the red and blue gain; the system automatically adjusts the WB according to color temperature.
- Custom Area: The system adjusts the WB only for the set area according to color temperature to ensure color accuracy.
In the Day/Night section:
- Select the device display mode:
- Color: The system displays color image.
- Auto: The system switches between color and black-and-white display according to the actual condition.
- B/W: The system displays black-and-white image.
- Select the camera sensitivity level when switching between color and black-and-white mode:
- Low
- Middle
- High
Select the delay value in seconds for the camera to switch between color and black-and-white mode. The lower the value, the faster the camera switches between color and black-and-white mode.
In the Illuminator section, select the IR light mode:
- Manual: Manually set the brightness of the IR light. The system adjusts light compensation based on the IR light intensity.
- Auto: The system automatically adjusts the IR light brightness according to the actual scene.
- Off: Disables the IR light mode.
Camera settings with the Hikvision driver allow configuring the following parameters.
In the Image Adjustment section, move the corresponding sliders to adjust the image:
- Brightness
- Saturation
- Contrast
- Sharpness
In the Exposure Settings section:
- Select the mode from the drop-down list:
- Auto, to set the auto iris level from 0 to 100
- If the camera is equipped with a fixed lens, only Manual is selectable, and the iris mode is not configurable
- If the Manual mode is selected:
- Select the exposure time in seconds from the drop-down list to adjust the electronic shutter time according to the actual luminance condition. The possible range is from 1/3 to 1/100,000s
- Move the Gain slider to set the image gain value from 0 to 100. The bigger the value is, the brighter would the image be, and the noise would also be amplified to a larger extent.
In the Day/Night Switch section:
- Select the Day/Night Switch mode according to different video security demands:
- Day: The camera stays in day mode.
- Night: The camera stays in night mode.
- Auto: The camera switches between the day mode and the night mode according to the illumination automatically.
- Schedule: The camera switches between the day mode and the night mode according to the defined schedule.
- Alarm Trigger: The day/night switch is triggered by alarm input. Set the switch mode to day or night.
- Enable the Smart Supplement Light and choose the supplement mode from the drop-down list:
- Auto, to change the supplement light according to the actual luminance (e.g., if the current scene is bright enough, then the supplement light adjusts itself to lower power; and if the scene is not bright enough, the light adjusts itself to higher power)
- Manual, to adjust the supplement by adjusting the distance (e.g., if the object is near the camera, the device adjusts the supplement light to lower power, and the light is in a higher power if the object is far away)
- If the Auto mode is selected, adjust the additional parameters:
- Set the Sensitivity value from 0 to 7. The higher the value is, the easier the mode switches.
- Set the Filtering Time value from 5 to 120 seconds. It refers to the interval time between the day/night switch.
- If the Schedule mode is selected, set the start time and the end time to define the duration for day/night mode
In the Backlight Settings section:
- Select the BLC area from the drop-down list:
- Close
- Up
- Down
- Left
- Right
- Center
- If the BLC area is set to Close, the WDR parameter becomes available. Select the Open option from the WDR drop-down list to use WDR when there is a high contrast of the bright area and the dark area of the scene
- If the WDR is enabled, set the WDR Contrast value from 0 to 100. The higher the value, the brighter the dark areas will be, but more noise may be introduced.
In the White Balance section, select the required white balance mode to adjust the color temperature according to the environment:
- MWB
- AWB1
- AWB2
- Locked WB
- Incandescent Lamp
- Warm Light Lamp
- Natural Light
- Fluorescent Lamp
In the Image Enhancement section:
- Select the digital noise reduction mode from the drop-down list:
- Off
- Normal
- Expert
- If the Normal mode is selected, set the DNR time level from 0 to 100 by moving the slider
- If the Expert mode is selected, set the DNR level for both space DNR [0-100] and DNR time [0-100]
In the Video Enhancement section:
- Select the Flip mode to change the image display:
- Left/Right
- Up/Down
- Center
- Off
- Enable the rotation function when you use the camera in a narrow-view scene to make complete use of the 16:9 aspect ratio
Camera settings with the Bosch driver allow configuring the following parameters.
In the Color section, move the corresponding sliders to adjust the image:
- Brightness
- Saturation
- Contrast
In the White Balance section:
- Select the appropriate white balance mode from the drop-down list:
- Standard Auto mode allows the camera to continually adjust for optimal color reproduction in an environment with natural light sources.
- Indoor mode is recommended for use in most indoor situations with artificial lighting.
- Sodium Lamp auto mode allows the camera to continually adjust for optimal color reproduction in an environment with sodium vapor light sources (street lighting).
- Manual RGB mode allows the Red, Green, and Blue gain to be manually set to a desired position.
- Outdoor mode is recommended for use in most outdoor situations with natural light sources.
- Basic auto mode allows the camera to continually adjust for optimal color reproduction using an average reflectance method. This is useful for indoor light sources and for colored LED light illumination.
- Dominant Color auto mode takes into account any dominant color in the image (for example, the green of a football pitch or of a gaming table) and uses this information to obtain a well-balanced color reproduction.
- Turn the RGB-weighted white balance on to manually adjust:
- R-Weight from -50 to +50, with 0 as the default. Reducing red introduces more cyan.
- B-Weight from -50 to +50, with 0 as the default. Reducing blue introduces more yellow.
- G-Weight from -50 to +50, with 0 as the default. Reducing green introduces more magenta.
In the Exposure section:
- Select the mode for automatic light-level control (ALC):
- Fluorescent 50 Hz
- Fluorescent 60 Hz
- Standard Auto
- Adjust the ALC level. A positive value is more useful for low-light conditions; a negative value is more useful for very bright conditions.
- Select the shutter mode from the drop-down list:
- Fixed, to set a selectable shutter speed
- Auto, to let the camera automatically set the optimum shutter speed. The camera tries to maintain the selected shutter speed as long as the light level of the scene permits.
- Select the shutter speed from the drop-down list for fixed exposure
- Select the default shutter speed from the drop-down list to improve the motion performance in Auto exposure mode. The camera tries to hold this shutter value as long as sufficient ambient light is available in the scene.
In the Day/Night section:
- Select the desired day/night mode from the drop-down list:
- Monochrome: The IR cut-off filter is removed, giving full IR sensitivity. It forces the camera to stay in Nigh Mode and transmit monochrome images.
- Color: The camera does not switch to Night Mode regardless of ambient light conditions and always produces a color signal regardless of light levels.
- Auto: The camera switches the IR cut-off filter on and off depending on the scene illumination level. It switches out of Night Mode after the ambient light level reaches a pre-defined threshold.
- If the Auto mode is selected, move the Night to Day Switchover slider to adjust the light level at which the camera automatically switches out of night mode (B/W) operation. Select a value between 10 and 55 (in increments of 5; default 40). The lower the value, the earlier the camera will switch to color mode.
In the Enhance section:
- Select the backlight compensation (BLC) mode from the drop-down list:
- Off to switch off the backlight compensation
- On to capture details in high-contrast and extremely bright-dark conditions
- Enable the contrast enhancement to increase the contrast in low-contrast conditions
- Enable intelligent defog feature which continuously adjusts image parameters to provide the best picture possible under foggy or misty conditions
- Enable intelligent DNR which reduces noise based on motion and light levels
- Adjust the sharpness level between -15 and +15. The zero position of the slider corresponds to the factory default level.
- Adjusts the temporal noise filtering level between -15 and +15. The higher the value, the more noise filtering.
- Adjust the spatial noise filtering level between -15 and +15. The higher the value, the more noise filtering.
- BLC does not work in Fixed shutter mode.
- The BLC function ignores small areas of high illumination directly into the camera. It increases the brightness of the overall screen to make sure that the subjects and the larger portion of the scene remain bright.
- A low (negative) Sharpness Level value makes the picture less sharp. Increasing sharpness brings out more detail. Extra sharpness can enhance the details of license plates, facial features, and the edges of certain surfaces but can increase bandwidth requirements.
In the Scene Mode section, select the desired current mode from the drop-down list:
- Indoor
- Outdoor
- Vibrant
- A scene mode is a collection of image parameters that are set in the camera when that particular mode is selected (installer menu settings are excluded). Several pre-defined modes are available for typical scenarios. After a mode has been selected, additional changes can be made through the user interface.
- When the camera is in an indoor room that often has smoke or has low contrast and the camera monitors an area facing the outdoors (such as large windows), Bosch recommends selecting the Outdoor mode.
Camera settings with the Hanwha driver allow configuring the following parameters.
In the Preset Mode section select the desired image preset mode from the drop-down list:
- Number Plates
- Outdoor Daytime
- Vivid
- User Preset 1
- Indoor Backlight
- Indoor Bright Scene
- User Preset 2
- Outdoor Night Time
In the SSDR section:
- Enable the SSDR mode to increase the brightness of the dark area alone to regulate the overall brightness in a scene where the difference between bright and dark is severe
- Select the amplitude area of the dynamic range from the drop-down list:
- Narrow
- Wide
- Adjust the level of dynamic range by moving the slider
In the White Balance section:
- Select the desired white balance mode;
- Manual, to adjust the red and blue gains of the camera video manually.
- ATW, to correct the colors of the camera video automatically.
- Narrow ATW, to auto-correct camera video color in 2800 K ~ 9000 K environment.
- Outdoor, to correct the video colors of the camera automatically to be optimized for the outdoor environment.
- Indoor, to correct the video colors of the camera automatically to be optimized for the indoor environment.
- AWC, to correct the colors of the camera video to be optimized to the current lighting condition and screen mode. To obtain the optimal condition for the current lighting, put the focus of the camera to a white paper. If the lighting environment is changed, you should readjust the settings accordingly.
- Mercury, to calibrate the camera video colors automatically so that they are optimized for mercury lamp illumination.
- Sodium, to calibrate the camera video colors automatically so that they are optimized for lighting conditions such as sodium.
- Move the Red Gain and Blue Gain sliders to adjust the red and blue gains of the camera video when the Manual mode is selected
The white balancing may not work properly in the following conditions:
- If the surrounding condition of the object is out of the temperature correction range (e.g., clear sky, sunset)
- If the surroundings of the object are dark
- If the focus of the camera directly faces the fluorescent lighting or if the camera is installed in a place of variable illumination, the white balancing operation may be unstable.
In the Backlight section select the desired mode and set its parameters as required:
- Select BLC mode to set the area to be displayed more clearly and change the BLC level to adjust the brightness of the monitoring area
- Select HLC mode to cut off the desired area to prevent an over-saturation on the monitor, if a strong light like a streetlamp or vehicle headlight points toward the camera. In this mode set the additional parameters as required:
- Change the HLC level to cut off the highlighted area
- Select the Mask mode from the drop-down list:
- Off: Does not block an area with a brightness that is a certain level or higher.
- On: Always blocks an area with a brightness that is a certain level or higher.
- Night Only: No blocked area is generated if the surrounding environment becomes dark to a certain level.
- All Day: No blocked area is generated if the surrounding environment becomes dark or bright to a certain level.
- If the Mask mode is selected (except Off), additionally:
- Choose the mask color from the drop-down list
- Set the mask tone by moving the slider
- Enable Dimming to detect an area on the screen with strong light, adjust the brightness, and reduce the saturated area
- Select WDR mode to display a sharp image of the objects in a scene where both bright and dark areas exist. In this mode set the additional parameters as required:
- Change the WDR level to adjust the intensity of backlight compensation
- Choose the WDR control mode from the drop-down list:
- Auto, to detect the surrounding environment and automatically use backlight compensation
- Always On, to constantly use backlight compensation
- Turn Off in Low Light, to disable automatic backlight compensation when detecting a dark environment
- Turn Off in Black/White, to disable automatic backlight compensation when switching to B/W mode
- At night operation, HLC will be activated only if the incoming highlight exceeds a certain area in a low-contrast environment.
- At night operation, HLC will not function in a too bright or too dark scene.
- During daytime operation, HLC will not work in dark conditions.
- WDR is recommended for use in the indoor environment.
- Noise may exist between the dark area and the bright area in the WDR mode.
- With WDR mode On or Off, the minimum, maximum, and user-preferred shutter values will be reset.
- If you use the P aperture lens manually or a shaking preventive shutter, the WDR performance is partially limited.
- In WDR mode, noise may occur in the motion area.
In the Exposure section adjust the exposure level of the camera:
- Set the desired value for each Shutter parameter. The shutter can set the sensor exposure automatically according to the environment; the electronic shutter operates at a range between minimum shutter and maximum shutter:
- Min. Shutter: Select the minimum value of the possible range for exposure time and set a long exposure time
- Max. Shutter: Select the maximum value of the possible range for exposure time and set a short exposure time
- Prefer Shutter: Select the proper exposure time that has a high priority in operation within the range of exposure time
- Select the antiflicker mode from the drop-down list. It prevents screen flickering that occurs due to inconsistency in the lighting in the capturing environment. Available options are:
- Off
- 50 Hz
- 60 Hz
- Select the desired mode for SSNR:
- On, to use the SSNR function and additionally adjust the SSNR level
- Off, to disable SSNR
- Wise NR, to adjust the noise reduction level automatically to improve object discrimination when a moving object is in the image
- Select the required level of SSNR 2D and SSNR 3D parameters. These options are available only if On or Wise NR mode is selected for SSNR:
- SSNR 2D Level: Reduces noise on the image using adjacent pixels in one frame. Noise will be reduced when you raise the level, but the picture may become less clear.
- SSNR 3D Level: Reduces noise on the image using the pixels of various frames. The higher the level, the less the noise, but then the video might lag.
- Select the iris mode from the drop-down list:
- Auto, to automatically adjust the iris depending on the optical intensity of the surroundings
- Manual, to manually adjust the iris’s F-number
- Select AGC (Auto Gain Control) mode to adjust the brightness by controlling the sensitivity of image gain when capturing an object in dim light:
- Off, to disable the AGC function that brightens dark images by amplifying gain from the video signal. When this option is selected, SSNR and Day/Night do not work.
- Manual, to manually adjust the AGC level.
- Max gain, to set the max gain level which can be auto-controlled depending on the brightness of the surroundings.
- If the background is darker than the subject, the subject will be shown normally only when the exposure is decreased. Conversely, if the background is brighter than the subject, the subject will be shown normally only when the exposure is increased.
- The screen exposure can be saturated depending on the max/min range of shutter settings.
- Enabling the Antiflicker mode disables all Shutter parameters.
- It may take a while until the effect is applied or canceled after setting the Wise NR mode (SSNR 2D and SSNR 3D).
- The level of noise might go up despite the improved video detection ability after setting the Wise NR mode (SSNR 2D and SSNR 3D).
- In a bright environment with less noise, the effect of Wise NR (SSNR 2D and SSNR 3D) can be little.
- As the usage of AGC increases, the SSNR 3D value for SSNR also increases, which could lead to stuttering in the video.
- AGC action increases screen noise.
- If the AGC mode option is set to Off or Manual, or if the Max Gain value is set to below 30 dB, the Day/Night mode cannot be set to Auto in the respective section.
In the Day Night Mode section:
- Select the Day/Night mode from the drop-down list to change the image to color or b/w according to the camera’s environment:
- Auto: Switches to color mode during the daytime and b/w at night or in low light.
- B/W: Outputs an image in b/w.
- Color: Outputs an image in color.
- Schedule: Activates the Day/Night switch according to the set schedule.
- Select the Dwell Time value in seconds to change to color or b/w when the Auto mode is selected for Day/Night and the brightness condition is maintained for the set dwell time
- Select the duration mode from the drop-down list to set the time interval when switching to color or b/w occurs. Selecting Customize allows you to manually set the duration by moving the sliders
- If Schedule is selected in the Day/Night mode, set the schedule for operation in color mode
- If AGC under Exposure is set to Off or Manual, or if Max gain is set below 30 dB, Day/Night cannot be set to Auto.
- In Schedule, when the Everyday checkbox is selected and the time is set, color mode is activated at the relevant time every day, and b/w mode is activated at all other times. If you wish not to have the color mode set for the same time every day, deselect Everyday and set the activation time to Mon., Tue., Wed., Thu., Fri., Sat., or Sun., respectively.
In the Special section:
- Adjust the brightness of the screen. The higher the number, the brighter the screen.
- Enable the Digital Image Stabilization parameter to automatically correct the video and stabilize the screen when the camera is shaking due to external impacts, such as wind.
- Enable the Sharpness parameter to adjust the overall sharpness of the image. Additionally, set the desired value in the Sharpness Level parameter by moving the slider. The higher the sharpness level, the stronger and clearer the video sharpness is.
- Enable the Gama Control parameter to adjust the brightness level of the video.
- Select the desired value in the Gamma parameter to adjust the contrast of the image. This means the gap between the brightest part and the darkest part in an image; a higher gamma value means a clearer display of the difference in brightness.
- Move the Contrast slider to adjust the shade contrast of the image.
- Move the Color Level slider to adjust the intensity of color in the image.
- Enable the Local Contrast parameter to see the subtle difference in the video brightness more clearly.
- Move the Local Contrast Level slider to adjust the intensity of the local contrast. The higher the level value, the higher the contrast of the video, which means a clearer image. However, this also increases the level of noise on the screen, and a warped form of the duplicated image might be more visible around the edges.
- Select the Defog mode from the drop-down list to correct the image when it is foggy or cloudy:
- Auto: The surrounding environment is detected and the image is corrected automatically.
- Manual: The user can see the surrounding environment and set the correction level directly by adjusting the defog level. A higher defog level displays the image more clearly. If the fog level is low and a high defog level is
set, the screen may look darker. - Off: Defog is disabled.
- When DIS is enabled, the video screen may be reduced or enlarged.
- If the Defog mode is set to Auto, as the amount of fog decreases, the level of the defog function is also lowered. To maintain the same effect of the function despite a decrease in the fog, then set the Defog mode to Manual.
- If the fog level is low and a manual high defog level is high, the screen may look darker.
In the Focus section:
- Select the focus mode from the drop-down list:
- Auto: The focus will be adjusted automatically according to the zoom factor.
- Manual: The focus will be adjusted manually according to the zoom factor.
- One Shot AF: Auto Focus will be performed once after the zooming operation.
- Select the zoom mode from the drop-down list to set how the focus is interconnected:
- Auto: It will control (detect and correct) the zooming operation to keep fitting the focus.
- Manual: The zooming operation will be guided by the focus track.
- Select the applicable range when automatically adjusting the camera focus:
- Narrow, to automatically adjust the focus in consideration of only a partial range from the current location
- Wide, to automatically adjust the focus in consideration of the whole supported range for the camera
- Select the zoom mode to synchronize the camera focus when the zoom is operating:
- Auto: Even if the zoom magnification is changed, the zoom operates while maintaining the focus by continuously appraising and modifying the condition in focus.
- Manual: The zoom operates according to the set focus track. The image may be out of focus if the zoom magnification is changed.
- Set the zoom speed from the drop-down list:
- Fast
- Medium
- Slow
- Select the lens reset option from the drop-down list:
- Choose Manual, to reset the lens manually once by clicking the Reset button
- Select a desired time between 1 and 7 days to reset the lens automatically at the set period from the set time
- Since the automatic focusing function adjusts the focus based on a subject in the middle of the screen, subjects on the periphery of the screen may be out of focus.
- The automatic focusing function may not operate normally under the following conditions:
- If there is a bright light or flashing light, such as a neon sign
- If the illumination in the monitoring area is low
- If the illumination in the monitoring area is excessively high
- If the camera operates with a slow shutter
- If the subject is dark
- If there is no intensity difference, such as between the sky and a wall
- If the camera is aimed at a thin horizontal line
- If there are objects both far and near within the monitoring area
- When setting as the manual focus, the focus can be changed due to the change of the surrounding environments.
Camera settings with the Uniview driver allow configuring the following parameters.
In the Image Enhancement section:
- Move the corresponding sliders to adjust the image:
- Brightness: The overall lightness or darkness of the image.
- Saturation: The intensity or vividness of colors in the image.
- Contrast: The difference between the lightest and darkest tones in the image.
- Sharpness: The definition of edges in the image.
- 2D Noise Reduction: Reduce noise by individually analyzing each frame, which may cause image blur.
- 3D Noise Reduction: Reduce noise by analyzing the difference between successive frames, which may cause image smearing or ghosting.
- Set the display direction of the picture by selecting the desired display option from the Image Rotation drop-down list:
- Normal
- Flip vertical
- Flip horizontal
- 180°
- 90° clockwise
- 90° counterclockwise
In the Exposure section:
- Select the Exposure mode from the drop-down list:
- Auto: The camera automatically sets the optimum shutter speed according to the scene.
- Custom: User can set exposure parameters as needed.
- Shutter Priority: The camera adjusts shutter as priority to adjust the image quality.
- Iris Priority: The camera adjusts iris as priority to adjust the image quality.
- Indoor 50 Hz: Reduce stripes by limiting shutter frequency.
- Indoor 60 Hz: Reduce stripes by limiting shutter frequency.
- Manual: Fine-tune image quality by setting shutter and gain manually.
- Low Motion Blur: Control the minimum shutter to reduce motion blur in faces captured in motion.
- Select the shutter value from the drop-down list to control the light that comes into the lens. A fast shutter speed is ideal for scenes in quick motion. A slow shutter speed is ideal for scenes that change slowly.
- Set the minimum and maximum gain to set the desired gain range. Depending on the illumination conditions, the camera automatically balances the gain within the set range to produce clearer images.
- Enable the Slow Shutter mode to increase image brightness in low-light conditions. Additionally, set the slowest shutter speed for exposure.
- Adjust the compensation value as required to achieve the desired image effect.
- Set the Restore Auto Exposure duration value in minutes for the camera to restore automatic exposure mode.
- Select the Metering Control mode from the drop-down list to define how the camera measures the intensity of light:
- Center-Weighted Average Metering: Measure light mainly in the central part of the image.
- Evaluative Metering: Measure light in the specified area of the image.
- Spot Metering: Similar to evaluative metering. But it cannot increase the brightness of images.
- Face Metering: Adjust image quality in poor lighting conditions by controlling the brightness of captured faces in face scenes.
- The Shutter parameter is configurable when Exposure Mode is set to Manual, Shutter Priority, or Custom.
- The Slow Shutter parameter is configurable when Exposure Mode is not set to Iris Priority and Image Stabilization is disabled.
- If Slow Shutter is disabled, the reciprocal of the shutter speed must be greater than the frame rate.
- The Gain parameter is configurable when Exposure Mode is set to Manual or Custom.
- The Compensation and Metering Control parameters are configurable when Exposure Mode is not set to Manual.
In the Day/Night section:
- Select the Day/Night mode from the drop-down list:
- Auto: The camera automatically switches between day and night mode according to the ambient lighting condition to output optimum images.
- Day: The camera outputs high-quality images in daylight conditions.
- Night: The camera outputs high-quality images in daylight conditions.
- Input Boolean: The camera switches between day and night mode according to the Boolean value input from a connected third-party device.
- If Auto mode is selected, configure additional parameters:
- Day/Night Sensitivity, to set the light threshold for switching between day mode and night mode
- Day/Night Switching, to set the length of time before the camera switches between day and night mode
- The Input Boolean option is only available on certain models.
- For the Day/Night Sensitivity parameter, a higher sensitivity value means that the camera is more sensitive to the change of light and is therefore more easily to switch between day and night mode.
In the Wide Dynamic Range section:
- Set the WDR mode:
- Disable WDR
- Enable, to ensure clear images in high-contrast conditions
- Auto, allows the camera to switch the WDR automatically
- Enable the Suppress WDR Stripes parameter to allow the camera to automatically adjust the slow shutter frequency according to the light frequency to minimize stripes in the image
- With Enabled or Auto WDR, adjust the WDR level
- When WDR is set to Auto, adjust the WDR On/Off Sensitivity parameters to change the WDR switching sensitivity
- The WDR mode is configurable when Exposure Mode is set to Automatic, Custom, Shutter Priority, Indoor 50Hz or Indoor 60Hz, and when Image Stabilization and Defog are disabled.
- A WDR level of 7 or higher is recommended if there is a high contrast between bright and dark areas in the scene. For low-contrast scenes, it is recommended to disable WDR or use levels 1 through 6.
In the Smart Illumination section:
- Enable smart illumination
- Select the required illumination mode from the drop-down list:
- White Light: The camera uses white light illumination.
- IR: The camera uses infrared light illumination.
- White Light and IR
- Choose the desired illumination control mode from the drop-down list:
- Global: The camera automatically adjusts illumination and exposure to achieve a balanced image effect. Some areas might be overexposed if you select this option. This option is recommended if you focus on the monitoring range and image brightness.
- Overexposure Restrain: The camera automatically adjusts illumination and exposure to avoid regional overexposure. Some areas might be dark if you select this option. This option is recommended if you focus on the clarity of the monitoring center area.
- Manual: This mode allows you to manually control the intensity of illumination.
- If the Manual control mode is selected, set the intensity of the illuminator:
- Near Illumination Level: Recommended for near-focus scenes.
- Far Illumination Level: Recommended for far-focus scenes.
In the White Balance section:
- Select the desired white balance mode from the drop-down list:
- Auto/Auto 2: Automatically adjust the red and blue gains according to the lighting conditions. If there are still color casts in Auto mode, try Auto 2 mode.
- Fine Tune: Manually adjust the red and blue offsets.
- Sodium Lamp: Automatically adjust the red and blue gains for optimal color reproduction in sodium light sources.
- Outdoor: Recommended for outdoor scenes where the color temperature varies widely.
- Locked: Keep the current color temperature.
- If the Fine Tune mode is selected, move the sliders to adjust the red and blue offsets
In the Advanced section configure the defog parameters:
- Select the desired defog mode from the drop-down list:
- Off, to disable the mode
- On, to improve image visibility in foggy, hazy, and other low-visibility scenes
- Auto, to automatically adjust the defog intensity according to the fog concentration for clear images
- If the Defog mode is enabled, move the slider to adjust the defog intensity
Camera settings with the Vivotek driver allow configuring the following parameters.
In the Video section:
- Select video stream display mode:
- Color
- Monochrome
- Set the power line frequency consistent with local utility settings to eliminate image flickering associated with fluorescent lights:
- 50 Hz
- 60 Hz
- Setup video orientation:
- Enable the Flip parameter to vertically reflect the display of the live video
- Enable the Mirror parameter to horizontally reflect the display of the live video
- Select the Rotation angle to rotate the display of the live video clockwise
- After the power line frequency is changed, disconnect and reconnect the power cord of the Network Camera in order for the new setting to take effect.
- Enable both Flip and Mirror parameters if the Network Camera is installed upside-down (e.g., on the ceiling) to correct the image orientation. Please note that if you have preset locations, those locations will be cleared after flip/mirror setting.
In the Day/Night section:
- Enable the Switch to B/W in Night Mode parameter to allow the camera automatically switching to Black/White during night time
- Select the IR-cut filter mode from the drop-down list:
- Auto: The camera automatically removes the IR-cut filter by judging the level of ambient light.
- Day: The camera switches on the IR-cut filter at all times to block infrared light from reaching the sensor so that the colors will not be distorted.
- Night: The camera switches off the IR-cut filter at all times for the sensor to accept infrared light, thus helping to improve low light sensitivity.
- Schedule: The camera switches between day and night mode based on a specified schedule. Additionally, enter the start and end time for day mode.
- When IR-Cut Filter Mode is set to Auto, select the IR-cut filter sensitivity mode from the drop-down list to tune the responsiveness of the IR filter to lighting conditions:
- Low
- Normal
- High
In the Illuminators section:
- Enable the Built-in IR Illuminator in Night Mode to turn on the camera’s onboard IR illuminator when the camera detects low light conditions and enters the night mode.
- Enable Anti-Overexposure to allow the camera to automatically adjust the IR projection to adjacent objects in order to avoid over-exposure in the night mode.
In the White Balance section:
- Select the desired white balance mode:
- Auto: Automatically adjusts the colors of the camera video.
- RB-Gain: Allows manual adjustment of the red and blue gains of the camera video.
- Manual:
- If RB-Gain is not supported, the camera retains its current white balance settings.
- If RB-Gain is supported, the red and blue gains are updated to the current values provided by the white balance module and can then be adjusted similarly to RB-Gain mode.
- Move the Red Gain and Blue Gain sliders to adjust the red and blue gains of the camera video when the RB-Gain mode is selected
In the Image Adjustment section:
- Move the corresponding sliders to adjust the image:
- Brightness: The overall lightness or darkness of the image.
- Saturation: The intensity or vividness of colors in the image.
- Contrast: The difference between the lightest and darkest tones in the image.
- Sharpness: The definition of edges in the image.
- Select the gamma adjustment mode from the drop-down list:
- Manual: Allows changing the preferred level of gamma correction towards higher contrast or towards the higher luminance for detailed expression for both dark and lighted areas of an image. The possible range is from 0.45 to 1, from Detailed to Contrast.
- Optimized: Lets the firmware to optimize your display.
- Enable the Electronic Image Stabilizer (EIS) or Digital Image Stabilizer (DIS) to reduce the blurring due to the camera physical vibration. Additionally adjust the EIS or DIS strength by moving the slider.
In the Defog section:
- Select the desired defog mode from the drop-down list:
- Off, to disable the mode
- On, to improve image visibility in foggy, hazy, and other low-visibility scenes
- If the Defog mode is enabled, move the slider to adjust the defog strength
- Enable the Highlight Mask function to mask strong light sources from the scene, and the image contrast will be strengthened.
In the Noise Reduction 3D section, move the Strength slider to increase or reduce noises and flickers in the image.
In the Exposure section:
- Select the exposure mode from the drop-down list:
- Auto: The camera automatically sets the optimum shutter speed according to the scene.
- Manual: Fine-tune image quality by setting shutter and gain manually.
- Select the Measurement Window type from the drop-down list to set measurement window(s) for low light compensation:
- Full View: Calculate the full range of view and offer appropriate light compensation.
- Custom: This option allows manually adding customized windows as inclusive or exclusive regions. A total of 10 windows can be configured.
- Auto: Firmware automatically determines an optimal exposure level.
- Center: Use the center portion of the screen to determine the exposure level.
- Select the required metering mode for exposure measurements:
- Auto: Allows the firmware to detect the exposure measurement automatically.
- BLC (Back Light Compensation): This option will automatically add a “weighted region“ in the middle of the window and give the necessary light compensation.
- HLC: (Highlight Compensation): Firmware detects strong light sources and compensates on affected spots to enhance the overall image quality. For example, the HLC helps reduce the glare produced by spotlights or headlights.
- Select the exposure level from the drop-down list. The possible range is from +2.0 to -2.0.
- When the exposure mode is set to Manual, move the Time and Gain Control sliders to manually adjust a range of shutter time and gain control values within which the camera can automatically tune to an optimal imaging result.
- Enable the WDR Pro mode to allow the camera to capture details in a high contrast environment.
- When WDR Pro is enabled, move the WDR Pro Strength slider to adjust the strength of the WDR Pro functionality, depending on the lighting condition at the installation site. Select a higher value when the contrast is high (between the shaded area and the light behind the objects).
- Enable the WDR Enhanced functionality to identify more image details with an extreme contrast from an object of interest with one shadowed side against a bright background, e.g., an entrance.
- When WDR Enhanced is enabled, move the Strength slider adjust the enhancement strength (low, medium, high) to reach the best image quality.
- Select iris mode from the drop-down list:
- Indoor or Outdoor as your application scene.
- Manual to adjust the iris position by moving the slider to Open or Closed manually.
- Enable the Flickerless mode to limit the exposure time in order to match the AC power frequency.
- Enable the Deblur mode to fix the shutter time to 1/120 second to reduce image smear.
- Under some circumstances when there is a difference between the video capture frequency and local AC power frequency (NTSC or PAL), the mismatch causes color shifts or flickering images. When the Flickerless mode is enabled, the exposure time will be forced to stay longer than 1/120 second. For cameras that come with fixed iris lens, setting the exposure time to longer than 1/120 second may introduce too much lights to the lens. Users can use this option to observe whether the result of long exposure time is satisfactory.
- The deblur function is related to Motion detection where motion-alerted pixels need to be suppressed in order to increase the accuracy of motion detection. In certain conditions, shadows or light changes can all cause false alarms in motion detection. This function uses the same detection window as that of the Motion detection.
In the AE Speed Adjustment section:
- Enable AE Speed Adjustment mode to automatically adjust the exposure in response to rapid changes in lighting conditions.
- Additionally adjust the following settings:
- Move the Speed Level slider to control how quickly the camera adapts its exposure to changing light levels.
- Move the Sensitivity slider to set how responsive the camera is to minor or major changes in lighting.
Camera: Streams Tab
The Streams tab allows to:

- View camera's streams:
- View the stream name
- View the stream profile
- View the recording priority of the stream:
- Primary: The main high-resolution stream with the highest playback priority. Only one Primary stream is available per camera.
- Secondary: A lower-resolution stream that is automatically used when playing back footage in a small window or when manually selected. Only one Secondary stream is available per camera.
- Auxiliary: Additional independent streams recorded for backup purposes and used only in exceptional cases. The number of Auxiliary streams is not limited.
- None: Indicates that recording is not performed for this stream.
- Manage stream profiles:
- Select the required profile by clicking its name in the list
- Configure the selected stream profile parameters
- A Primary stream must be assigned to the camera in order to configure a Secondary stream.
- The Primary stream cannot be replaced by any other stream type (Secondary, Auxiliary, None).
- The Primary stream cannot be deleted.
- For optimal playback quality, recorded footage should be available in both high and low resolution. To ensure this, recording should always be configured for at least two streams.
- The switching between profiles is available by clicking on their names.
- The selected profile's name is always highlighted.
The parameters of stream profiles depend on the driver of the selected camera:
- AXIS driver
- Basic driver
- RTSP driver
- ONVIF driver
- Dahua driver
- Hikvision driver
- Bosch driver
- Hanwha driver
- Uniview driver
- Vivotek driver
Stream profile settings with the AXIS driver allow to:
- Сlick the desired profile name in the list to view stream details, including:
- Stream URL
- Profile name and token
- Video source name and token
- Configure the stream parameters in the selected profile:
- Select the required codec type from the Encoding drop-down list:
- JPEG
- H.264
- H.265
- Select the desired stream resolution from the Resolution drop-down list.
- Enter the required number of frames per second for the stream in the Frame Rate Limit field to limit the frame rate amount.
- Use the Compression slider to adjust the image compression.
- Enable GOP Mode to dynamically adjust the interval between I-frames based on the level of activity in the scene.
- When GOP Mode is enabled, enter a maximum GOP length, that is the maximum number of P-frames between two I-frames.
- Select the desired Bitrate Control mode from the drop-down list:
- VBR (Variable Bitrate): Allows the bitrate to vary based on the level of activity in the scene. More activity requires more bandwidth. We recommend this option for most situations.
- ABR (Average Bitrate): Automatically adjusts the bitrate over a longer time period and provide the best possible image quality based on the available storage.
- MBR (Maximum Bitrate): Sets a maximum instant bitrate of the stream based on your network bandwidth.
- Off: Disables the bitrate control mode
- When MBR mode is selected, additionally specify the maximum bitrate value in kbits/s.
- When ABR mode is selected, additionally configure the following parameters:
- Target Bitrate: Enter desired target bitrate to set the average bitrate the stream will aim to achieve.
- Retention Time: Enter the number of days to keep the recordings.
- Bitrate Limit: Enter a bitrate limit that is equal or higher than the target bitrate.
- Select the required codec type from the Encoding drop-down list:
- High compression reduces the bitrate and image quality, while low compression improves quality at the cost of increased bandwidth and storage usage.
- When GOP Mode is enabled, I-frames are inserted based on the level of activity in the scene. An I-frame is a fully self-contained image that does not rely on other frames for reconstruction.
Stream profile settings with the Basic driver allow to:
- Click the desired profile name to view stream details, including:
- Stream URL
- Profile name and token
- Video source name and token
- Video encoder name and token
- Configure the stream parameters in the profile:
- Select the required codec type from the Encoding drop-down list:
- Select the desired stream resolution from the Resolution drop-down list
- Specify the time interval in seconds between video data encoding in the Encoding Interval field
- Enter the required number of frames per second for the stream in the Frame Rate Limit field
- Move the Quality slider to the left (to decrease) or to the right (to increase) the image quality
- Enter the desired value in kilobits per second in the Bitrate Limit field to limit the data transfer rate for the stream
Stream profile settings with the RTSP driver allow viewing of the available stream profile information:
- Stream URL
- Profile name and token
Stream profile settings with the ONVIF driver allow to:
- Click the desired profile name to view stream details, including:
- Stream URL
- Profile name and token
- Video source name and token
- Video encoder name and token
- Configure the stream parameters in the profile:
- Select the required codec type from the Encoding drop-down list:
- Select the desired stream resolution from the Resolution drop-down list
- Specify the time interval in seconds between video data encoding in the Encoding Interval field
- Enter the required number of frames per second for the stream in the Frame Rate Limit field
- Move the Quality slider to the left (to decrease) or to the right (to increase) the image quality
- Enter the desired value in kilobits per second in the Bitrate Limit field to limit the data transfer rate for the stream
Stream profile settings with the Dahua driver allow to:
- Click the desired profile name to view stream details, including:
- Stream URL
- Profile name and token
- Video source name and token
- Configure the stream parameters in the profile:
- Select the required codec type from the Encoding drop-down list
- Select the desired stream resolution from the drop-down list
- Select the bitrate type from the drop-down list:
- VBR (Variable Bitrate), which allows the bitrate to vary depending on the complexity of the video content
- CBR (Constant Bitrate), which maintains a consistent bitrate regardless of the video content's complexity
- If the VBR option is selected, adjust the video quality level by moving the Quality slider:
- To a higher value, increasing the quality, but also increasing the average bitrate
- To a lower value, decreasing the quality, but saving more bandwidth
- Enter the desired number of frames for the GOP length from 25 to 150
- Enter the required number of frames per second for the stream in the Frame Rate Limit field
- Select the bitrate mode from the drop-down list:
- 2048
- 8192
- Custom
- If the Custom option is selected for the Bitrate Mode, enter the desired value in kilobits per second in the Bitrate Limit field to limit the data transfer rate for the stream
- Select the H.264 profiling method from the Profile drop-down list:
- High
- Main
- Baseline
- The VBR type decreases the bitrate when the scene is simple, saving bandwidth. Conversely, when the scene is complex, the bitrate increases to maintain video quality. VBR is more efficient in terms of bandwidth usage and can provide better overall video quality.
- The CBR type ensures a predictable and steady stream of data, which can be beneficial for network stability and storage planning. However, it may result in lower video quality during complex scenes or inefficient use of bandwidth during simple scenes.
- The Quality setting helps balance the trade-off between video quality and bandwidth efficiency when using variable bitrate.
- The GOP Length value is recommended to be set twice as big as FPS.
- For the Record Always recording mode, set the bitrate type to VBR to optimize storage space. This reduces the bitrate during low activity periods, saving storage while maintaining video quality. Conversely, for the Motion Only recording mode, set the bitrate type to CBR with the highest possible bitrate to ensure the best picture quality during motion-triggered recording.
Stream profile settings with the Hikvision driver allow to:
- Click the desired profile name to view stream details, including:
- Stream URL
- Profile name and token
- Video source name and token
- Configure the stream parameters in the profile:
- Select the required codec type from the Encoding drop-down list
- Select the desired stream resolution from the Resolution drop-down list
- Select the required number of frames per second for the stream from the Frame Rate Limit drop-down list
- Enter the desired value in kilobits per second in the Bitrate Limit field to limit the data transfer rate for the stream
- Select the bitrate type from the drop-down list:
- VBR (Variable Bitrate), which allows the bitrate to vary depending on the complexity of the video content
- CBR (Constant Bitrate), which maintains a consistent bitrate regardless of the video content's complexity
- Move the Quality slider to the left (to decrease) or to the right (to increase) the image quality
- Move the I-Frame Interval slider to set the intervals in which the I-frames will be coded
- Select the H.264/H.265 profiling method from the Profile drop-down list
- The Quality slider is enabled for VBR bitrate type only.
- The Profile and Smoothing parameters are enabled for H.264/H.265 codec types only.
Stream profile settings with the Bosch driver allow to:
- Click the desired profile name to view stream details, including:
- Stream URL
- Profile name and token
- Video source name and token
- Configure the stream parameters in the profile:
- Select the required codec type from the Encoding drop-down list
- Select the desired video mode from the drop-down list
- Select the required bitrate optimization support setting from the drop-down list:
- Off: Bitrate optimization support is disabled
- Maximum Quality
- High Quality
- Medium
- Low Bitrate
- Minimum Bitrate
- Select the desired frame rate for the video stream from the drop-down list
- Select the required structure for the group of pictures from the GOP Mode drop-down list, depending on whether you place greater priority on having the lowest possible delay (IP frames only) or using as little bandwidth as possible:
- IP
- IBP
- IBBP
- Enter the maximum bitrate value in kilobits per second. The value in this field must be at least 10% higher than the value entered in the Target Bitrate field. If the maximum bitrate value is too low, it will be adjusted automatically.
- Enter the target bitrate value in kilobits per second. For complex images or frequent changes of image content due to frequent movements, this limit can temporarily be exceeded up to the value entered in the Maximum Bitrate field.
- Select the appropriate averaging period as a means of stabilizing the long-term bitrate
- Move the I/P-Frame Delta QP slider to set the ratio of the I-frame quantization (QP) to the P-frame quantization (QP). For example, you can set a lower value for I-frames by moving the slider to a negative value. Thus, the quality of the I-frames relative to the P-frames is improved. The total data load will increase, but only by the portion of I-frames
- Move the I-Frame Distance slider to set the intervals in which the I-frames will be coded
- Move the Min. P-Frame QP slider to adjust the image quality of the P-frame and to define the lower limit for the quantization of the P-frames, and thus the maximum achievable quality of the P-frames
To obtain the highest quality at the lowest bandwidth, even in the case of increased movement in the picture, configure the quality settings as follows:
- Observe the coverage area during normal movement in the preview images.
- Set the value for Min. P-Frame QP to the highest value at which the image quality still meets your needs.
- Set the value for I/P-Frame Delta QP to the lowest possible value.
This is how to save bandwidth and memory in normal scenes. The image quality is retained even in the case of increased movement since the bandwidth is then filled up to the value that is entered under Maximum Bitrate.
- The encoder maintains the maximum bitrate over a number of GOPs (group-of-pictures), limiting image quality when necessary. To ensure the long-term stability of the maximum bitrate, use the Averaging period parameter.
- The target bitrate should be set according to the desired picture quality for typical scenes with no excessive motion. It is intended to limit the data rate for the device, optimizing the use of the bandwidth in the network.
- The I-Frame Distance values range from 3 to 255. An entry of 3 indicates that I-frames are continuously generated. An entry of 4 indicates that only every fourth image is an I-frame, and so on; the frames in between are coded as P-frames. The supported values depend on the GOP Mode setting. For example, only even values are supported with IBP; if you have selected IBBP, only 3 or multiples of 3 are supported.
- In the H.264 protocol, the Quantization Parameter (QP) specifies the degree of compression and thus the image quality for every frame. The lower the quantization of the P-frame (QP value), the higher the encoding quality (and thus the best image quality) and the lower the frame refresh rate depending on the settings for the maximum data rate under network settings. A higher quantization value results in low image quality and lower network load. Typical Min. P-Frame QP values are between 18 and 30.
Stream profile settings with the Hanwha driver allow to:
- Сlick the desired profile name in the list to view stream details, including:
- Stream URL
- Profile name and token
- Video source name and token
- Configure the stream parameters in the profile:
- Select the required codec type from the Encoding drop-down list:
- MJPEG
- H.264
- H.265
- Select the desired stream resolution from the Resolution drop-down list
- Enter the required number of frames per second for the stream in the Frame Rate Limit field
- Enter the desired value in kilobits per second in the Bitrate Limit field to limit the data transfer rate for the stream
- Select the bitrate control type from the drop-down list:
- CBR (Constant Bitrate), which maintains a consistent bitrate regardless of the video content's complexity
- VBR (Variable Bitrate), which allows the bitrate to vary depending on the complexity of the video content
- Choose the desired encoding priority from the drop-down list:
- Frame rate
- Bitrate
- Compression
- Select the H.264 profiling method from the Profile drop-down list:
- High
- Main
- Baseline
- Select the Entropy Coding mode in H.264 with the High or Main profile method to reduce the possible compression loss due to encoding:
- CABAC
- CAVLC
- Move the Video Compression slider to the left (to decrease) or to the right (to increase) video compression
- Select the Smart Codec mode from the drop-down list when the bitrate control value is CBR
- Move the GOV Length slider to set the distance (in terms of the number of frames) between two consecutive I-Frames in a video sequence when H.264/H.265 codec is selected
- Enable the Dynamic GOV Mode to make the GOV length automatically change to the set value of the maximum dynamic GOV when the bitrate control is VBR in H.264/H.265 codec
- Move the Dynamic GOV slider to set the value of the maximum dynamic GOV when Dynamic GOV is enabled
- Enable the Dynamic FPS Mode to automatically change the setting of the FPS value to the minimum dynamic value when the bitrate control is VBR in H.264/H.265 codec
- Move the Minimum FPS slider to set the minimum dynamic value when Dynamic FPS is enabled
- Select the required codec type from the Encoding drop-down list:
Stream profile settings with the Uniview driver allow to:
- Click the desired profile name to view stream details, including:
- Stream URL
- Profile name and token
- Video source name and token
- Configure the stream parameters in the profile:
- Select a video compression standard for your camera from the Encoding drop-down list:
- MJPEG
- H.264
- H.265
- Select the desired stream resolution from the Resolution drop-down list. The higher the resolution, the clearer the image.
- Enter the desired frame rate for the video stream.
- Set the bitrate limit for the stream.
- Select the bitrate control mode from the drop-down list:
- VBR (Variable Bitrate): The camera keeps the quality of video streams as constant as possible by varying the bitrate.
- CBR (Constant Bitrate): The camera keeps a specific bitrate by varying the quality of video streams.
- When VBR is selected, move the Quality slider to adjust the image quality.
- Set the I-Frame Interval for the number of frames between I-frames. A shorter interval presents better image quality but consumes more bandwidth and storage.
- Enter the desired number of frames for GOP to define the basic pattern of the video stream encoded with I and P frames.
- Move the Smoothness slider to choose whether smoothness or clarity precedes the video stream.
- Select the SVC (Scalable Video Coding) mode:
- On: Enables a video stream to be broken into multiple layers of resolution, quality, and frame rate, reducing bandwidth consumption without compromising the image quality.
- Off: Disables the SVC mode
- Select the U-Code mode:
- Basic Mode: The bitrate is reduced by about 25%.
- Advanced Mode: The bitrate is reduced by about 50%.
- Select a video compression standard for your camera from the Encoding drop-down list:
- When H.265 or H.264 is selected, Image Quality is not available.
- When MJPEG is selected, Bitrate, I-Frame Interval, Smoothing, SVC and U-Code are not available.
- The bitrate restores to the default when you switch between H.264 and H.265.
- To ensure image quality, the frame rate shall not be greater than the reciprocal of the shutter speed.
- Smoothing is recommended for fluent video in a poor network environment.
Stream profile settings with the Vivotek driver allow to:
- Click the desired profile name to view stream details, including:
- Stream URL
- Profile name and token
- Video source name and token
- Configure the stream parameters in the profile:
- Select a video compression standard for your camera from the Encoding drop-down list:
- MJPEG
- H.264
- H.265
- Select the desired stream resolution from the Resolution drop-down list. The higher the resolution, the clearer the image.
- Enter the desired frame rate in the Frame Rate Limit field to limit the maximum refresh frame rate per second. Set the frame rate higher for smoother video quality and for recognizing moving objects in the field of view.
- Select the desired intra frame period in seconds from the drop-down list to determine how often for firmware to plant an I frame. The shorter the duration, the more likely you will get better video quality, but at the cost of higher network bandwidth consumption.
- Enable Dynamic Intra Frame Period to optimize bandwidth usage by dynamically adjusting I-frame insertion intervals, especially effective with high-efficiency codecs like H.265. In static or low-motion scenes, this feature can save up to 53% of bandwidth, and up to 80% when combined with Smart Stream, compared to using H.264 without such features. This ensures efficient streaming without compromising image quality, even in varying scene conditions.
- Enable the Smart FPS feature to optimize resource usage by reducing computing efforts and bandwidth in static scenes. It queues old frames when no motion is detected and resumes normal real-time streaming when motion occurs, ensuring compliance with frame rate requirements while saving resources.
- Move the Quality slider to the left (to decrease) or to the right (to increase) the video quality
- Enter the maximum bitrate value in kilobits per second in the Bitrate Limit field to control the size of video streams for bandwidth and storage concerns. The bitrate ranges from 20kbps to a maximum of 80Mbps.
- Select the bitrate control mode from the drop-down list:
- VBR (Variable Bitrate): The camera keeps the quality of video streams as constant as possible by varying the bitrate.
- CBR (Constant Bitrate): The camera keeps a specific bitrate by varying the quality of video streams.
- When CBR mode is selected, configure additional parameters:
- Select the Policy mode from the drop-down list:
- Frame Rate, to maintain the frame rate per second performance, while the image quality will be compromised.
- Quality, to drop some video frames in order to maintain image quality.
- Enable Smart Q to reduce frame size and bitrate consumption through the following:
- Dynamically adjusting the image quality for scenes in different luminosities in low light frames. Less noises means less of the bandwidth consumed.
- Endorsing different qualities for the I frames and P frames, and hence reduces the frame size.
- Dividing a single frame into different sections, and giving these sections different qualities. For a highly complex area, such as an area with dense vegetation, screen windows, or repeated patterns (complex textiles patterns like wall paper), having a lower quality value actually poses little effects on human eyes.
- Unnecessary quality is unrecognized by human eyes and wastes the bitrate.
- Select the Policy mode from the drop-down list:
- Select a video compression standard for your camera from the Encoding drop-down list:
- If the power line frequency is set to 50Hz , the following frame rates for the Frame Rate Limit parameter are available: 1fps, 2fps, 3fps, 5fps, 8fps, 10fps, 12fps, 15fps, and up to 25fps. If the power line frequency is set to 60Hz, the frame rates are available at 1fps, 2fps, 3fps, 5fps, 8fps, 10fps, 12fps, 15fps, and up to 30fps. The IB9365 supports a frame rate of up to 60fps.
- Available durations for the Intra Frame Period parameter are: 1/4 second, 1/2 second, 1 second, 2 seconds, 3 seconds, and 4 seconds.
- The Smart Q streaming can save up to 50% to 80% of bandwidth in different illumination conditions while keeping the same imaging quality.
Camera: Record Tab
The Record tab allows to:
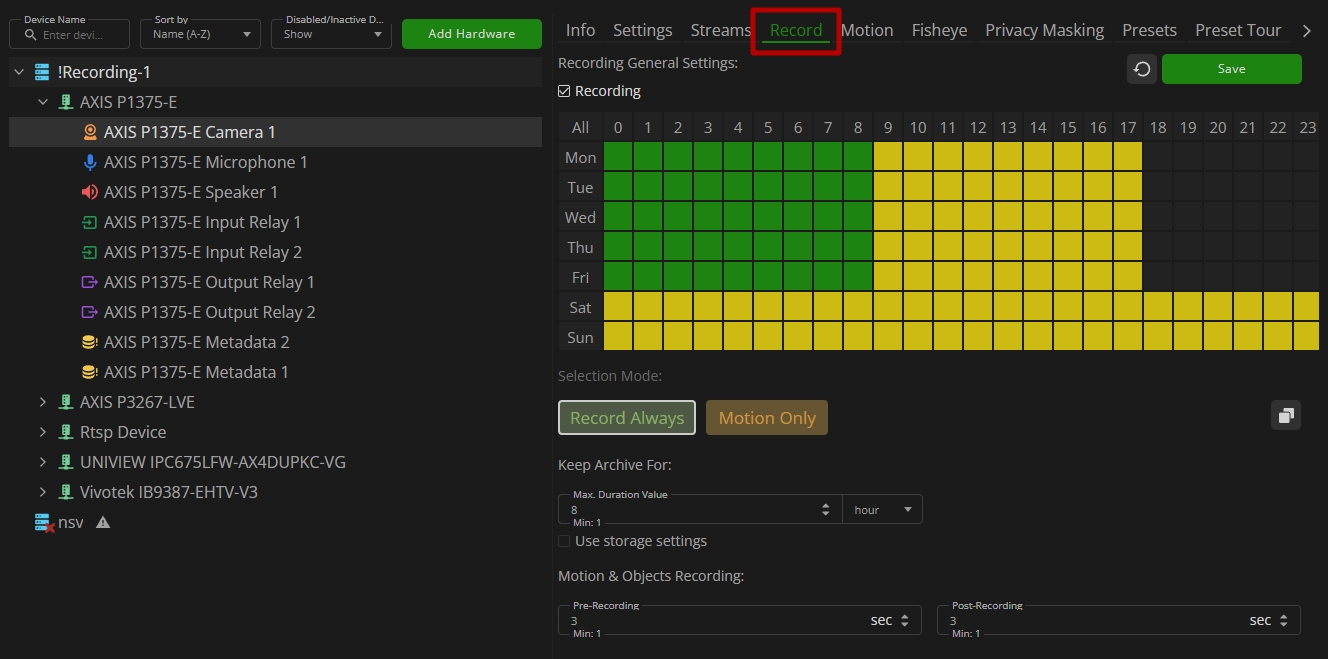
- Enable or disable camera recording by selecting or deselecting the Recording checkbox
- Switch the selection mode:
- Record Always mode to enable recording under any conditions
- Motion Only mode to enable recording only under motion detection
- Select the required recording hours for each day:
- Click the single cell to select it
- Hold and drag the mouse to select multiple cells in the required area
- Click the required hour to select the corresponding cell column
- Click the required day of the week to select the corresponding cell row
- Click the All button to select all cells in the table chart
- Click the desired cell/column/row once again to deselect it and disable the recording
- Click the Copy Schedule To icon to copy the recording schedule to multiple other cameras. In the Copy Schedule To pop-up window:
- Check the boxes next to the required cameras and folders
- Click the Confirm button
- Set the parameters for keeping records in the archive:
- Enter the maximum keeping duration value
- Select the maximum keeping duration value type from the drop-down lists:
- Minutes
- Hours
- Days
- Select the Use Storage Settings checkbox to apply the retention period defined in the Storage settings
- Set pre- and post-recording time in seconds for motion and object recording
- Click the Reset button to cancel all changes
- Click the Save button to apply changes
- The Copy Schedule To pop-up window contains all connected cameras except for the one from which the schedule is being copied.
- When the Use Storage Settings checkbox is enabled, the Max. Duration Value parameter is locked.
- Deleting the archive will also permanently delete all bookmarks within a selected time period on a specific camera.
Camera: Motion Tab
The Motion tab allows to:
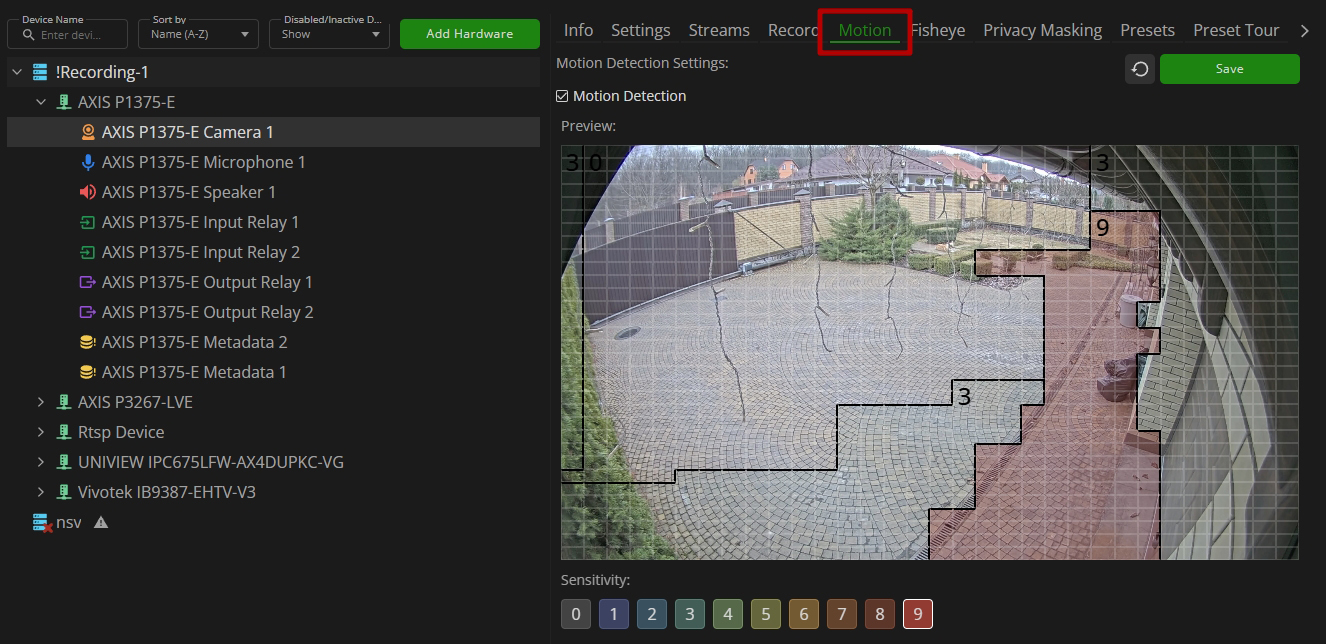
- Enable or disable motion detection by selecting or deselecting the Motion Detection checkbox
- Set the required level of the motion detection sensitivity from 0 to 9
- Click and drag the cursor over the frame to specify the borders of the motion detection area with the selected sensitivity level
- Click the Reset icon to cancel all changes
- Click the Save button to apply changes
- The number in the upper-left corner of each motion detection area indicates the sensitivity level for that area.
- Various motion detection areas with different sensitivity levels are interchangeable.
Camera: Fisheye Tab
The Fisheye tab allows to:

- Enable or disable fisheye dewarping by selecting or deselecting the Fisheye checkbox
- Show or hide the grid overlay by selecting or deselecting the Show Grid checkbox
- Define the camera’s mounting position to apply the appropriate dewarping algorithm based on its orientation:
- Wall
- Ceiling
- Floor
- Adjust the mounting angle to correct image distortion
- Improve dewarping precision by selecting the most suitable lens projection type:
- Equidistant
- Stereographic
- Equisolid
- Manually refine distortion settings using the following sliders:
- Use the Size slider to change the size of the calibration circle
- Use the Ellipticity slider to adjust the shape of the lens (panamorph lens support)
- Use the X Offset slider to change the position of the calibration circle horizontally
- Use the Y Offset slider to change the position of the calibration circle vertically
- Compare the Before and After video frames to evaluate the applied corrections and make further adjustments if needed
- Click the Reset button to cancel all changes
- Click the Save button to apply the configured settings
- The Wall mounting option supports only a 180-degree panoramic view, while the Ceiling and Floor options enable a 360-degree panoramic view.
- The Equidistant dewarping mode can also be used for compatible 360° panoramic images and videos.
- By default, the calibration circle is positioned at the upper-left corner of the camera frame.
- The calibration circle can be repositioned manually by dragging it with the mouse. In this case, the X Offset and Y Offset sliders update automatically.
Camera: Privacy Masking Tab
The Privacy Masking tab allows to:
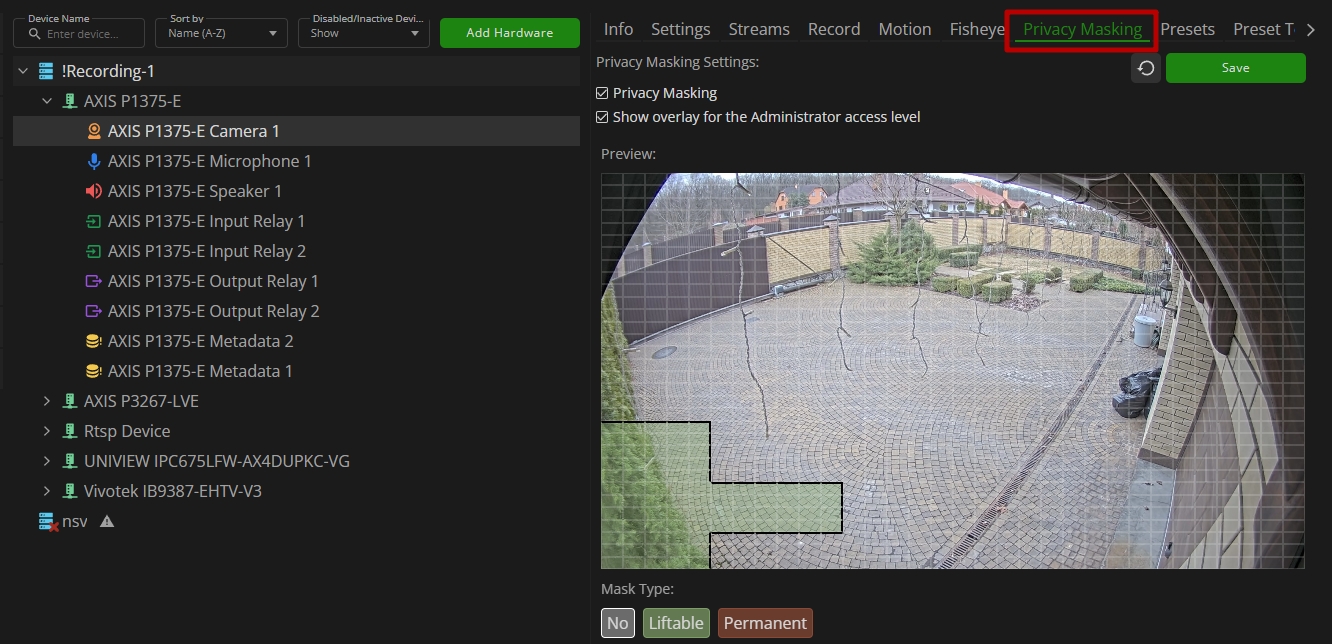
- Enable or disable privacy masking by selecting or deselecting the the Privacy Masking checkbox
- Check the Show Overlay for the Administrator Access Level box to enable privacy masking displaying for administrators
- Click and drag the cursor over the frame to specify the borders of the privacy masking area with the desired mask type
- Click the Reset icon to cancel all changes
- Click the Save button to apply changes
- Use the Liftable mask type to visually overlay the desired area in the interface, masking it from the user's view.
- Use the Permanent mask type to visually overlay the desired area in the interface, masking it from the user's view and preventing the system from detecting anything within the selected area on the frame.
- Use the No mask type to clear the desired area from the privacy mask.
- Neither mask type is applied to the exported video.
Camera: Presets Tab
The Presets tab allows to:
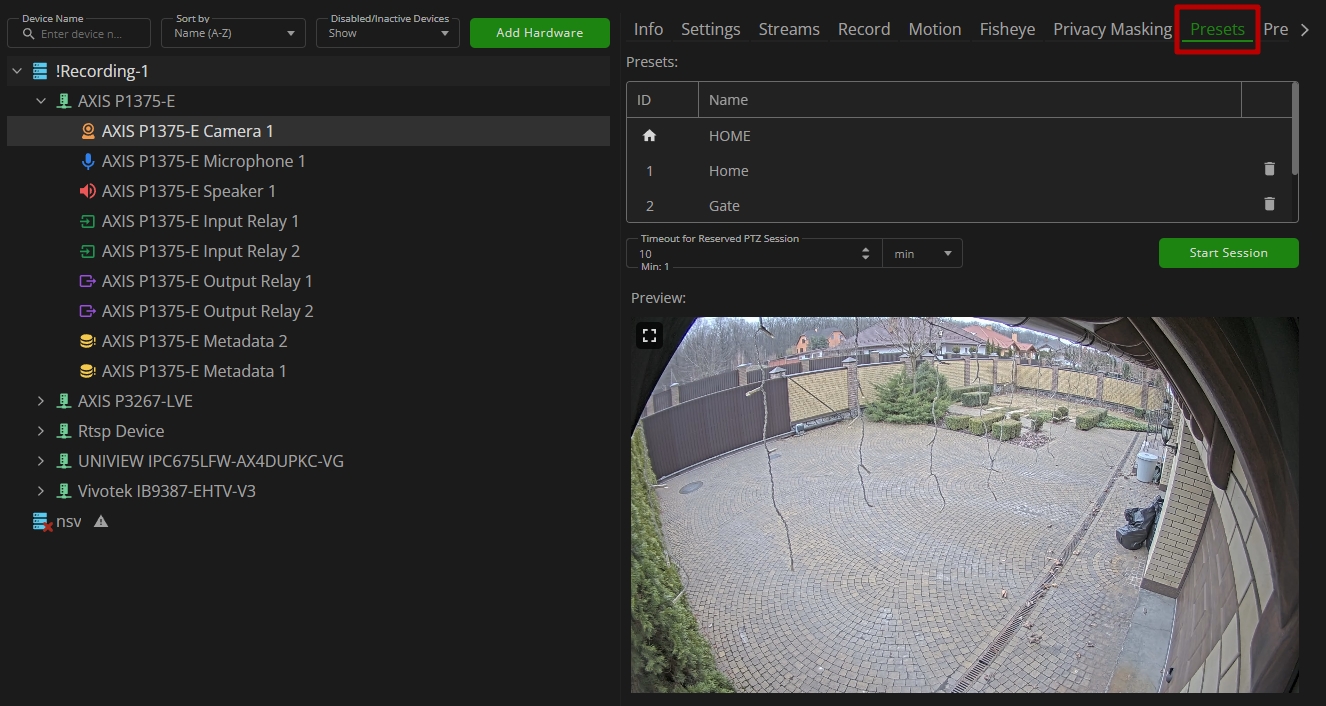
- Manage presets:
- In the Presets table:
- Click the Set on the Camera icon to see the required preset position on the camera frame preview
- Click the Delete icon to delete the required preset
- In the camera frame preview, view the selected preset position
- In the Presets table:
- Manage PTZ session:
- Set the timeout for the reserved PTZ session:
- Enter the time value
- Select the time units:
- Seconds
- Minutes
- Hours
- Click the Start Session button to start the manual PTZ session for the reserved time
- View the user who initiated the PTZ session, and the timeout before the session ends
- Click the Stop Session button to stop the manual PTZ session before the reserved session time ends
- Set the timeout for the reserved PTZ session:
- The Set on the Camera icon is available only during the PTZ session.
- Changes to the values of the Timeout for Reserved PTZ Session parameter will be applied to the next session after the modifications are made. The changes cannot be applied to the current session.
- The Enlargement icon in the upper-left corner of the frame allows opening the frame in full-size view. Clicking the icon again will return the frame to its previous view.
The manual PTZ session allows to:
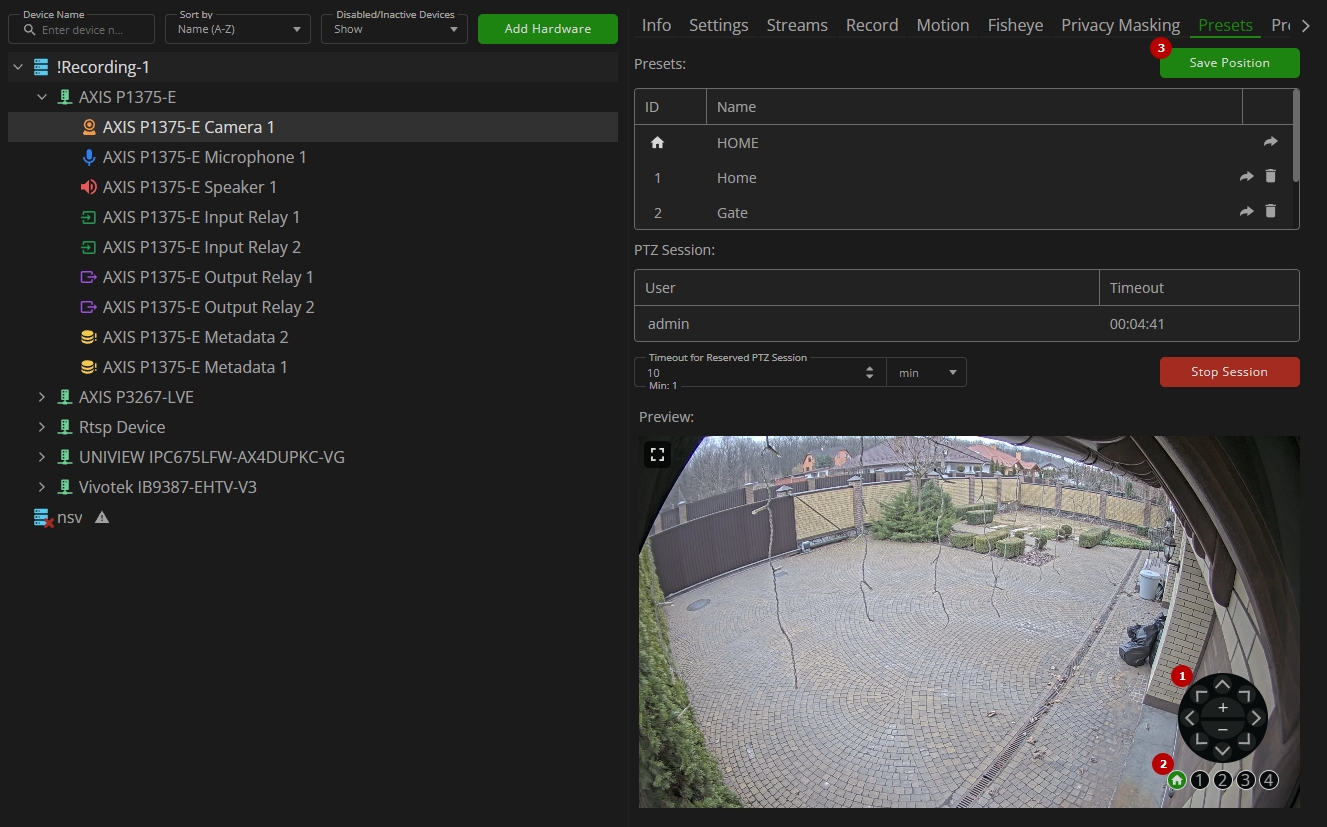
- Use PTZ controllers to select the desired preset position:
- Zoom controllers ("+" and "-"), to zoom the frame in and out
- Direction controllers, to move across the zoomed-in frame in the desired direction
- Click the preset shortcuts to move between added presets and see their positions in the frame
- Click the Save Position button to add a new preset based on the manually selected position. In the Add Preset pop-up window:
- Enter a new preset name
- Click the Confirm button
Camera: Preset Tour Tab
The Preset Tour tab's functional menu allows to:
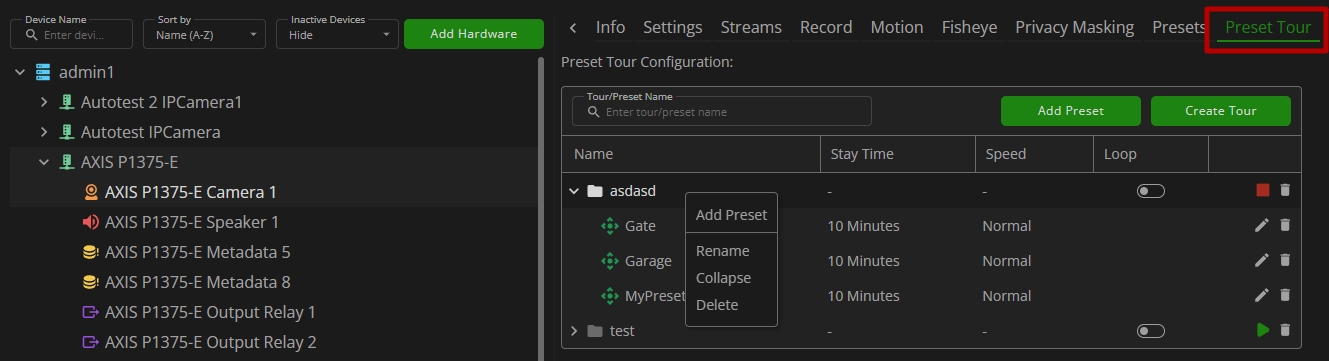
- Enter the tour or preset name or characters in the name in the Tour/Preset Name search field to filter tours and presets
- Right-click the required tour and in the drop-down menu:
- Select the Add Preset option to add the required presets to the selected tour
- Rename the selected tour
- Collapse the selected tour if its content is expanded
- Delete the selected tour
- Select, hold, and drag the required preset to rearrange its position within the tour
- Switch the Loop toggle to enable/disable the preset tour cyclic playback
- Click the Play/Stop icon to start or stop the desired preset tour playback
- Edit the required preset settings within the required tour
- Delete the required tour or preset
To create a new preset tour, click the Create Tour button. In the Create Tour pop-up window:
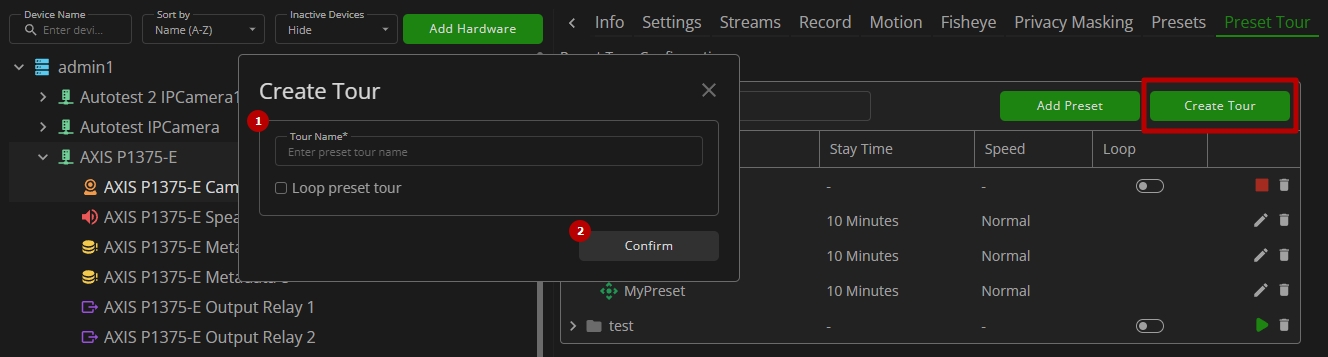
- Configure the tour parameters:
- Enter the preset tour name
- Select the Loop Preset Tour checkbox to enable the preset tour cyclic playback
- Click the Confirm button
To add a preset to the tour, select the Add Preset button. In the Add Preset pop-up window:
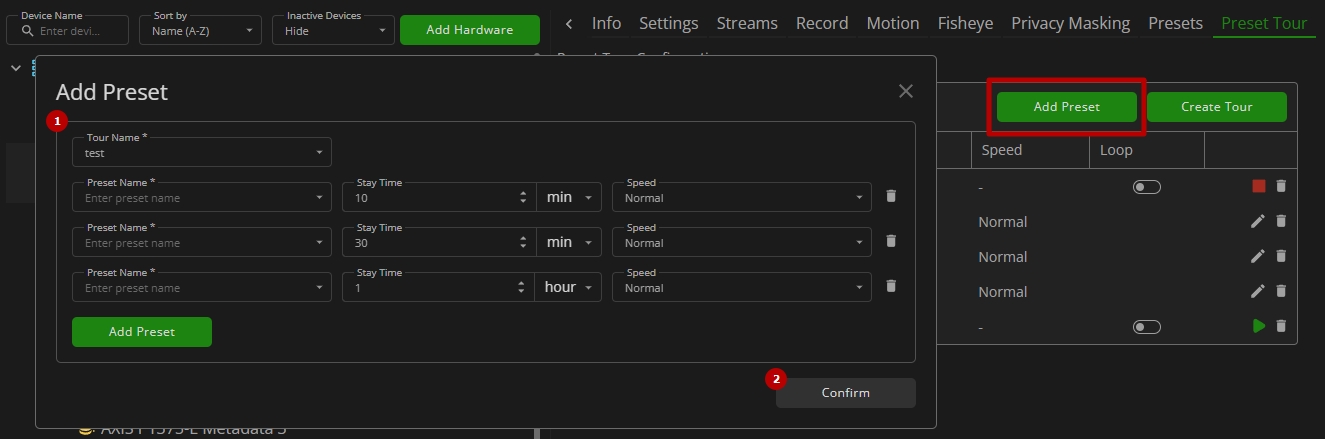
- Set the required parameters:
- Select the desired tour from the drop-down list to contain the presets
- Select the desired preset name from the drop-down list
- Enter the required preset stay time and select the desired time value from the drop-down list:
- Seconds
- Minutes
- Hours
- Choose the transition speed from the drop-down menu:
- Lowest
- Low
- Normal
- High
- Highest
- Click the Add Preset button to add one more preset to the tour
- Click the Delete icon to delete the required preset from the tour
- Click the Confirm button
- The Add Preset button is available only when at least one preset tour is created.
- The Stay Time parameter determines the time for which the selected preset is displayed during the preset tour playback.
- The Speed parameter is responsible for the rate at which the selected preset replaces the previous one during preset tour playback.
- The delete icon becomes available in each preset row only if the tour contains 2 or more presets.
- The number of presets within one tour is not limited.
- The same preset can be positioned within different tours without any limits.
- The same preset can be duplicated on different positions within one tour.
To edit the required preset, select the Edit icon on the toolbox. In the Edit Preset pop-up window:
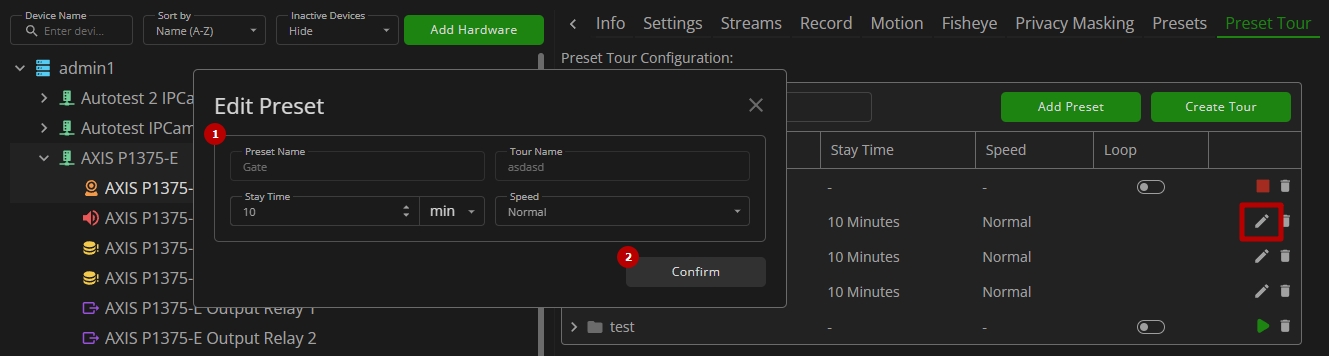
- Change the required parameters:
- Enter the required preset stay time and select the desired time value from the drop-down list:
- Seconds
- Minutes
- Hours
- Choose the transition speed from the drop-down menu:
- Lowest
- Low
- Normal
- High
- Highest
- Enter the required preset stay time and select the desired time value from the drop-down list:
- Click the Confirm button to apply changes
- The Preset Name and Tour Name fields are not available for editing.
- The Stay Time parameter is responsible for determining the duration for which the selected preset is displayed during the preset tour playback.
- The Speed parameter is responsible for the rate at which the selected preset replaces the previous one during preset tour playback.
To delete the required tour or preset:

- Select the Delete icon on the toolbox
- Confirm the intention in the pop-up window
Camera: Plugins Tab
The Plugins tab allows viewing and managing all analytics related to the selected camera. Tab's functional menu allows to:
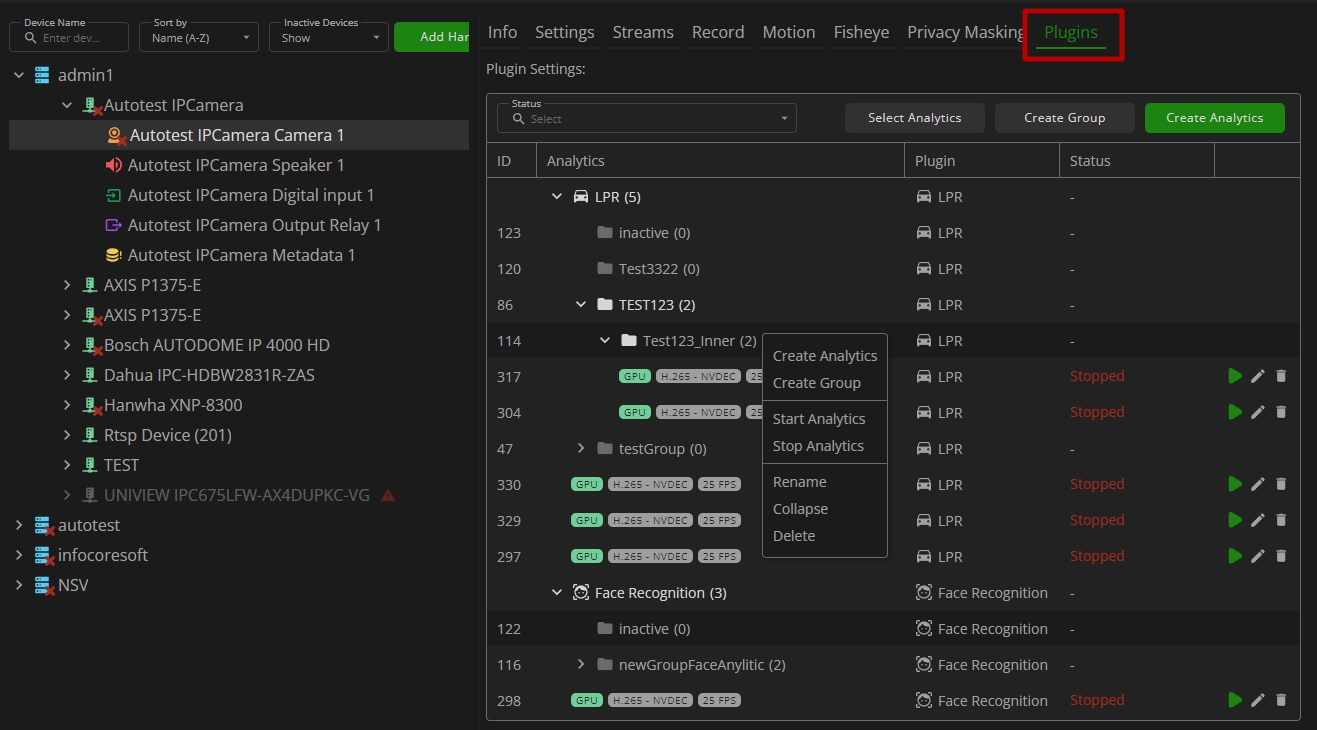
- Select the desired analytics status from the Status drop-down list to filter analytics
- Click the Create Group button to create a new analytics group:
- Select the desired plugin in the pop-up window
- Enter a new analytics group name within the Root group of the chosen plugin
- Press Enter to confirm the intention
- Right-click the desired analytics group and in the context menu:
- Select the Create Analytics option to create a new analytics for a desired plugin within the selected group
- Select the Create Group button to create a new analytics group within the selected one
- Choose the Start/Stop Analytics options to enable or disable all analytics within the selected group simultaneously
- Rename the selected analytics group
- Collapse the selected group's content if it's expanded
- Delete all analytics within the selected group simultaneously
- Right-click the desired analytics and in the context menu:
- Start/Stop the selected analytics
- Move the selected analytics to another group within the plugin
- Delete the selected analytics
To create a new analytics:
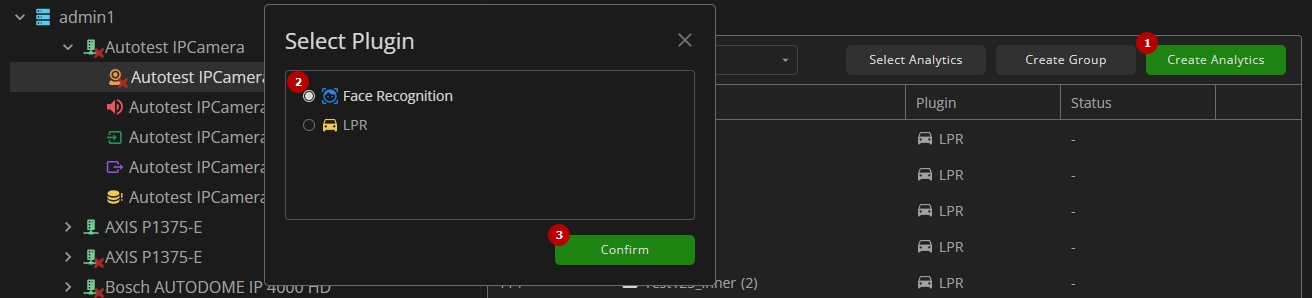
- Click the green Create Analytics button
- Select the desired plugin from the list
- Click the Confirm button
- Once the desired plugin is selected, proceed to set up the parameters of new analytics according to the specific plugin requirements:
- Create LPR Analytics
- Create Face Recognition Analytics
- The camera currently being viewed is automatically selected when creating analytics. This selection, including the stream, can be changed at any time if other options are available.
To edit the required analytics, select the Edit icon and proceed to edit the parameters of the selected analytics according to the specific plugin requirements:
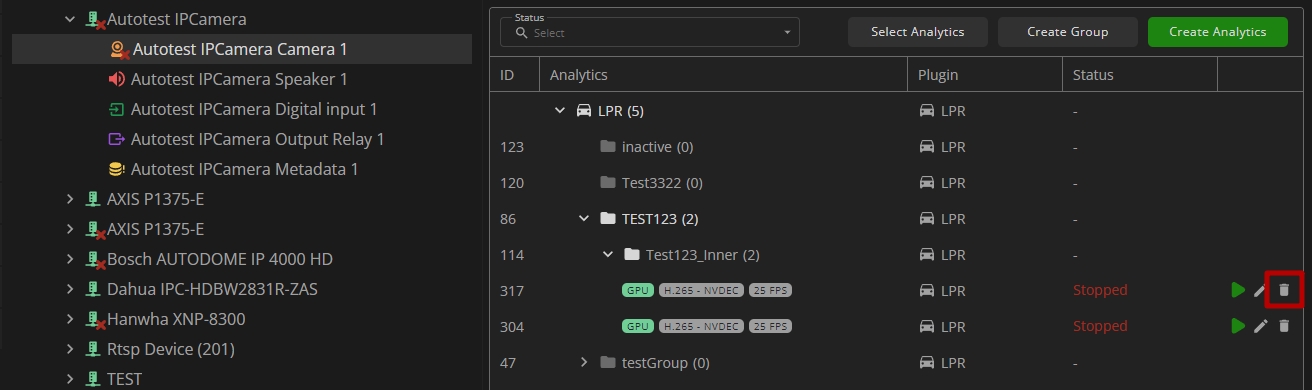
To enable or disable the analytics and view the change in the analytics status:
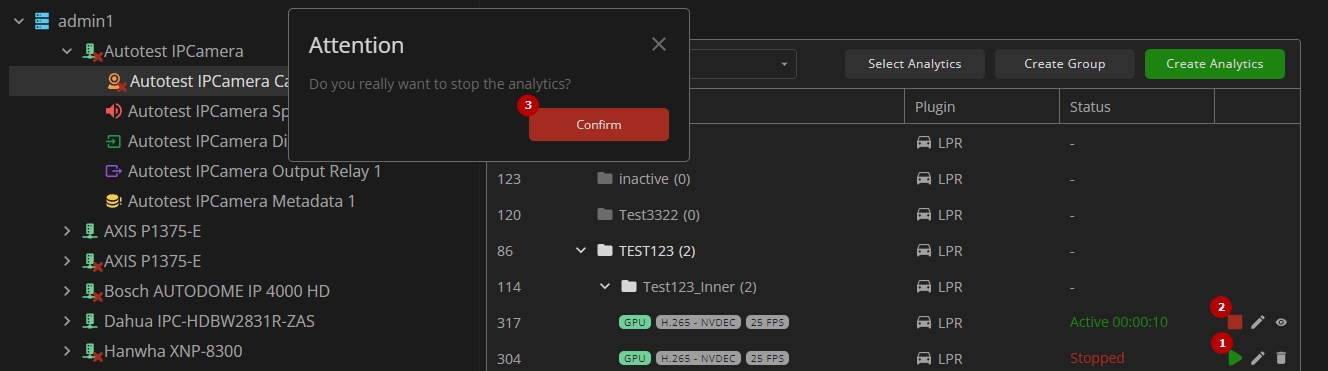
- Select the Start button to enable the analytics
- Click the Stop button to disable the analytics process
- Confirm the intention
To enable or disable multiple analytics at once, click the Select Analytics button:

The Select Analytics functional menu allows to:

- Check the boxes next to the required groups or separate analytics to select them
- Click the Start Analytics button and confirm the intention in the pop-up window to enable all selected analytics
- Click the Stop Analytics button and confirm the intention in the pop-up window to disable all selected analytics
- Click the Cancel button to quit the analytics selection
To view the required analytics live, click the View icon:
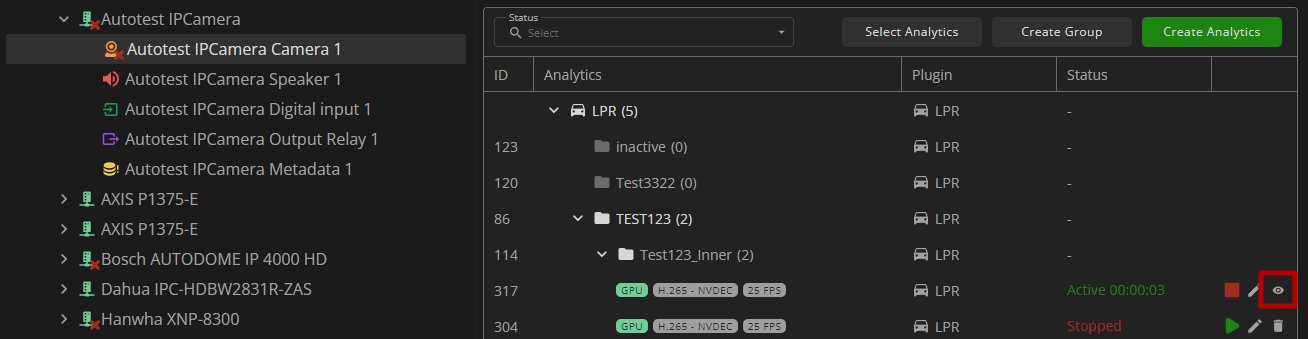
To delete the analytics:
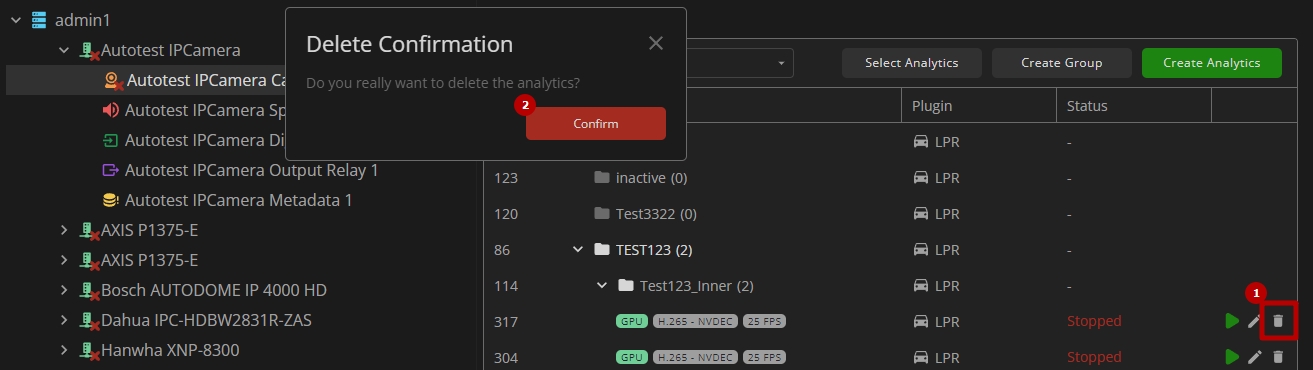
- Select the Delete icon on the toolbox
- Confirm the intention
Microphone Parameters
The Microphone device item features the Info tab, which enables the following actions:

- View the microphone name and edit it by clicking the Edit icon
- View the microphone description and edit it by clicking the Edit icon
Speaker Parameters
The Speaker device item features the Info tab, which enables the following actions:

- View the speaker name and edit it by clicking the Edit icon
- View the speaker description and edit it by clicking the Edit icon
Metadata Parameters
The Metadata device item features the Info tab, which enables the following actions:
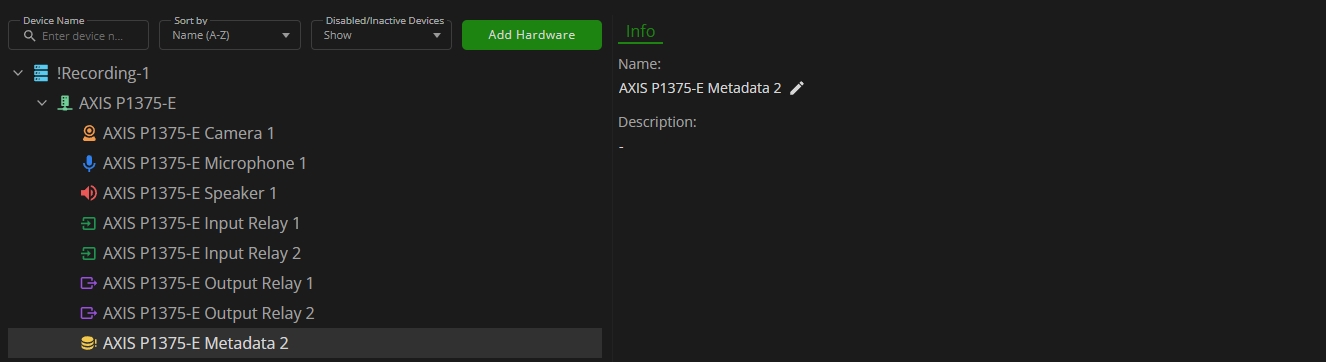
- View the metadata device item name and edit it by clicking the Edit icon
- View the metadata device item description and edit it by clicking the Edit icon
Input Parameters
The Input device item parameters are organized into the following tabs:
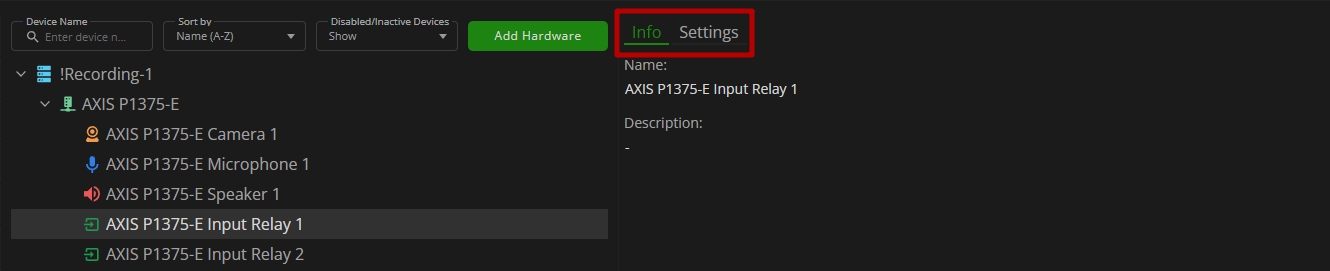
Input: Info Tab
The Info tab allows to:

- View the input device item name and edit it by clicking the Edit icon
- View the input device item description and edit it by clicking the Edit icon
Input: Settings Tab
The Settings tab allows:

- Selecting the input normal state:
- Closed circuit
- Open circuit
- Turn on the Supervised mode to make it possible to detect and trigger actions if someone tampers with the connection to digital I/O devices. In addition to detecting if an input is open or closed, you can also detect if someone has tampered with it (that is, cut or shorted).
- The supervised connection requires additional hardware (end-of-line resistors) in the external I/O loop.
- The Supervised mode is available only for devices using the AXIS driver that support supervised input functionality.
Output Parameters
The Output device item parameters are organized into the following tabs:
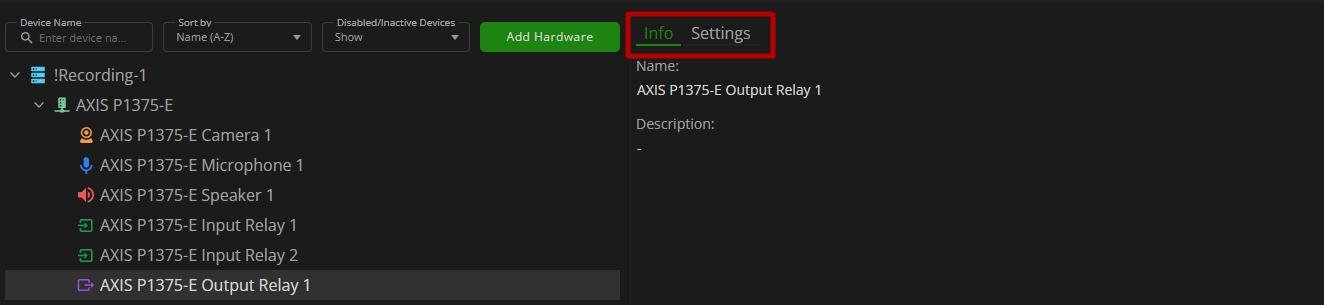
- The switching between tabs is available by clicking on their names.
- The selected tab is always highlighted.
Output: Info Tab
The Info tab allows to:

- View the output device item name and edit it by clicking the Edit icon
- View the output device item description and edit it by clicking the Edit icon
Output: Settings Tab
The Settings tab allows to:

- Select the output normal state:
- Closed circuit
- Open circuit
- Turn on the Enabled mode to force the output relay into the selected normal state, overriding control commands