Recording Servers
Overview
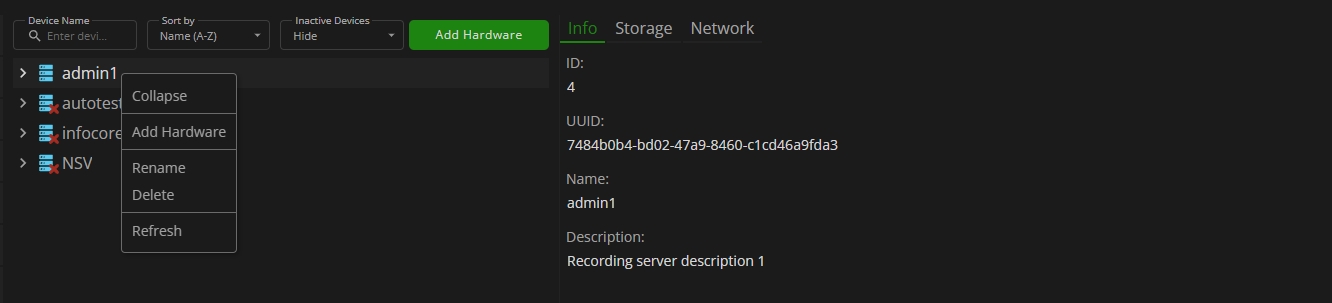
To access recording servers, select the Recording Servers item in the main menu:

Use and Functionality
The Recording Servers item shows recording servers, devices, and their device items. The item's functional menu allows to:
- Enter the device name or characters in the name in the Device Name search field to filter devices
- Sort devices by:
- Newest first
- Oldest first
- Name (A-Z)
- Name (Z-A)
- Select the inactive and manually disabled device display mode:
- Show
- Hide
- Right-click the required server, and in the drop-down menu:
- Select the Collapse option to collapse the server content if it was expanded
- Choose the Add Hardware option to connect the required devices to the server
- Rename the selected server
- Delete the selected server
- Refresh the server status/settings
- Right-click the required device, and in the drop-down menu:
- Select the Collapse option to collapse the device content if it was expanded
- Select the Edit Device option to change the device connection parameters
- Select the Add New Device Item option to add more device items to the selected device
- Select the Change Driver option to change the driver for the selected device
- Rename the selected device
- Delete the selected device
- Enable/disable the device usage in system processes
- Refresh the device status/settings
- Right-click the required device item, and in the drop-down menu:
- Rename the selected device item
- Refresh the device item status/settings
- Delete the device item from the recording server
- If the Inactive Devices mode is set to Show, all inactive and manually disabled devices are displayed in the device list with gray names and the tooltip with the device status description.
- If there is an issue with a device driver and it becomes unavailable, the device and its associated items will be assigned the Inactive Device status. Inactive devices and related device items are not available for use in system processes.
- If a device has existing associated processes (rules, alarms, analytics), it cannot be manually disabled. Before disabling, ensure the selected device is manually removed from all related processes.
- If a device is manually disabled, all device items associated with that device are automatically removed from any layouts or maps/plans where they are used.
- If a device item has existing associated processes (rules, alarms, analytics), it cannot be deleted from the recording server. Before deletion, ensure that the device item is manually removed from all related processes.
- Manually disabled devices are only visible in the Recording Server list and are excluded from all system processes as if these devices and related device items do not exist in the system.
- If a recording server does not have a configured storage, it is unavailable for adding devices.
Add Camera to RTSP Device
To add a new camera to the RTSP device, right-click the RTSP device name and select the Add New Device Item option from the context menu. In the pop-up window:
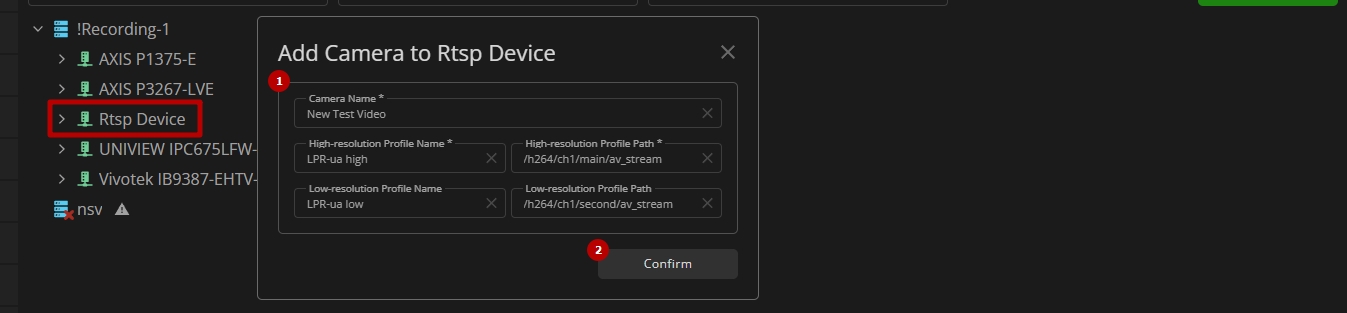
- Fill in the required fields:
- Enter the camera name
- Enter the high-resolution stream profile name and specify the path
- Enter the low-resolution stream profile name and specify the path
- Click the confirm button to save the new camera
Add Hardware
To connect a new device to the server, click the Add Hardware button. The Add Hardware pop-up window comprises 6 tabs:

- General
- Credentials
- Drivers
- Network
- Detection
- Configuration
- The Drivers and Network tabs are disabled upon Express hardware detection method selection.
- The Credentials tab is disabled upon IP Address Range Scanning and Manual hardware detection methods selection.
Step 1. Set the desired hardware detection method in the General tab:
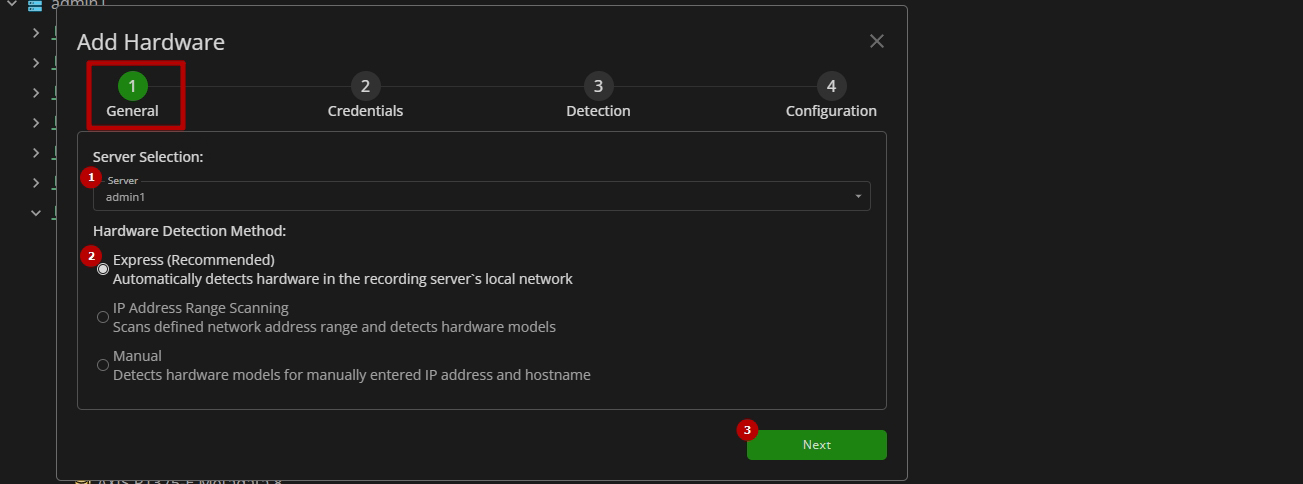
- Select the desired server with configured storage
- Select the Express method to detect hardware in the recording server's local network automatically
- Click the Next button to proceed
Step 2. Configure the access parameters in the Credentials tab:
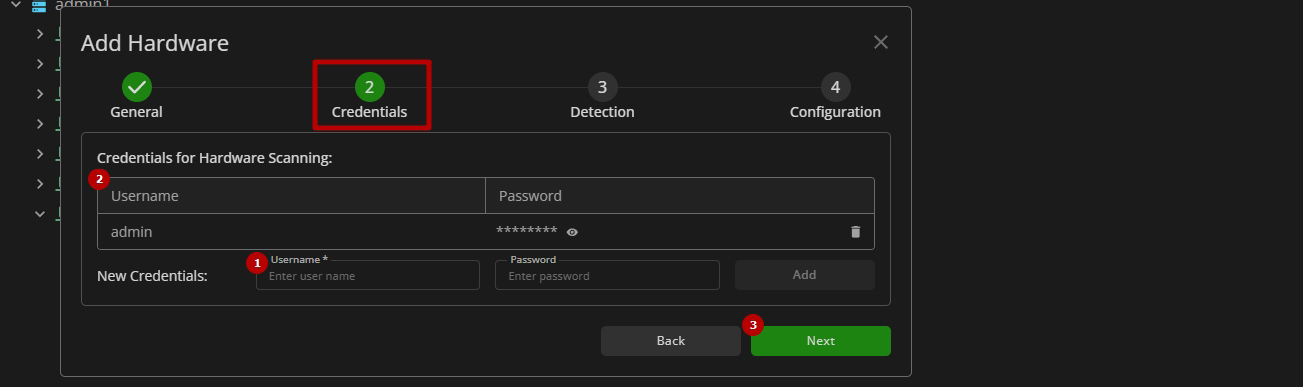
- Add user credentials:
- Enter the username
- Enter the user password (optional)
- Click the Add button
- View added users and their credentials in the table
- Click the Next button to proceed
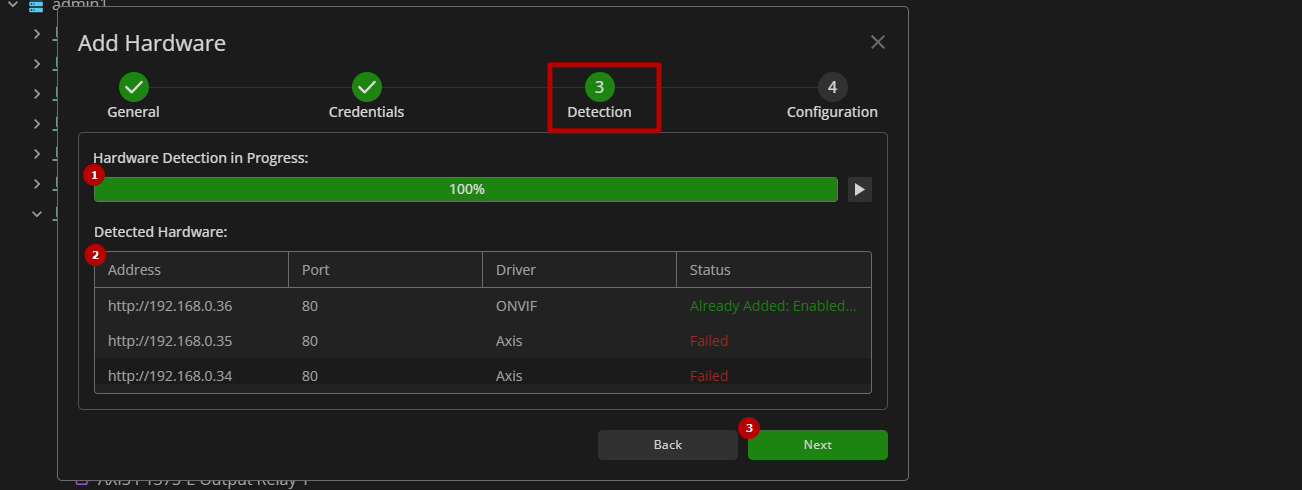
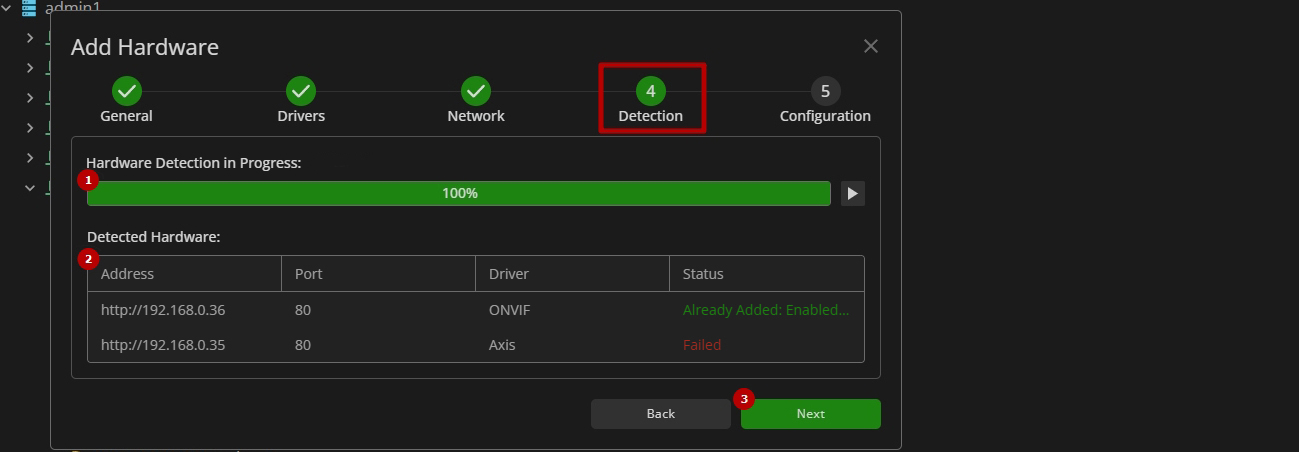
Step 3. Wait for the hardware detection process to complete in the Detection tab:
 .
.
- Manage the detection process:
- View the detection progress bar
- Click the Start button to start the detection process again after its completion
- Click the Stop button to stop the detection process without waiting for its completion
- View the detected hardware information and its detection status in the table
- Click the Next button to proceed
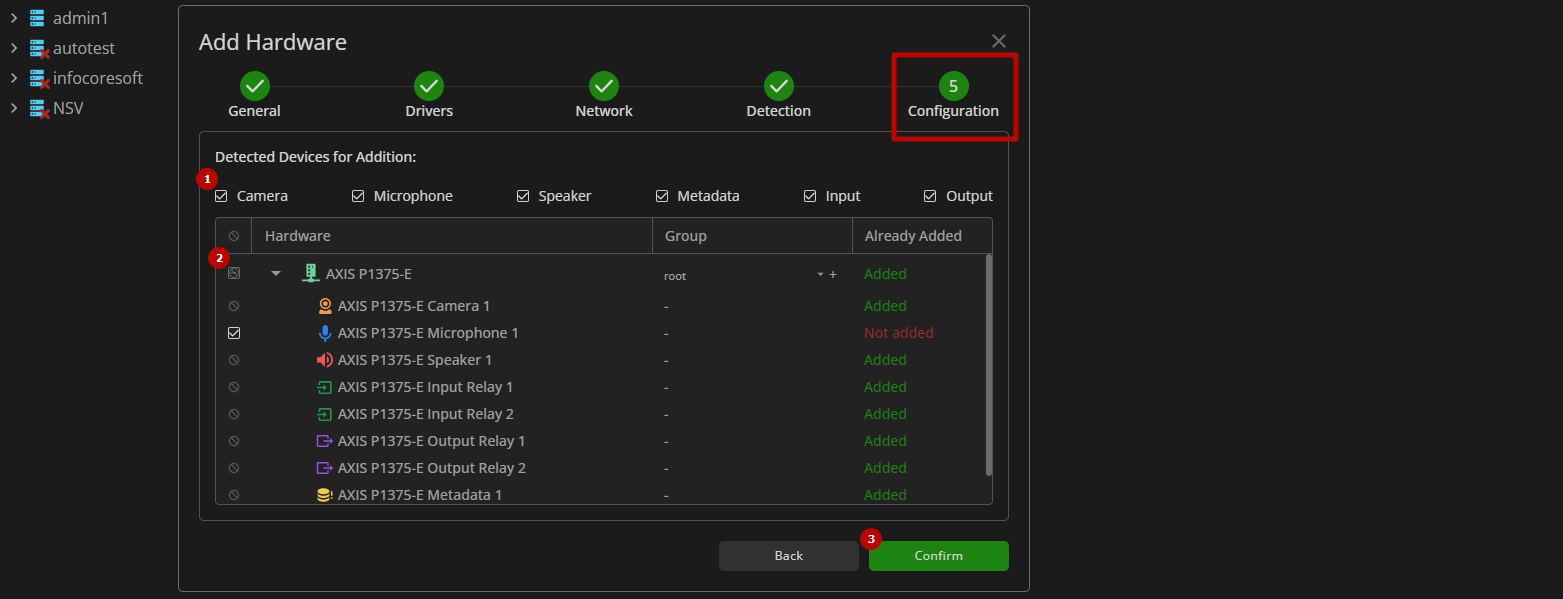
Step 4. Configure the detected hardware in the Configuration tab:
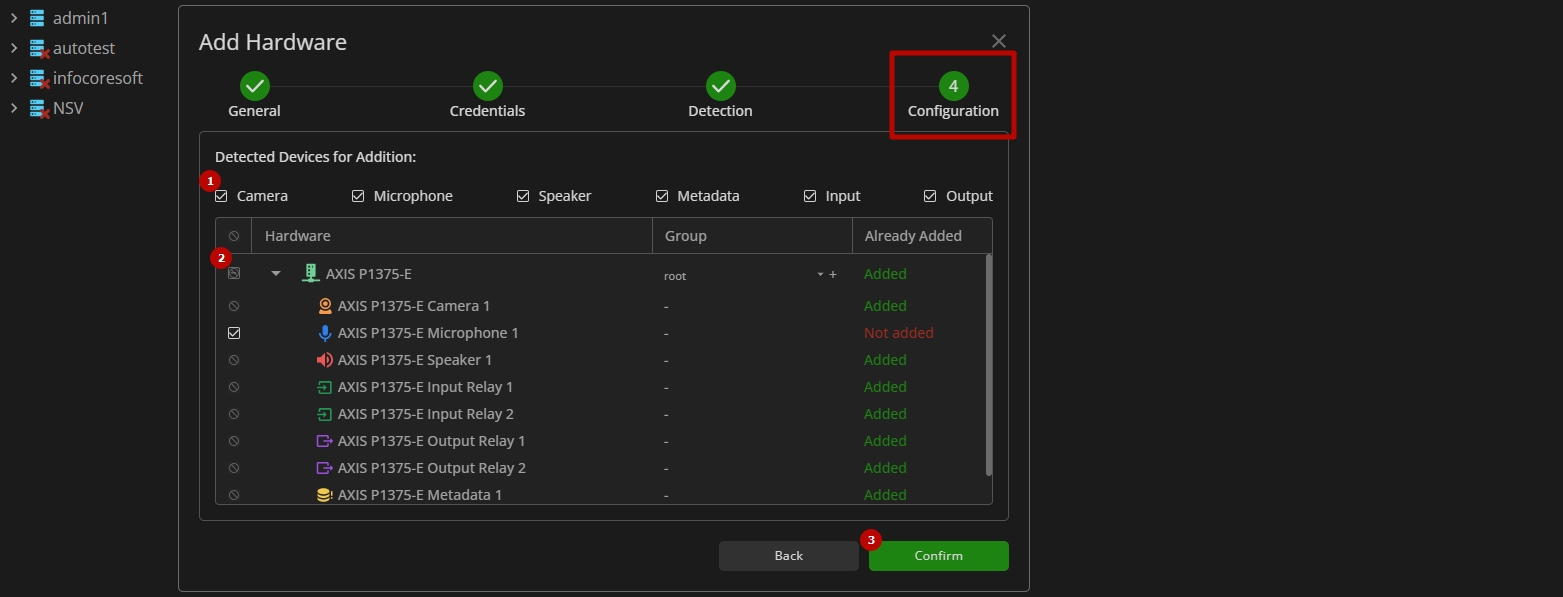
- Check the boxes next to the desired device categories to add device items of the selected categories only
- Manage the detected devices in the table:
- Check the boxes for the required devices or device items in the first column to enable them in the system, or check the box in the column's title to select all checkboxes at once
- Select the required group from the drop-down list to organize new devices or create a new group by clicking the "+" button. In the Create New Group pop-up window:
- Enter a new group name
- Select a folder for a new group location
- Click the Confirm button
- Click the Confirm button to finish the process
- All devices are located in the root folder by default.
- If the detected device has already been added in the system, it's new device items are still available for adding by selecting their checkboxes in the first column.
Step 1. Set the desired hardware detection method in the General tab:
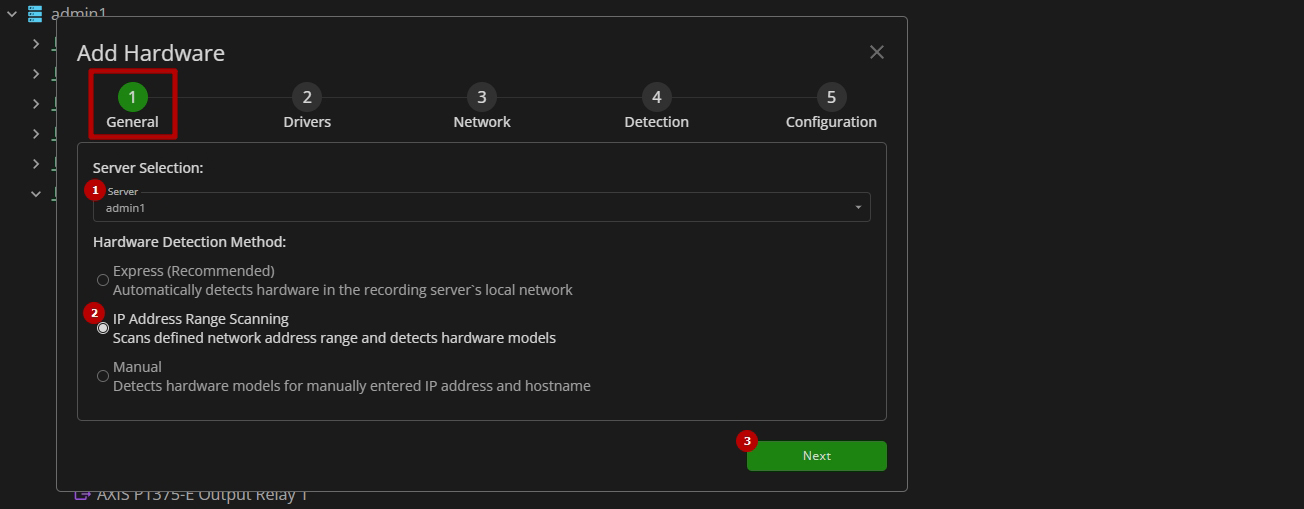
- Select the desired server
- Select the IP Address Range Scanning method, to detect the devices in the defined range of network addresses
- Click the Next button to proceed
Step 2. Set the desired driver in the Drivers tab:

- Select the required driver from the list
- Click the Next button to proceed
Step 3. Configure the network parameters in the Network tab:
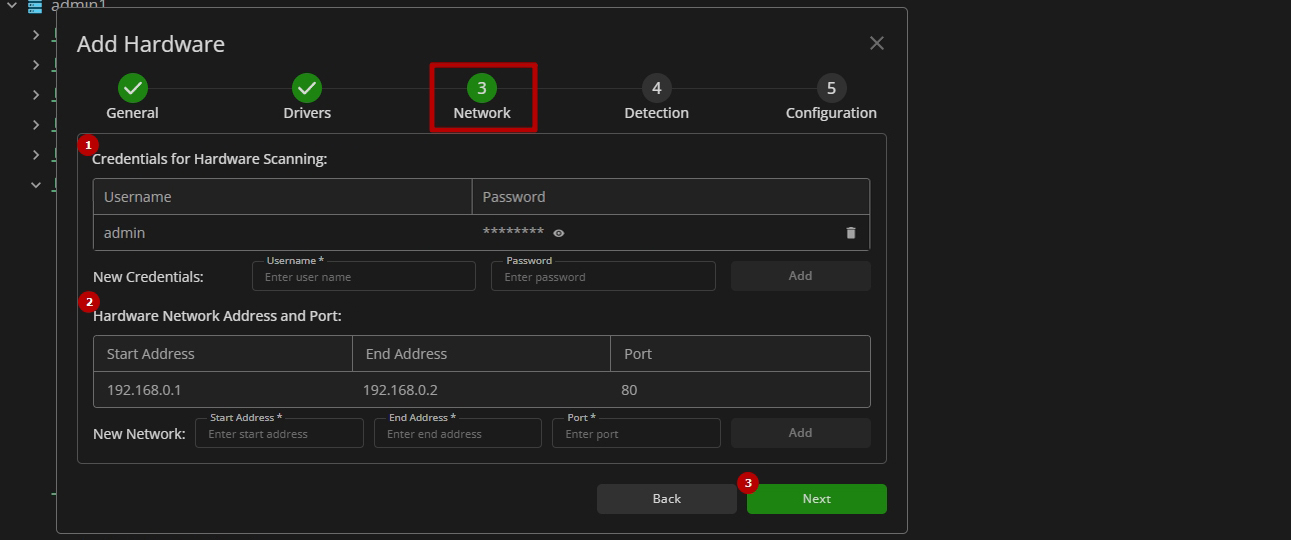
- Specify user credentials:
- Enter username
- Enter user password
- Click the Add button
- Set the hardware address range and port:
- Enter the start and end addresses in the required range
- Enter the port
- Click the Add button
- Click the Next button to proceed
- All users added to the table must have access to the new device.
- The Start Address and End Address fields must be filled with valid IP addresses only, website names are prohibited.
Step 4. Wait for the hardware detection process to complete in the Detection tab:
- Manage the detection process:
- View the detection progress bar
- Click the Start button to start the detection process again after its completion
- Click the Stop button to stop the detection process without waiting for its completion
- View the detected hardware information and its detection status in the table
- Click the Next button to proceed
Step 5. Configure the detected hardware in the Configuration tab:

- Check the boxes next to the desired device categories to add device items of the selected categories only
- Manage the detected devices in the table:
- Check the boxes for the required devices or device items in the first column to enable them in the system, or check the box in the column's title to select all checkboxes at once
- Select the required group from the drop-down list to organize new devices or create a new group by clicking the "+" button. In the Create New Group pop-up window:
- Enter a new group name
- Select a folder for a new group location
- Click the Confirm button
- Click the Confirm button to finish the process
- All devices are located in the root folder by default.
- If the detected device has already been added in the system, it's new device items are still available for adding by selecting their checkboxes in the first column.
Step 1. Set the desired hardware detection method in the General tab:
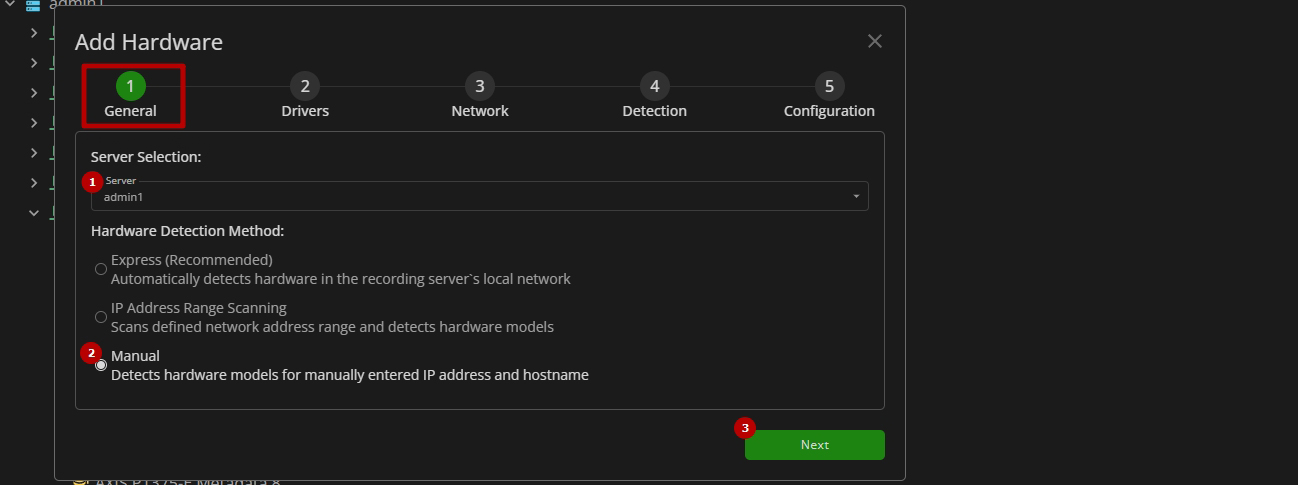
- Select the desired server
- Select the Manual method, to detect devices for manually entered IP address or hostname
- Click the Next button to proceed
Step 2. Set the desired driver in the Drivers tab:
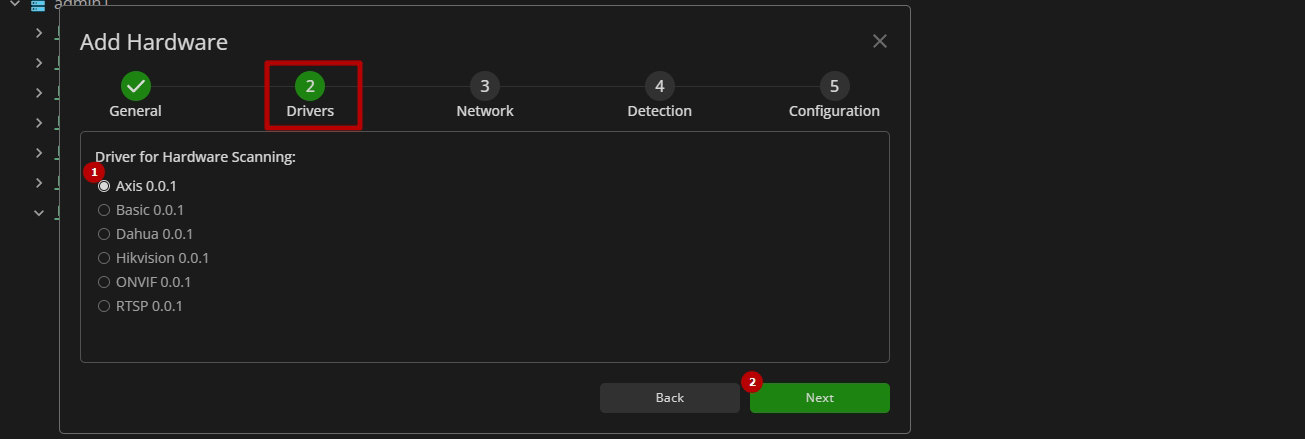
- Select the required driver from the list
- Click the Next button to proceed
Step 3. Configure the network parameters in the Network tab:
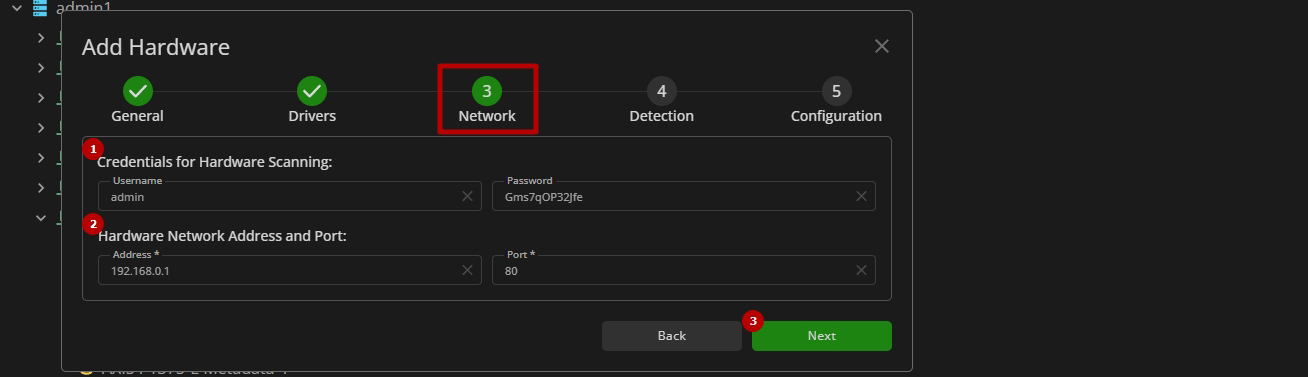
- Specify username and password (optional)
- Set the hardware address (or hostname) and port
- Click the Next button to proceed
Step 4. Wait for the hardware detection process to complete in the Detection tab:

- Manage the detection process:
- View the detection progress bar
- Click the Start button to start the detection process again after its completion
- Click the Stop button to stop the detection process without waiting for its completion
- View the detected hardware information and its detection status in the table
- Click the Next button to proceed
Step 5. Configure the detected hardware in the Configuration tab:
- Check the boxes next to the desired device categories to add device items of the selected categories only
- Manage the detected devices in the table:
- Check the boxes for the required devices or device items in the first column to enable them in the system, or check the box in the column's title to select all checkboxes at once
- Select the required group from the drop-down list to organize new devices or create a new group by clicking the "+" button. In the Create New Group pop-up window:
- Enter a new group name
- Select a folder for a new group location
- Click the Confirm button
- Click the Confirm button to finish the process
- All devices are located in the root folder by default.
- If the detected device has already been added in the system, it's new device items are still available for adding by selecting their checkboxes in the first column.
Edit Device
To edit the device connection parameters, right-click the selected device and choose the Edit Device option from the drop-down menu. In the Edit Device pop-up window:
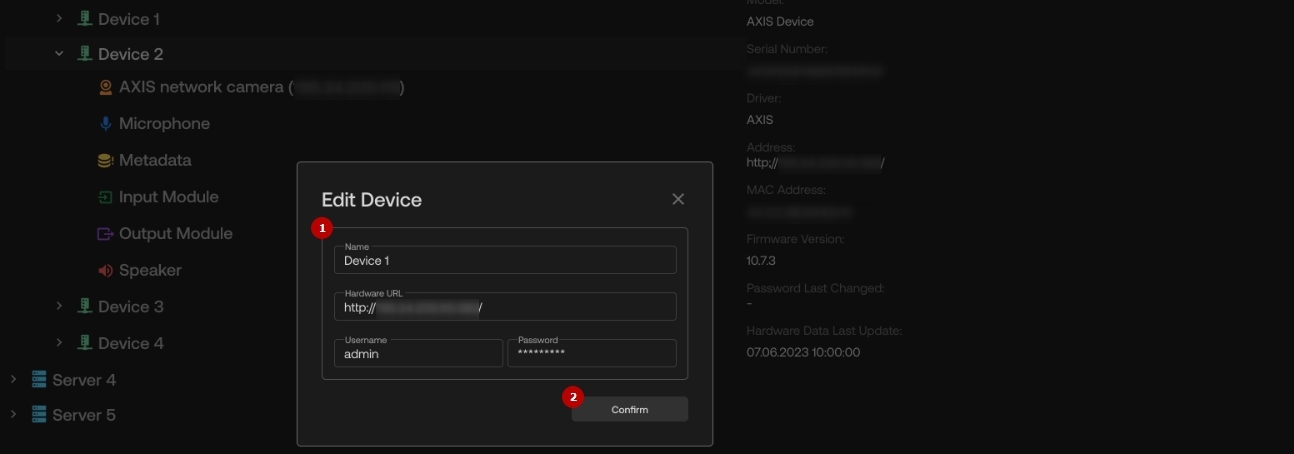
- Edit the required fields:
- Device name
- Hardware URL
- Username and password
- Click the Confirm button to save changes
Add New Device Item
To add new device items to the desired device, right-click the device and select the Add New Device Item option from the drop-down menu. In the Add New Device Items pop-up window:
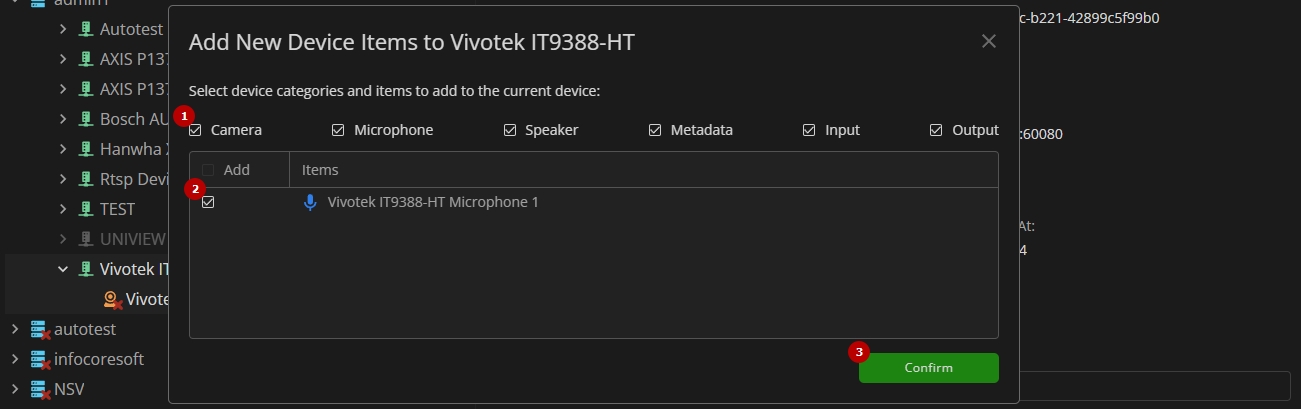
- Check the boxes next to the desired device categories to add device items of the selected categories only
- Check the boxes for the required device items in the Add column to select them, or check the box in the Add column's title to select all device items at once
- Click the Confirm button to add new selected device items to the device in the system
Change Device Driver
To change the driver for the desired device, right-click the device and select the Change Driver option from the drop-down menu. The Change Device Driver pop-up window comprises 3 tabs:
- Driver
- Replace Device Elements
- Information
Step 1. In the Drivers tab, select a new driver:
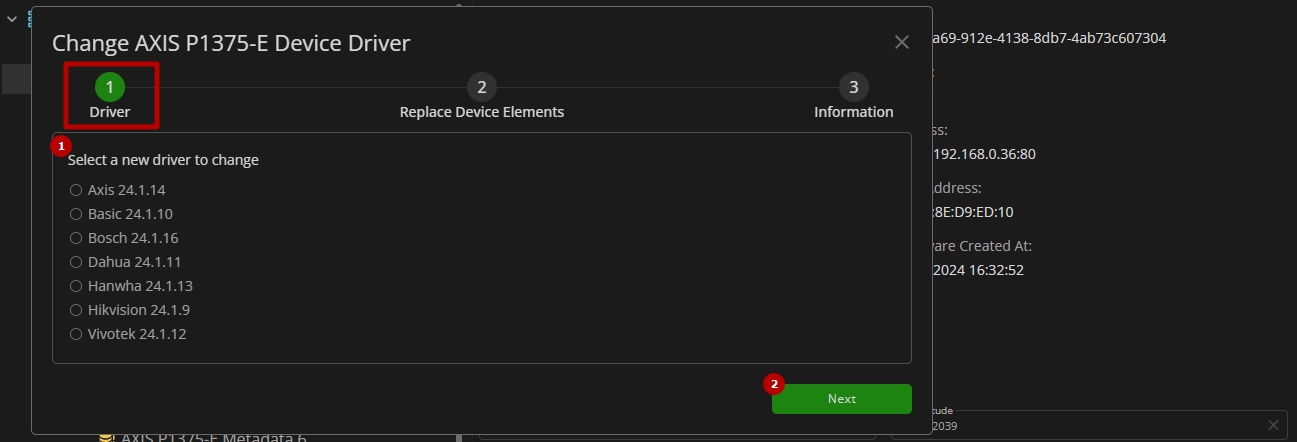
- Choose a single desired driver from the driver list
- Click the Next button to proceed
Step 2. In the Replace Device Elements tab, select new required device items to replace the current in use:

- Check the boxes next to the new desired device items
- Select the current device item from the drop-down list to inherit by the new one
- Click the Next button to proceed
Step 3. In the Information tab, review information about the changes that will occur if you proceed with the driver replacement:
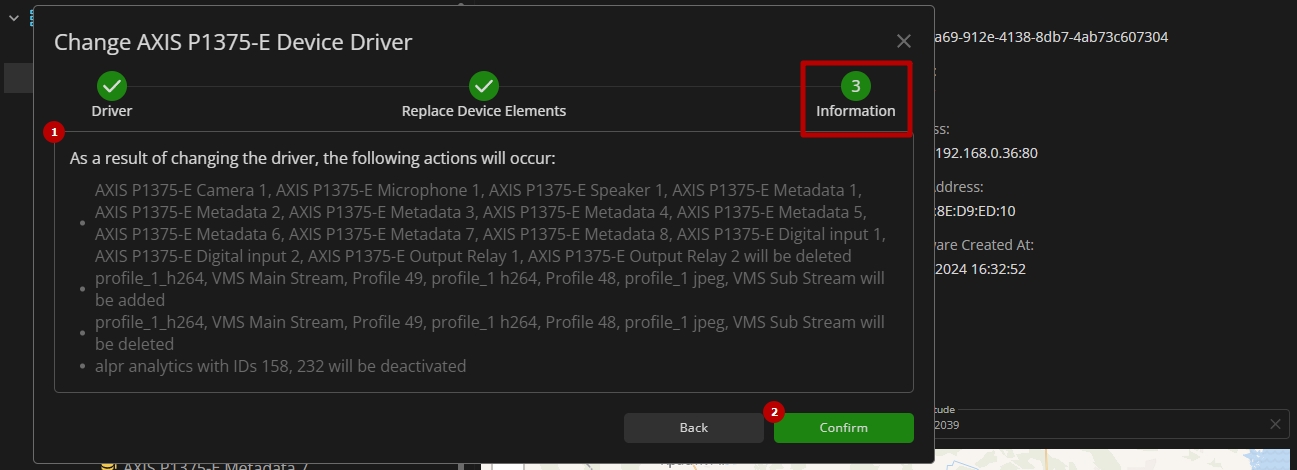
- See the list of changes
- Click the Confirm button to apply changes and replace the device driver
Parameters Configuration
Each server, device, and device item has its own editable parameters: