LPR Tab: Search
This page comprises the Search section overview and functionality description. The section displays the vehicle search results including a license plate number, make and model, various vehicle attributes, date and time, camera data, and frame with a vehicle.
Overview
To access search results, select the Search section in the LPR plugin menu:

Use and Functionality
The Search functional menu allows to:

- Enter the license plate number or part of the number
- Enter the ADR code or part of the code
- Click the Select by Radius parameter to set the area for search. In the pop-up window:
- Enter the radius in kilometers
- Click the map at the desired spot to set the center of the search circle
- Select the Confirm button
- Select the required time frame
- Click the Analytics parameter to choose the desired video analytics. In the pop-up window:
- Check the boxes next to the required video analytics and groups
- Click the Confirm button
- Select the required list name, the All Lists or Off the List option from the drop-down list
- Select the estimated vehicle's:
- Color
- Make
- Model
- Country of registration
- Direction of movement
- Type
- Click the Search button to start filtering
- Click the Reset button to clear the filters
- Select the Auto Update toggle to enable or disable real-time update of the search results
- Click the Export Report button to download the report. In the Export Settings pop-up window, set the parameters:
- Select the required report file format:
- CSV
- Enter the required number of the newest results collected for the report
- Select the Add Frames with License Plate Numbers checkbox to include relevant cropped photos of license plates in the report
- Select the Add Full Size Event Frame checkbox to include full-size event frames in the report
- Click the Confirm button to generate the report
- Select the required report file format:
- Move between List and Grid view modes by clicking the corresponding toggle
To streamline selection, the Make, Model, and Country fields allow entering part of the name to filter drop-down options.
Once selected and filtered, in the search results:
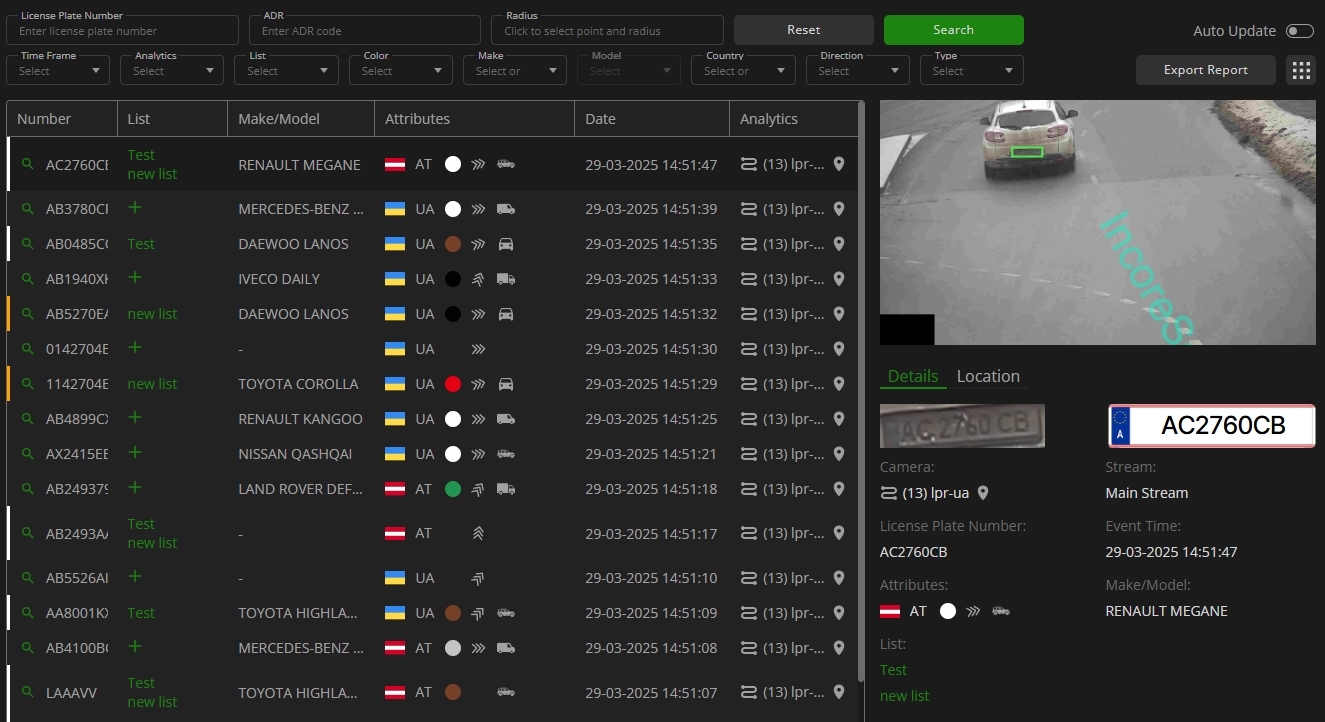
- Click the Magnifying Glass icon next to the required number to filter search results only for the selected number
- View recognized vehicle data, date and time the license plate number has been recognized by the selected analytics
- View recognized vehicle attributes:
- Country of registration
- Color of the vehicle
- Direction of movement
- Vehicle type:
- Car
- Motorbike
- Bus
- Truck
- Van
- Pickup
- SUV
- ADR code (in case a vehicle carries dangerous goods)
- Click the list name to open the View List item or add a license plate number to the required list by clicking the "+" button. In the Create Vehicle Card pop-up window:
- Verify the license plate number
- Select a required list
- Write a comment about the license plate number
- Click the Confirm button
- View the vehicle route and camera location on the map by clicking the corresponding icons in the Analytics column
- Click the row in the table with the desired license plate number to see the frame with a vehicle preview. Each search result comprises:
- Details tab, to view the recognized vehicle information and other data
- Location tab, to view the camera location on the map
To view the specific search result details, click the frame preview. In the pop-up window:
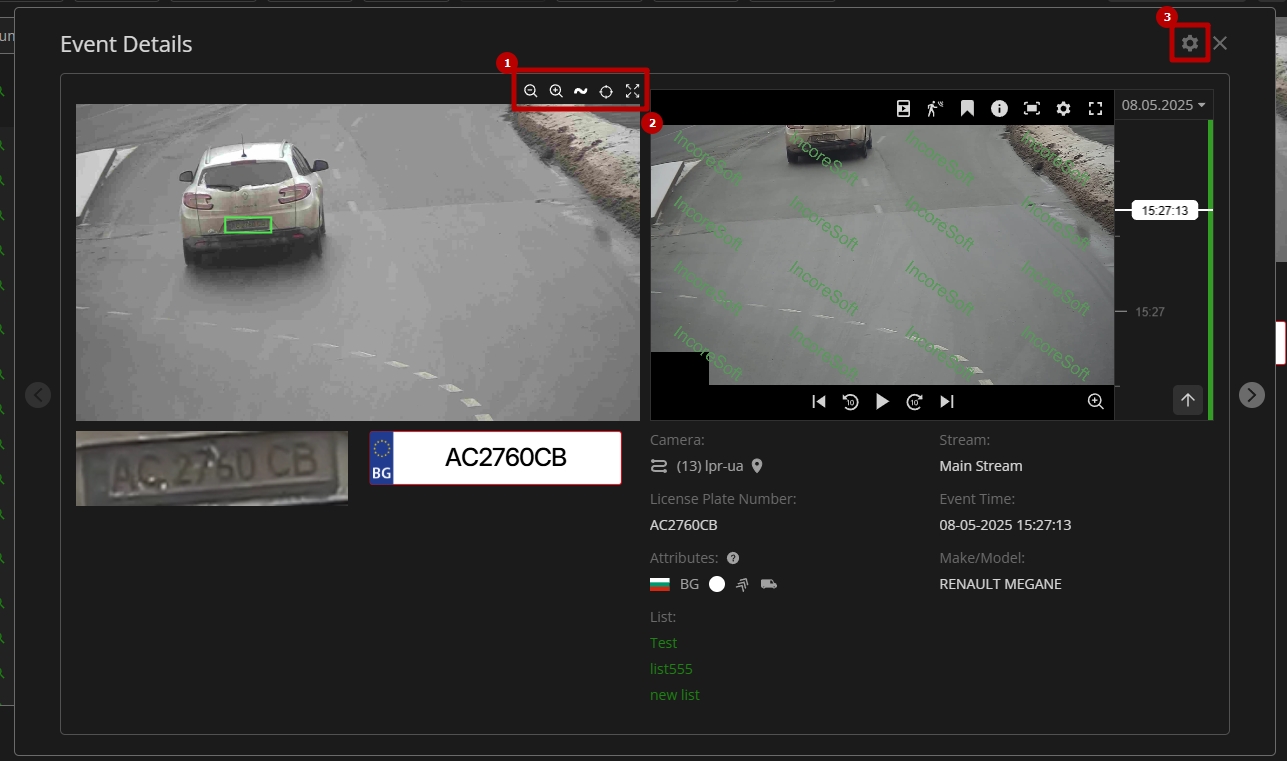
- Use frame view tools:
- Zoom Out icon (-) to zoom out from a specific area of the frame
- Zoom In icon (+) to zoom in on a specific area of the frame
- Reset View icon (~) to reset the frame to its original size and position
- Target icon to zoom in on the detected object in the frame
- Enlargement icon to open the frame in full-screen (in the full-screen press the Esc button to return to default view)
- Use video management tools to interact with the video fragment associated with the detected event:
- Navigate through the recording using the playback controls below the video frame:
- Play or pause the video
- Skip forward or backward by 10 seconds
- Step forward or backward frame by frame
- Use the camera management tools available in the upper-right corner of the video frame:
- Show on Layout, to open the camera view in a separate tab on the navigation panel
- Motion
- Bookmark
- Information
- Snapshot
- Camera Settings
- Full Screen
- Click the Zoom icon below the video frame to:
- Zoom the frame in and out using the mouse wheel or the "+" and "-" buttons
- Move across the zoomed-in frame by holding and dragging it
- Use the timeline on the right of the video frame to browse through the video:
- Scroll the mouse wheel to zoom in or out on the timeline for more or less detail
- Click and drag the timeline to navigate earlier or later in the footage
- Click the date field at the top of the timeline to open a calendar and select a specific date
- Use the Go to Live button at the bottom of the timeline to jump to the real-time video stream
- Navigate through the recording using the playback controls below the video frame:
- Hover the mouse over the Extra Options icon. In the drop-down menu:
- Select the Add to List option to add the vehicle to the desired list
- Click the Save Image option to download the frame with a vehicle in full-size
- Select the Export PDF option to download the PDF report of the selected search result
- "<" and ">" arrow buttons at the pop-up window's sides allow switching between search results.
- Hover the mouse over the bounding box in the frame to see its width and height parameters in pixels.
- For detailed descriptions of all camera management tools, refer to the View Grid: Camera documentation.