User Access Rights: Cameras Tab
Overview
The camera and camera group permissions include:
Hierarchy | Permission Name | Description | Required Permission |
|---|---|---|---|
Primary | View Cameras | Grants access to the selected camera or camera group. | — |
Secondary | Hide Watermark | Disables watermark overlaying on video from the selected camera or camera group. | View Cameras |
Secondary | Hide Privacy Masking | Disables privacy masking on video streams from the selected camera or camera group. | View Cameras |
Secondary | View Live | Grants access to view live video streams from the selected camera or camera group. | View Cameras |
Secondary | Export Video | Grants access to the Export tab of the Client Panel and allows exporting video from the selected camera or camera group. | View Cameras |
Secondary | Create Snapshot | Allows the creation of a snapshot from the selected camera or camera group. | View Cameras |
Secondary | Control Manually | Allows to control PTZ manually for the selected camera or camera group. | View Cameras |
Secondary | View PTZ Presets | Allows to view and switch PTZ preset positions for the selected camera or camera group. | View Cameras |
Secondary | View Alarms | Grants access to all alarms related to the selected camera or camera group and allows viewing search results filtering by Alarms category. | View Cameras |
Secondary | View Notifications | Grants access to all notifications in the Notification Panel related to the selected camera or camera group. | View Cameras |
Tertiary | View Playback | Grants access to view video recordings from the selected camera or camera group. | View Cameras, View Live |
Tertiary | Manage Alarms | Allows editing and managing alarms related to the selected camera or camera group. | View Cameras, View Alarms |
Quaternary | View Bookmarks | Grants access to view all bookmarks on the selected camera or camera group recordings. | View Cameras, View Live, View Playback |
Quinary | Create Bookmark | Allows the creation of bookmarks on the selected camera or camera group recordings. | View Cameras, View Live, View Playback, View Bookmarks |
Quinary | Edit Bookmark | Allows to edit bookmarks on the selected camera or camera group recordings. | View Cameras, View Live, View Playback, View Bookmarks |
Quinary | Delete Bookmark | Allows to delete bookmarks from the selected camera or camera group recordings. | View Cameras, View Live, View Playback, View Bookmarks |
- All secondary permissions require the previous assignment of the View Cameras primary permission. Otherwise, these options are blocked.
- All lower-order permissions (tertiary, quaternary, and quinary) require the prior assignment of their respective higher-order permissions. Without these permissions, the related lower-order options are inaccessible.
- Hovering the mouse cursor over the blocked permission allows viewing a list of all necessary permissions that must be assigned beforehand.
- The user has full access to the required camera or camera group features only if all permissions are selected within the assigned role.
- The user does not have any access to the required camera or camera group unless at least the View Cameras primary permission is selected within the assigned role.
Schedule Settings
To set the schedule for enabling View Live or View Playback permission, proceed with the following steps:
- Expand the View Live or View Playback section by clicking the Arrow icon
- Choose the operation time frames from the Within Schedule drop-down list:
- Always
- Mon-Fri
- Sat-Sun
- Custom
- Limit the playback duration by selecting the required option from the Limit Playback To drop-down list (available for View Playback permission only):
- No limit
- Last 5 minutes
- Last 10 minutes
- Last 30 minutes
- Last hour
- Last 6 hours
- Last day
- Last 2 days
To configure a custom schedule, select the Edit icon. In the Edit Custom Schedule pop-up window:
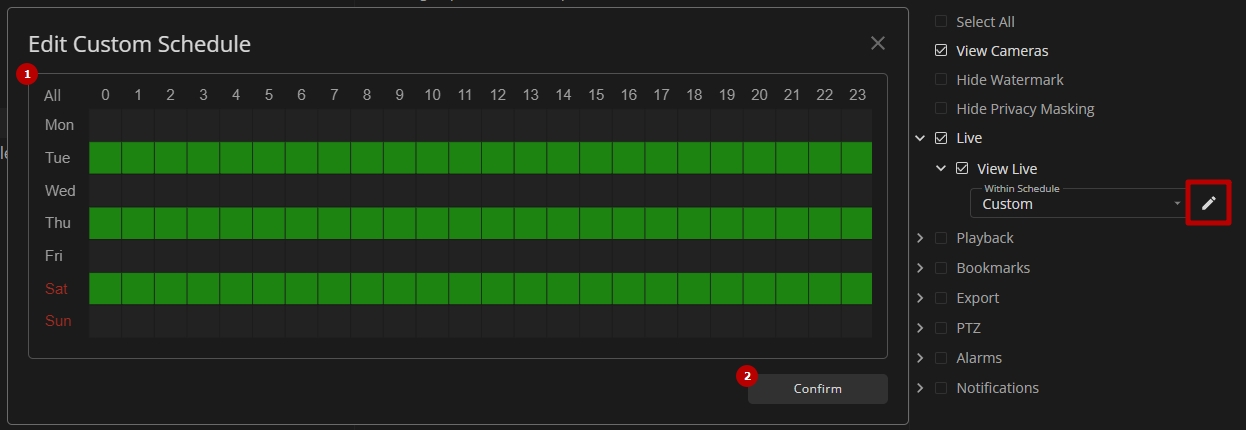
- Select/deselect the required operation hours for each day:
- Click the single cell to select/deselect it
- Hold and drag the mouse to select/deselect multiple cells in the required area
- Click the required hour to select/deselect the corresponding cell column
- Click the required day of the week to select/deselect the corresponding cell row
- Click the All button to select/deselect all cells in the table chart
- Click the Confirm button