LPR Speed Control: Events
This page comprises the Events item overview and functionality description. The item allows viewing the average speed of the recognized vehicles by the selected rule.
Overview
To access speed control events, in the LPR plugin menu:

- Expand the Speed Control section
- Select the Events item
Use and Functionality
The Events functional menu allows to:

- Enter the license plate number or part of the number
- Select multiple desired speed rules from the drop-down list
- Click the Select by Radius parameter to set the area for search. In the pop-up window:
- Enter the radius in kilometers
- Click the map at the desired spot to set the center of the search circle
- Select the Confirm button
- Select the required time frame
- Select the estimated vehicle's:
- Color
- Make
- Model
- Country of registration
- Type
- Click the Search button to start filtering
- Click the Reset button to clear the filters
To streamline selection, the Make, Model, and Country fields allow entering part of the name to filter drop-down options.
Once selected and filtered, in speed control events:
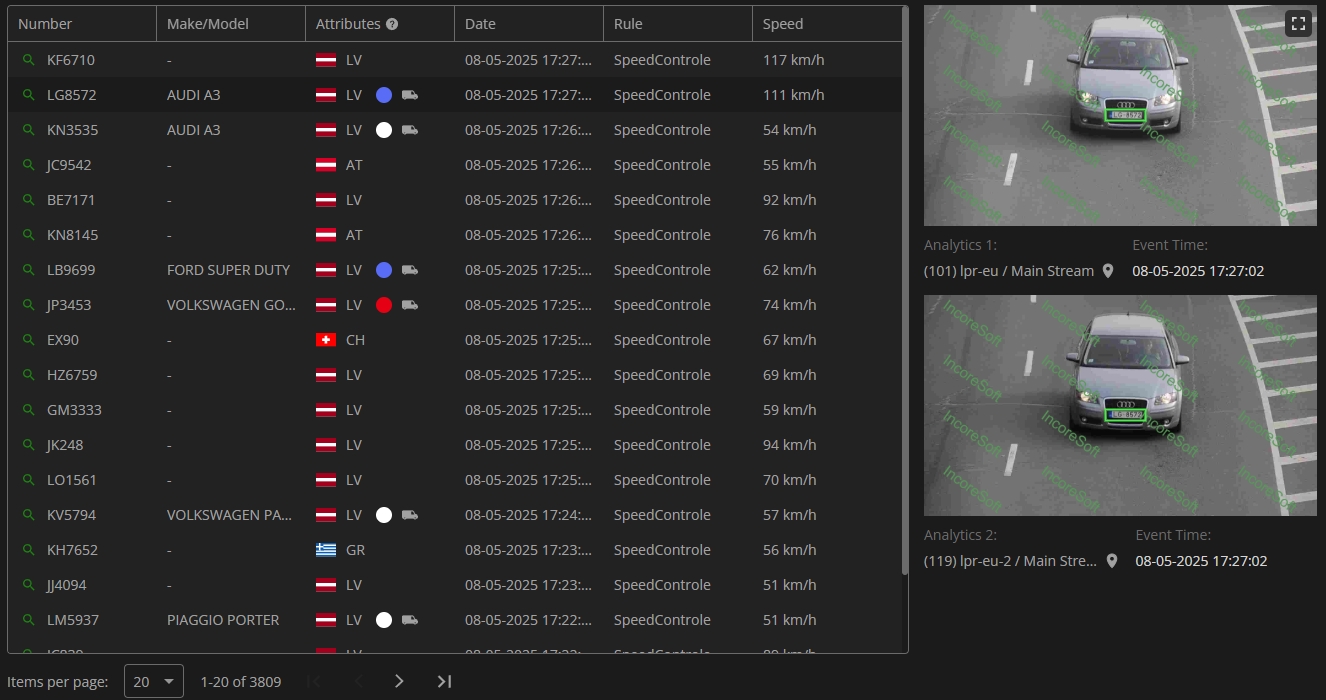
- View recognized vehicle data, date and time the vehicle has been recognized by the second selected camera in the rule, rule name, and average vehicle speed
- Click the row in the table with the desired license plate number to view the frame preview from the route entry and exit cameras in the selected rule
- View the camera location on the map by clicking the corresponding icon next to the analytics name
To view the specific speed control event details, click the Enlargement button under the frame preview. In the pop-up window:
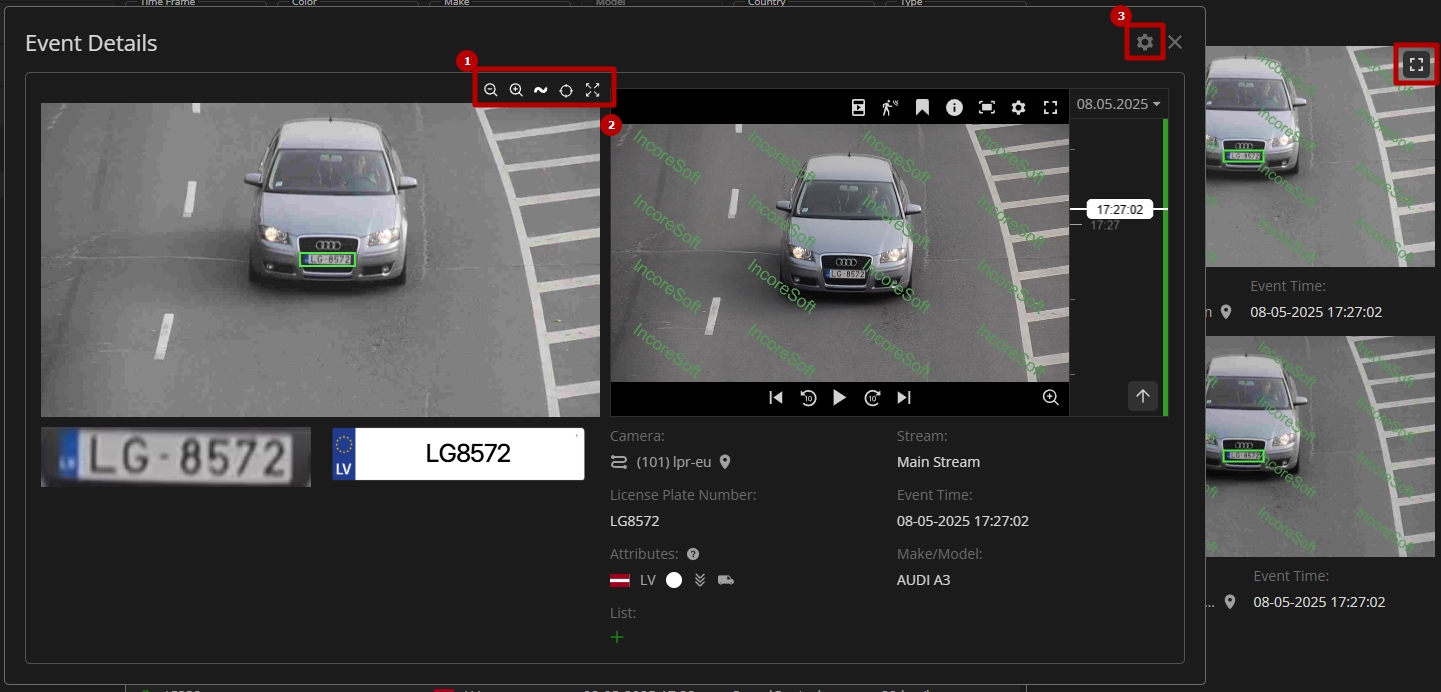
- Use frame view tools:
- Zoom Out icon (-) to zoom out from a specific area of the frame
- Zoom In icon (+) to zoom in on a specific area of the frame
- Reset View icon (~) to reset the frame to its original size and position
- Target icon to zoom in on the detected object in the frame
- Enlargement icon to open the frame in full-screen (in the full-screen press the Esc button to return to default view)
- Use video management tools to interact with the video fragment associated with the detected event:
- Navigate through the recording using the playback controls below the video frame:
- Play or pause the video
- Skip forward or backward by 10 seconds
- Step forward or backward frame by frame
- Use the camera management tools available in the upper-right corner of the video frame:
- Show on Layout, to open the camera view in a separate tab on the navigation panel
- Motion
- Bookmark
- Information
- Snapshot
- Camera Settings
- Full Screen
- Click the Zoom icon below the video frame to:
- Zoom the frame in and out using the mouse wheel or the "+" and "-" buttons
- Move across the zoomed-in frame by holding and dragging it
- Use the timeline on the right of the video frame to browse through the video:
- Scroll the mouse wheel to zoom in or out on the timeline for more or less detail
- Click and drag the timeline to navigate earlier or later in the footage
- Click the date field at the top of the timeline to open a calendar and select a specific date
- Use the Go to Live button at the bottom of the timeline to jump to the real-time video stream
- Navigate through the recording using the playback controls below the video frame:
- Hover the mouse over the Extra Options icon. In the drop-down menu:
- Select the Add to List option to add the vehicle to the desired list
- Click the Save Image option to download the frame with a vehicle in full-size
- Select the Export PDF option to download the PDF report of the selected event
- For detailed descriptions of all camera management tools, refer to the View Grid: Camera documentation.
- Hover the mouse over the bounding box in the frame to see its width and height parameters in pixels.