Maps/Plans
Overview
To access maps and plans, select the Maps/Plans item in the main menu:

Use and Functionality
The Maps/Plans item shows maps, plans, and their groups. The item's functional menu allows to:
- Enter the map or plan name or characters in the name in the Map/Plan Name search field to filter maps and plans
- Sort maps and plans by:
- Newest first
- Oldest first
- Name (A-Z)
- Name (Z-A)
- Click the Create Group button to create a new map/plan group. In the New Group pop-up window:
- Enter a new group name
- Select the desired group from the drop-down list to nest a new one
- Click the Confirm button
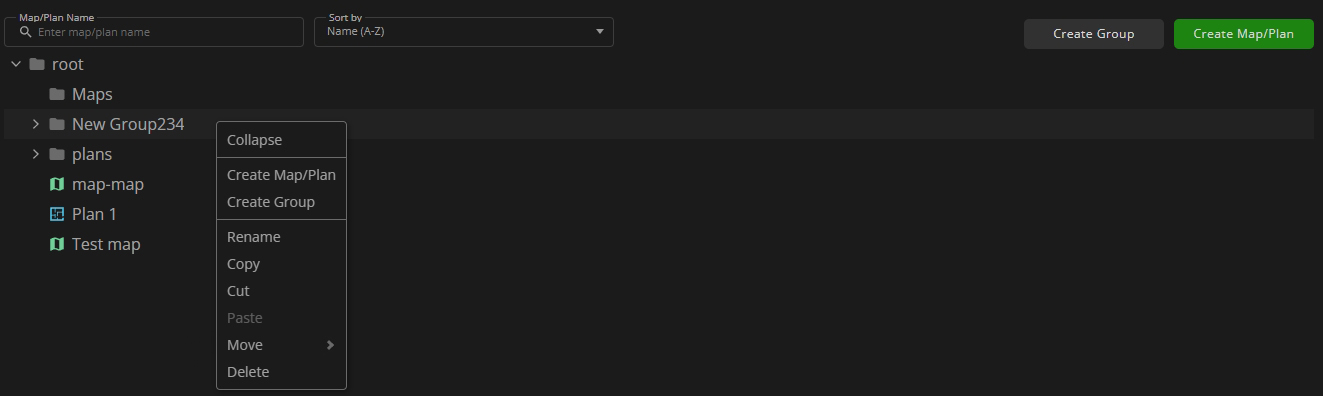
- Right-click the group name, and in the drop-down menu:
- Select the Collapse option to collapse the group (enabled only if its content is expanded)
- Create a new map/plan within this group
- Create a subgroup within it
- Rename the group
- Copy the group to the clipboard
- Cut the group
- Paste the group or map/plan (enabled only if the group or map/plan has already been cut or copied to the clipboard)
- Move the group to another group
- Delete the group
- Right-click the map/plan name, and in the drop-down menu:
- Edit the map/plan
- Rename the map/plan
- Copy the map/plan to the clipboard
- Cut the map/plan
- Move the map/plan to another group
- Delete the map/plan
- Hover the mouse cursor over the desired plan to see its preview
- Select, hold, and drag the required group or map/plan to move it to the desired group
- A map/plan editor can also be opened by double-clicking the map/plan name.
- The group containing maps, plans, or other groups cannot be deleted. First, delete the items within the group, and then proceed to delete the group itself.
- The cut group cannot be pasted inside itself.
Create New Map/Plan
To create a new map or plan in the root folder, click the green Create Map/Plan button, or select the Create Map/Plan option in the drop-down menu upon right-clicking the required group to create a map or plan within it. In the New Map/Plan pop-up window:
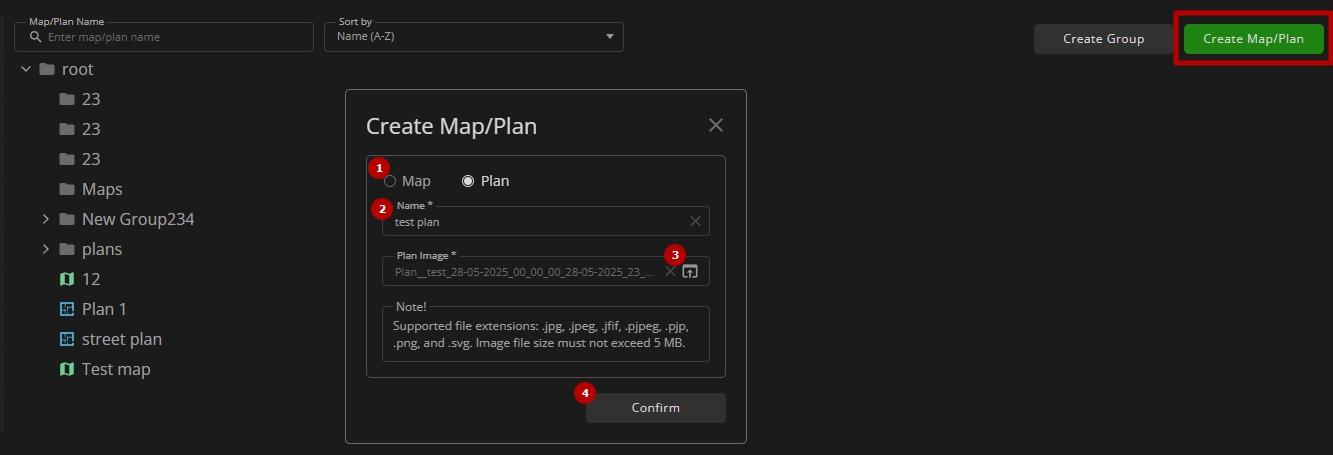
- Select the desired type:
- Map
- Plan
- Enter map/plan name
- Upload a plan image (available for plans only):
- Drag the file to the field
- Select it among files on the computer by clicking the Upload icon
- Click the Confirm button
- Once the map/plan is created, the map/plan editor opens, enabling the arrangement of devices on the map/plan.
- The supported file formats for plan images are .jpg, .jpeg, .jfif, .pjpeg, .pjp, .png, and .svg.
- The plan image file size must not exceed 5 MB.
Edit Map/Plan
To edit the required map or plan, double-click the map/plan name. The map/plan editor interface comprises the following elements:
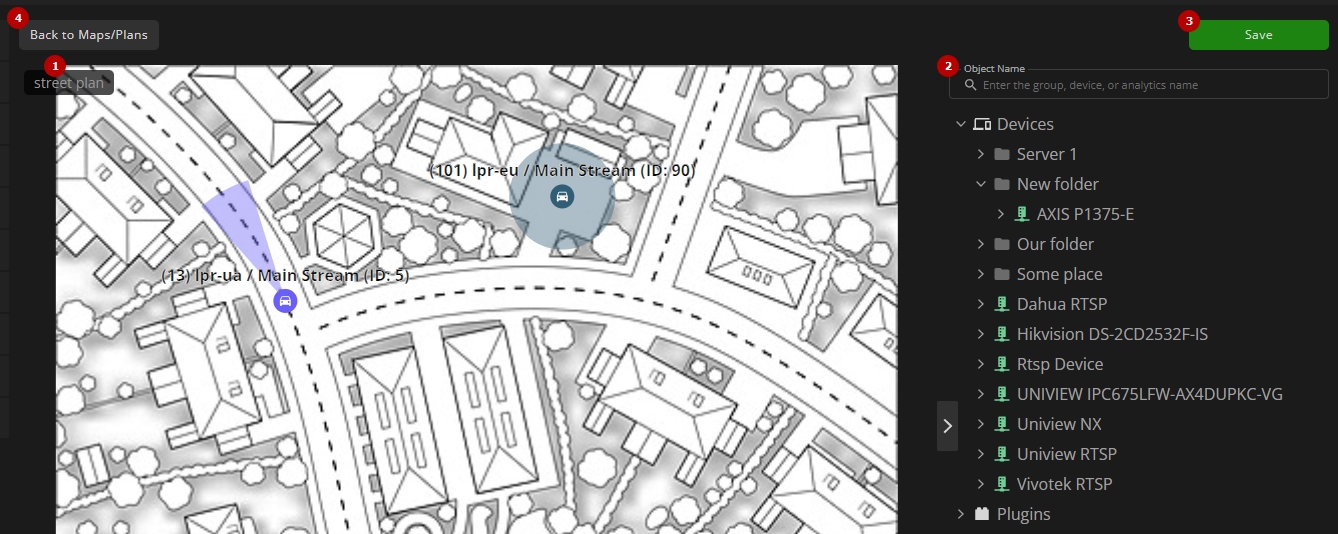
- Map segment or a full-scale plan image, depending on the chosen type
- Expandable sidebar featuring key objects:
- Object Name search bar for quick object filtering
- List of available devices and device items in the Devices group
- List of available analytics in the Plugins group
- Save button to apply the changes
- Return button to navigate back to the Maps/Plans item
Refer to the specific plugin documentation to learn more about analytics notifications configuration on maps/plans:
- LPR: Maps/Plans
- Face Recognition: Maps/Plans
Locate Device Items
To place the device or device item in the required location on the map or plan, hold and drag the desired object from the list to the map/plan.
Once all required devices and device items are located on the map/plan, select the required object's icon to:
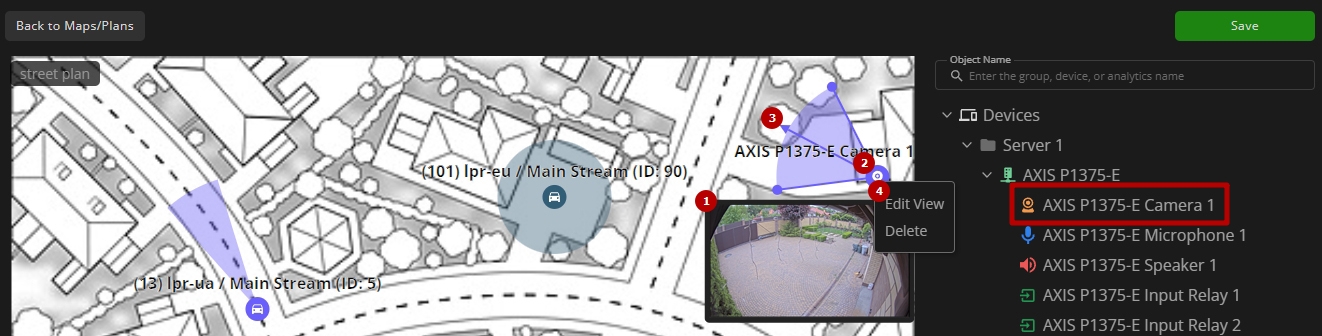
- See camera frame preview (available only for Camera device items)
- Drag the object icon to change its position
- Adjust the surveillance area based on the shape:
- Сone-shaped:
- Drag the entire cone to set the viewing direction
- Drag the side handles to adjust the angle of view
- Drag the arrow handle to resize the cone
- Circle-shaped: Drag the edge handles to change the radius
- Polygon-shaped:
- Drag the vertex handles to reshape the area
- Right-click the desired vertex to remove it
- Сone-shaped:
- Right-click the object's icon to access additional options via the context menu:
- Select the Edit View option to customize the display settings
- Select the Delete option to delete the object from the map or plan
The Edit View pop-up window allows configuring the object display settings:
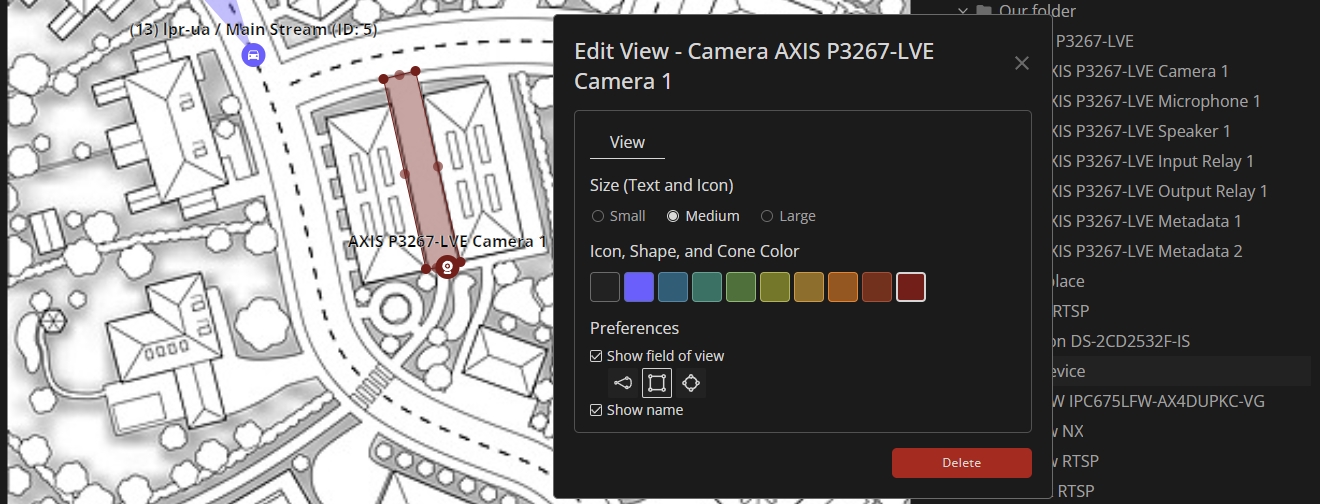
- Select text and icon size:
- Small
- Medium
- Large
- Choose the desired color of the icon, shape (polygon or circle), and cone
- Select the Show Field of View checkbox to display the surveillance area
- Set the surveillance area shape:
- Cone
- Polygon
- Circle
- Check the Show Name checkbox to display the object name on the map or plan