Marketplace
This page describes the Marketplace item that allows viewing and managing plugins and drivers.
Overview
To access plugins and drivers, in the main menu:
- Open the Settings section
- Select the Marketplace item
Use and Functionality
The Marketplace functional menu comprises:
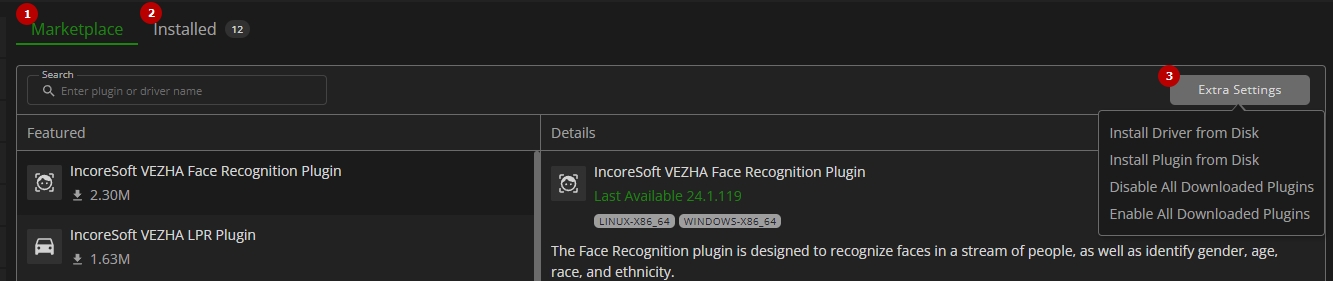
- Marketplace tab to install plugins and drivers
- Installed tab to manage installed plugins and drivers
- Extra Settings button with options to:
- Install driver from disk
- Install plugin from disk
- Disable all downloaded plugins
- Enable all downloaded plugins
- The selected tab is always highlighted. Switch between tabs by clicking on their names.
- The Marketplace tab opens first by default.
- The icon with a number within a circle next to the Installed tab represents the count of all installed plugins and drivers.
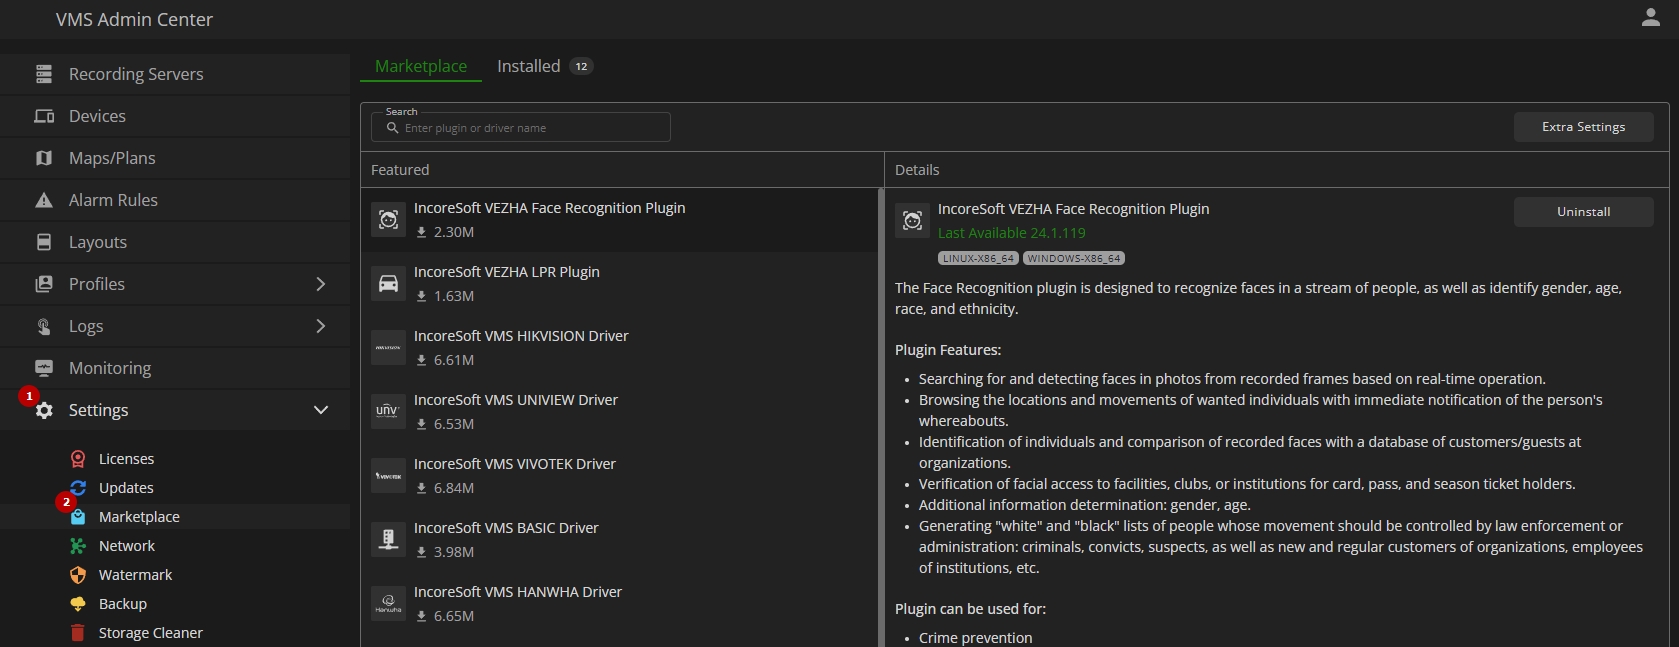
Marketplace Tab
The Marketplace tab contains a list of all available for installation plugins and drivers in the system.
Installation of VEZHA plugins becomes available only after VMS is synchronized with VEZHA AI.
To install a new plugin or driver:

- Enter the plugin or driver name or characters in the name to filter plugins and drivers in the list
- Select the required plugin or driver in the list
- Click the Install button to start the installation
The Details block comprises:
- Last available update version
- Supported OS
- Plugin or driver features description
- Install button
Installed Tab
The Installed tab contains a list of installed plugins and drivers in the system.
To update a plugin or driver:

- Enter the plugin or driver name or characters in the name to filter plugins and drivers in the list
- Select the required plugin or driver in the list
- Choose the desired plugin or driver version from the drop-down list in the Details block
- Click the Update button to start the plugin or driver version update
The Details block comprises:
- Current version and available update version options
- Enabled or Disabled plugin status
- Plugin or driver features description
- Options to:
- Update the selected plugin or driver (only displayed if a new update version is available and selected)
- Enable or disable the selected plugin
- Uninstall the selected plugin
Installed tab additional options allow to:

- Click the Disable All Plugins button and confirm the intention in the pop-up window to collectively deactivate all installed plugins
- Click the Update All button and confirm the intention in the pop-up window to simultaneously update all plugins and drivers to their most recent available versions
- Select the checkbox next to the required plugin to enable or disable only the selected plugin
- Enabled plugins are showcased in the main menu by default.
- Disabled plugins are deleted from the main menu but continue to be installed within the system.
- Drivers cannot be uninstalled or disabled from the Marketplace.
Plugin Synchronization
Once VEZHA AI integration is enabled:
- VEZHA plugins become available for use in the Admin Center and Client Panel
- The VEZHA web interface becomes unavailable
- Plugin installation, update, and uninstallation are automatically synchronized between VMS and VEZHA
If the plugin versions in VEZHA and VMS are not aligned, a Repair button becomes available to resolve the mismatch:

Use the Repair button to automatically synchronize the plugin version between VEZHA and VMS.