Alarms Tab
This page provides the Alarms tab overview and functionality description. The Alarms tab comprises a list of alarms caused by the Create Alarm action in a predefined Alarm Rule, with the ability to filter and manage them.
Overview
To access alarms, on the Navigation Panel:

- Click the "+" button
- Select Alarms in the context menu
- See the Alarms tab
Use and Functionality
The Alarms tab interface comprises:
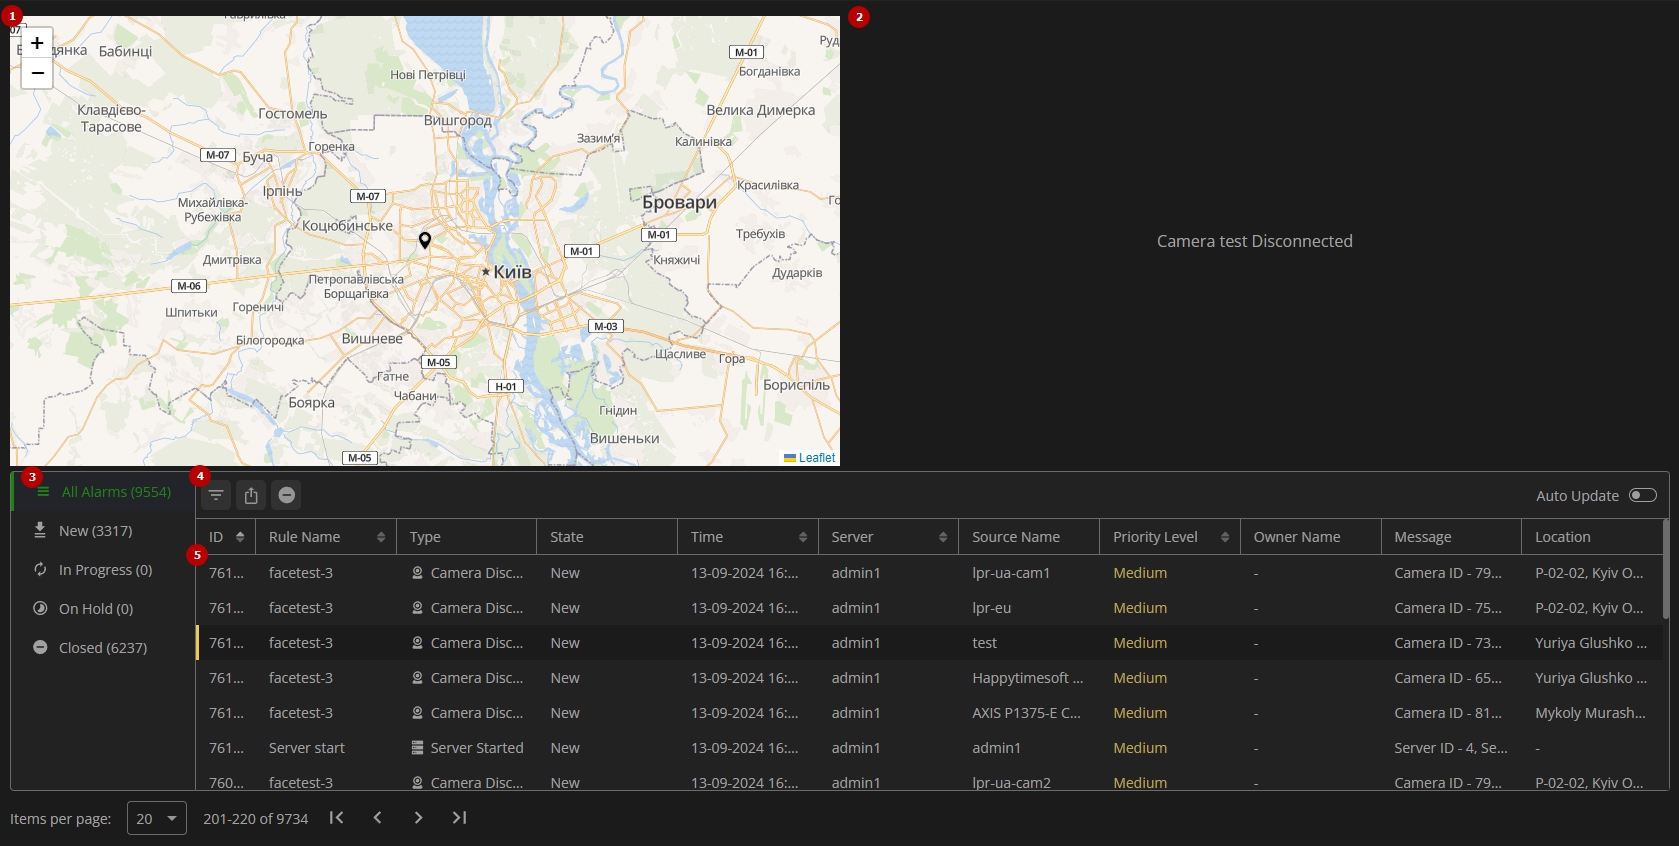
- Location window, to view the camera location on the map
- Video playback window, to watch the video fragment associated with the alarm
- Quick alarm filters, including:
- All Alarms
- New
- In Progress
- On Hold
- Closed
- Additional options to:
- Search by specific filters
- Export alarms
- Close all new alarms
- Enable or disable alarm auto-update by switching the Auto Update toggle
- Table with the list of alarms, to view and manage the required alarms
- The Location and Video Playback windows display visual data for alarms with a camera source only. Otherwise, no additional data is visible.
- The Auto Update feature refreshes the list of alarms according to applied filters and sorting criteria.
Video Playback View
The Video Playback window contains a media player with a video recording at a specific date and time when the selected alarm occurred. Use video management tools to interact with the video fragment:
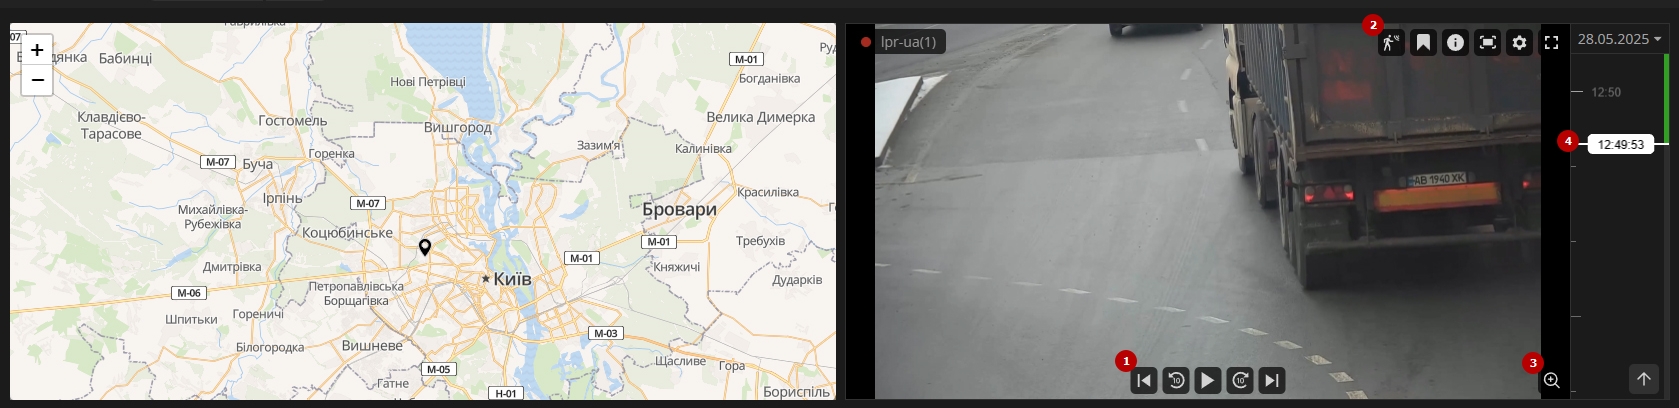
- Navigate through the recording using the playback controls below the video frame:
- Play or pause the video
- Skip forward or backward by 10 seconds
- Step forward or backward frame by frame
- Use the camera management tools available in the upper-right corner of the video frame:
- Motion
- Bookmark
- Information
- Snapshot
- Camera Settings
- Full Screen
- Click the Zoom icon below the video frame to:
- Zoom the frame in and out using the mouse wheel or the "+" and "-" buttons
- Move across the zoomed-in frame by holding and dragging it
- Use the timeline on the right of the video frame to browse through the video:
- Scroll the mouse wheel to zoom in or out on the timeline for more or less detail
- Click and drag the timeline to navigate earlier or later in the footage
- Click the date field at the top of the timeline to open a calendar and select a specific date
- Use the Go to Live button at the bottom of the timeline to jump to the real-time video stream
For detailed descriptions of all camera management tools, refer to the View Grid: Camera documentation.
Search Filters
The Search Filters functional menu allows to:

- Click the Filters icon to open the extra search panel to filter alarms in the list by specific parameters:
- Enter full alarm ID to find the specific alarm
- Enter the alarm rule name or characters in the name to filter alarms triggered by the specific rule
- Select multiple required alarm types from the drop-down list:
- Generic Alarm
- Camera Disconnected
- License Issue
- Server Failure
- Server Started
- Select the required time frames
- Choose multiple required servers
- Select multiple desired sources. In the Select Source pop-up window:
- Check the boxes next to the required sources and folders
- Click the Confirm button
- Select multiple desired alarm priority levels from the drop-down list:
- All
- Low
- Medium
- High
- Choose multiple required alarm owners from the drop-down list
- Click the Reset icon to clear all applied filters
Click the "X" button in the applied filter to clear only this filter.
Alarm List
All alarms in the list are displayed in the following table columns:
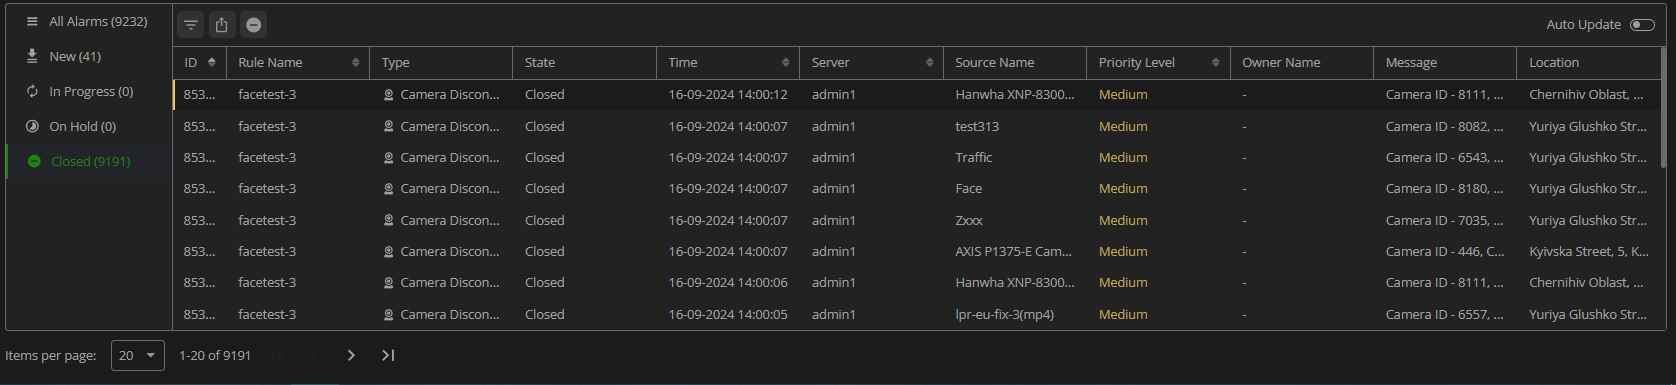
- ID: Unique alarm identificator
- Rule Name: Name of the rule related to the alarm
- Type: Type of the alarm (Generic Alarm, Camera Disconnected, etc.)
- State:
- New
- In Progress
- On Hold
- Closed
- Time: Date and time the alarm occurred
- Server: Name of the recording server to which the camera or device belongs
- Source Name: Resource that initiates the alarm (Device or Server name)
- Priority Level:
- Low
- Medium
- High
- Owner Name: Name of the user to whom the alarm is assigned
- Message: Any custom text information about the alarm
- Location: Camera location address
- Left-click the vertical arrows next to the required column header (available for ID, Rule Name, Time, Server, and Priority Level columns), to sort alarms in the required order by the parameter specified in the name of the selected column:
- In ascending or descending order for numbers
- Alphabetically for text
- Right-click any column header to open the drop-down menu with all available parameters to display in the table. Check the desired parameters in the drop-down menu to form the table with the required alarm data, and uncheck the other ones. This action also enables/disables the respective search filter.
- Right-click the required alarm in the table to open the context menu. The alarm context menu comprises the following options:
- Open, to open the pop-up window with the alarm and manage it
- Acknowledge, to change the alarm state to In Progress, and assign the alarm to the user who performed this action (the user becomes the Owner of the alarm)
- Set on Hold, to change the alarm state to On Hold
- Close, to change the alarm state to Closed
- Use the navigation bar at the bottom of the table to switch between pages of the alarm list. By default, the table displays 20 records per page. To adjust the number of visible records, click on the current Items per Page value and select a different option from the available dropdown menu.
To manage the required alarm, double-click the desired alarm record in the table. In the Alarm Details pop-up window:
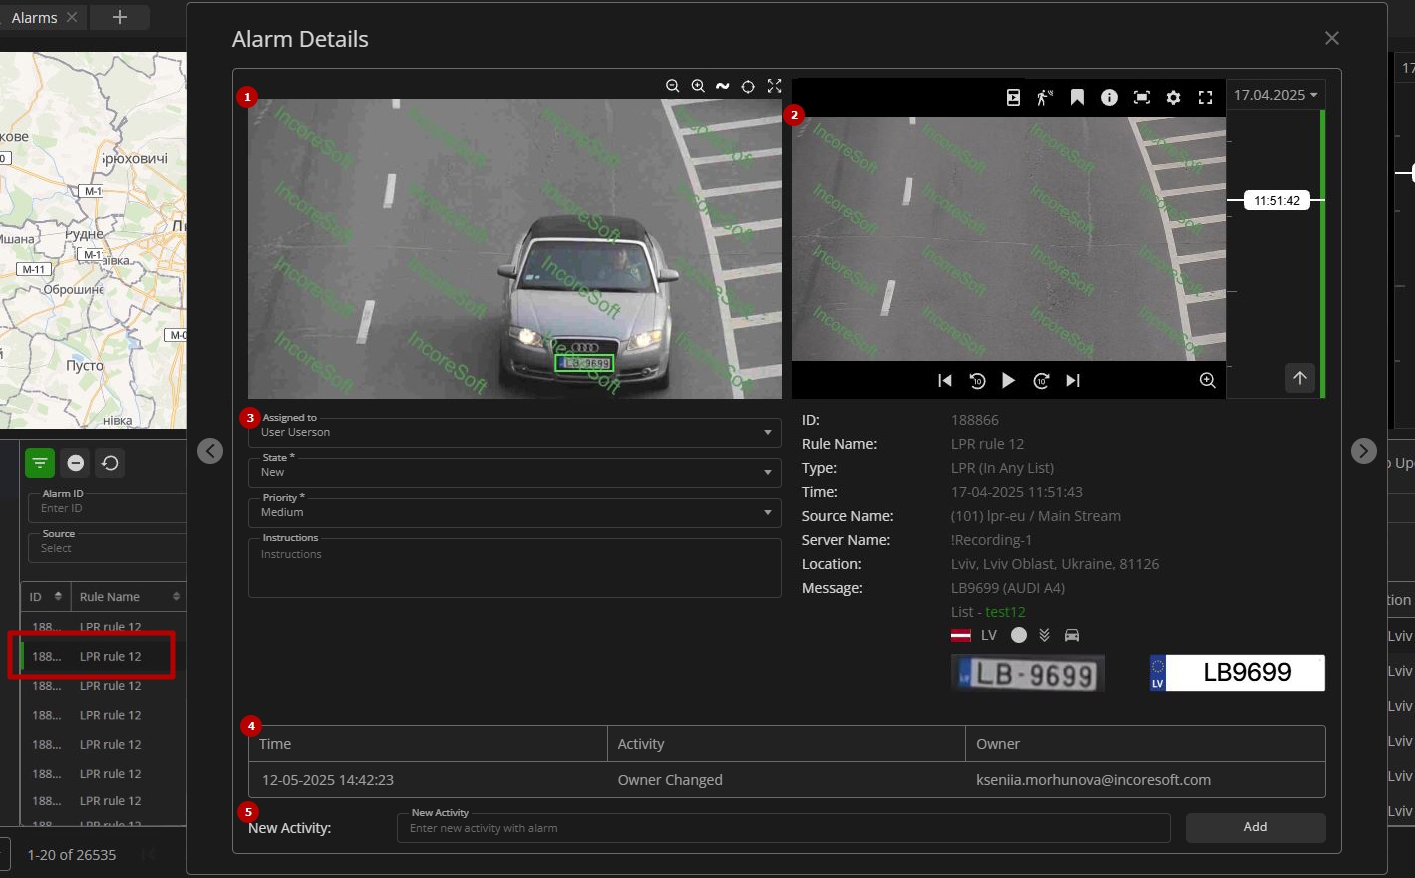
- View the frame of the alarm from the camera
- View the recording of the video fragment associated with the alarm and information about the alarm below it
- Manage the alarm capabilities:
- Assign the alarm to the required user from the drop-down list
- Select the state of the alarm from the drop-down list:
- New
- In Progress
- On Hold
- Closed
- Select the alarm priority level from the drop-down list:
- High
- Medium
- Low
- Enter the instructions for the user about recommended further actions
- View the table of the alarm history, which comprises:
- Date and time of the activity
- Activity description
- Name of the user, who performed the activity
- Add a new activity record for the alarm:
- Enter new alarm activity description
- Click the Add button to add the record to the table
- Alarm frame and video playback are available only for alarms with actions that require video from a camera. Otherwise, only text alarm information is visible.
- The alarm history table comprises system records about changing parameters in the pop-up fields and custom comments written by users.
- "<" and ">" arrow buttons at the pop-up window's sides allow switching between alarms.